Posts for: lloydl2
Jul 1, 2019 13:32:52 #
Longshadow wrote:
So are prints normally more detailed than a monitor?
(I never did a comparison.)
(I never did a comparison.)
Depends on the size of the print and pixel density
Jul 1, 2019 11:22:08 #
Jul 1, 2019 11:18:12 #
quite a nice variety of creativity in the edits so far. Keep them coming.
Jul 1, 2019 11:13:21 #
Blaster34 wrote:
Currently I have a 5 year old ASUS 13.3" Zenb... (show quote)

I have an asus 15.6 in 4k video on my laptop that I use when I am out and about and I find the font sizes (they get compressed as the pixel depth goes up) is too small. On my desktop I have 2 27" displays an hd
1920 x 1080 and a 2560 x 1440. I also find printed stuff including windows and other application frames small and harder to read. As far as photographs they display very nicely on both 27 displays and it is difficult to tell the difference. I use the asus for teaching and have it connected to an hd large screen monitor and although there is a minimal amount of edge cutting off mostly at the bottom it is useable.
As far as printing goes there is no connection between pixel density on the screen (typically much lower than printed images) there is a connection and you should color profile your screens so printed material will color match better. Hope this helps
Jul 1, 2019 10:56:41 #
I see some pink and cyanish blotching at the very bottom of the frame and suspect it is atmospheric dust and haze amplified by the sun
Jun 30, 2019 19:19:18 #
Download the image and edit in any way you wish. Then submit your result to this thread. You may post a maximum of two edits. Entries will be accepted until 7 pm EDT, Thursday. Voting will run from Thursday evening until Sunday evening. The winner will host the following week's challenge. Thank you for your continued support. Have fun!
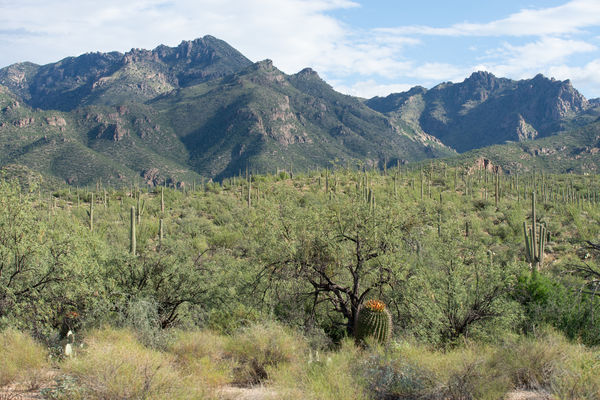
this landscape of Sabino Canyon in the NE section of Tucson, AZ is surrounded by mountains on both sides which can be observed from the approximately 8 mile gorge that runs through the bottom of the canyon.. The area is rich in vegetation with an abundance of Cactus plants. I look forward to seeing how you each process this image and the creativity I've seen from the contributors to past images and your views.
I've included a link to a raw version of the image and have attached the raw converted to jpg with no processing down below.
RAW IMAGE LINK
https://www.dropbox.com/s/nq7hqpghrvgz3tj/_DSC4862.ARW?dl=0
unprocessed jpg below
Jun 29, 2019 13:23:02 #
This image can benefit greatly by editing and using dodge and burn techniques to bring out the detail and texture of the flowers and accentuate the lighting.
Jun 28, 2019 13:14:14 #
kenievans wrote:
I need your help with this one. I am getting real... (show quote)
here is my edit, I am an avid lightroom user and fan and did most of the changes with the basic sliders and white balance adjustments. I also used the local brush and radial filters to dodge and burn and bring out some of the color and detail in the trees. using highlights shadows white and black sliders typically fix 99% of the photo issues. In this case I also went into photoshop to remove the wires and a lot of sensor spots...(time for a cleaning).. my relighting technique was learned from serge ramelli youtube videos..
Jun 28, 2019 12:15:58 #
Jun 26, 2019 11:49:22 #
you can use the white balance sliders in conjunction with the local brush tool and other local tools to effect the tonal values of specific areas in the scene such as making the sky more blue by using the blue/yellow wb slider or adding magenta by using the green magenta wb slider and then painting in the area you want the effect to take place
Jun 25, 2019 19:57:02 #
Here is a version in Black and White

Jun 25, 2019 12:42:17 #
a very lovely scene indeed. Unfortunately the lighting was flat do to the cloudiness of the day. My version re lit the image hope you like it. Oh this was done completely in lightroom a few basic slider adjustments and some radials, local brush adjustments to give it some lighting pop.

Jun 23, 2019 13:24:47 #
bleirer wrote:
I've been experimenting with an alternative way to... (show quote)
your method is kind of similar to this Phlearn dodge and burn the easy way I just saw this week on youtube phlearn with aaron nace https://www.youtube.com/watch?v=6HUsb6uH2O4
Jun 18, 2019 11:47:54 #
Jun 17, 2019 14:14:15 #
version 2 in black and white