Another way to dodge and burn
Jun 22, 2019 14:58:12 #
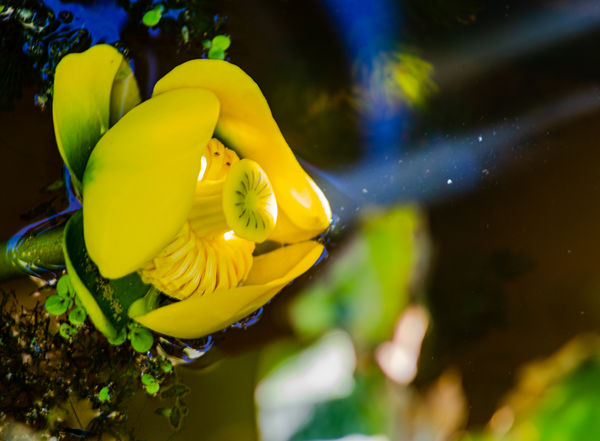
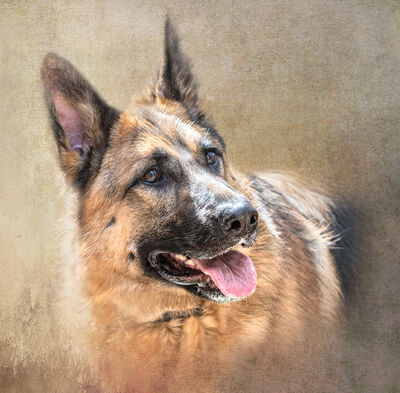
I've been experimenting with an alternative way to dodge and burn that I saw in a photoshop video that preserves raw data. In this picture, I started with my usual lightroom adjustments then sent the file as a smart object to photoshop. The smart object allows one to double click to re-open and edit in adobe camera raw at any time. If you duplicate the smart object any change to one will transfer to the duplicate, but if you right click and select 'new smart object via copy' you get an unlinked copy. So the light rays were already there but I wanted to lighten and accentuate them. So I did new smart object via copy, re-opened ACR and severely lightened the whole image using the exposure slider, then alt-clicked the new layer mask button at the bottom. (Alt-clicking turns the mask into a 'hide all' mask, where regular clicking turns it into a reveal all mask). I then clicked the mask and used the brush tool at very low flow to paint the light rays, gradually revealing more of the over-exposed layer below. Finally dialing in the opacity a little.
The final image is below, your critique and recommendations for improving the method are welcome. I'd rather you used your own photos though.
The final image is below, your critique and recommendations for improving the method are welcome. I'd rather you used your own photos though.
Jun 22, 2019 15:02:14 #

Jun 22, 2019 16:24:11 #

Thanks very much for this information. Your result is quite effective!
Jun 22, 2019 16:40:47 #

Jun 22, 2019 19:08:38 #
Nicely done!!
This is is a really helpful technique that I hope all members will try to learn. It works well for bringing up shadows and equally as well for bringing down the high lights. I recently worked with a member of UHH to demonstrate what could be down to their black and white image, I think I actually had 4 layers at different exposures that were seamlessly blended in the final image. Of course there needs to be something there to work with. Blocked shadows and blown hi lights can't be rescued with this or any technique. The technique works well too for adding highlights when the original is lacking them.
This is is a really helpful technique that I hope all members will try to learn. It works well for bringing up shadows and equally as well for bringing down the high lights. I recently worked with a member of UHH to demonstrate what could be down to their black and white image, I think I actually had 4 layers at different exposures that were seamlessly blended in the final image. Of course there needs to be something there to work with. Blocked shadows and blown hi lights can't be rescued with this or any technique. The technique works well too for adding highlights when the original is lacking them.
Jun 22, 2019 20:38:25 #
bleirer wrote:
I've been experimenting with an alternative way to... (show quote)
 How can we make that thumb bigger?
Jun 22, 2019 20:47:02 #
bleirer wrote:
I've been experimenting with an alternative way to... (show quote)
sounds complicated; but non-destructive editing is surely worth the effort. Now to read your instruction over, and over and then I am going to give it a try myself. Thanks illuminating a new approach for me.
erich
Jun 23, 2019 00:58:13 #
Thanks for the kind words. The downside is that it is computer intensive and makes the file size gigantic. The plus is that every step is reversible and even filters become smart filters attached to the smart object , making them adjustable too.
Jun 23, 2019 06:20:01 #
Jun 23, 2019 06:26:58 #

Jun 23, 2019 07:51:26 #
Fstop12 wrote:
What version of Photoshop are you using?
Photoshop CC. I don't know which version started smart objects. Also there are some tools that don't work on smart objects directly, but sometimes layers are doable, or selections and masks, but at some point one might have to rasterize a duplicate, which means turn it into a regular layer without the connection to camera raw.
Jun 23, 2019 08:41:50 #
I've learned something new today so thank you for the education which I'll try to put to good use.
Jun 23, 2019 09:05:24 #
sippyjug104 wrote:
I've learned something new today so thank you for the education which I'll try to put to good use.
Thank you. Of course there are several other ways to dodge and burn, including a lot simpler ways, some also non destructive, so I don't think there is any best way, just depends on what one is trying to accomplish.
Jun 23, 2019 12:43:25 #
And if you had two different images rather than two copies of one image, the same method would make a composite, add select and mask for even more precision.
Jun 23, 2019 12:45:38 #
If you want to reply, then register here. Registration is free and your account is created instantly, so you can post right away.