Posts for: Anvil
Apr 14, 2019 10:55:20 #
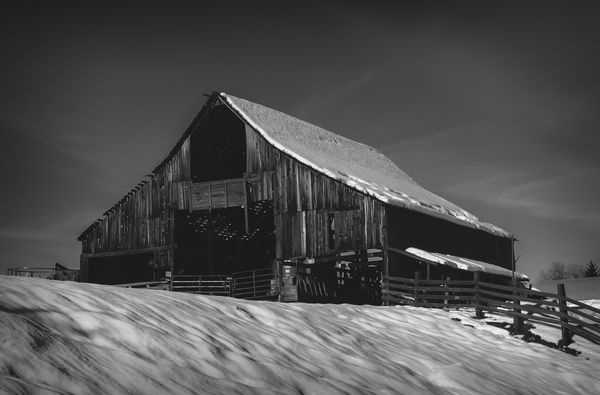
Old barns seem to lend themselves to a black and white treatment. They also lend themselves to dark, mysterious shadows.
Apr 14, 2019 09:17:08 #
I always enjoy your long exposure work, but this one might be my favorite of yours. Very nice!
Apr 9, 2019 09:12:37 #
I had to Google "anamorphic still photography" to find out what this is. It looks quite interesting. Do you squish the photo in Photoshop, or something like that?
Mar 28, 2019 12:51:57 #
The tuft of hair reminds me of something. I am not a professional photographer, and I'm certainly not a wedding photographer, but I was asked to shoot the wedding of my niece/goddaughter. The wedding was in Estes Park, CO, and it was a gorgeous, sunny day. I had many of the same problems that MegTee experienced. If I'm not shooting wildlife, I can be extraordinarily unobservant. I took one shot of the groom's parents that would have been excellent, had not a gust of wind blown at the exact time I snapped. I didn't even notice, until I got back home, that a fist-sized clump of hair stuck straight out of the woman's head. That's were I learned how to deal with hair, in post.
Mar 28, 2019 10:24:42 #
MegTee -- I hope you don't mind, but I experimented with your photo, in an attempt to determine the best way to achieve what you want.
First, with the hair. This part is somewhat tedious. I had to use a combination of things to get this far. One of the things that can work is content-aware fill, but ONLY if you establish little, independent zones. You can't do it all at once. Look at that big, windblown tuft of hair. It covers an area of that has different backgrounds. Use the clone tool to section off areas of that tuft of hair, making sure that each area does not have a background that has too many tones. I think I made three areas. You can select one of the areas, using the lasso, then go to Edit-Fill, and set the fill type to content-aware. This will give you a pretty good start. Then, you can use the normal tools you would use, to get rid of little wisps of single hairs.
When you get something you like, the background might be a tiny bit patchy. Create a clone stamp, so that you can apply a Gaussian blur filter on the patchy section. You only have to apply the blur to a section (use the lasso to select). You can blend this new layer on top of the old layer, to smooth out that blur, even further.
By this time, you ought to have something you like. Then, you can concentrate on removing the shadows on the faces. I did this by using a luminosity mask -- one of the dark ones. I posted a tutorial, just a couple of days ago, on using luminosity masks. I modified the mask, in a manner similar to the description, in that tutorial.
Here is the end result. The hair could probably be a bit better, but it all depends upon how big the print would be.
Mar 26, 2019 22:09:15 #
Cool! Can't wait to see the results.
Mar 26, 2019 09:20:01 #
Thanks! I posted both parts.
Mar 25, 2019 19:04:27 #
Happy to contribute.
Mar 25, 2019 16:46:26 #
Thanks! I hope it makes sense. I really wish I could have inserted the pics in the text, but, alas...
Mar 25, 2019 16:43:24 #
Final product. (Figure 11)

Mar 25, 2019 16:40:30 #
This is part two of a two-part explanation of the procedure involved in getting stars, in a nighttime shot, to appear brighter, but without making everything else look brighter. This part deals with the Luminosity mask, itself – how to create it, modify it (might be the most important part), and use it.
The original thread that generated a request for this explanation is here: Star light, star bright -- Where the hell are the Northern Lights?
There are various tools available that will create luminosity masks, and there are youtube videos that show how to use them. Personally, I use Zone System Express, from Blake Rudis. This product is not free, so I won’t go through what I do with it. Instead, I’ll use another product, which is free, from Jimmy McIntyre. The product is Easy Panel 2. Find it, and a tutorial on its use, here: https://www.shutterevolve.com/easy-panel-2-0-free-16-bit-luminosity-mask-panel/
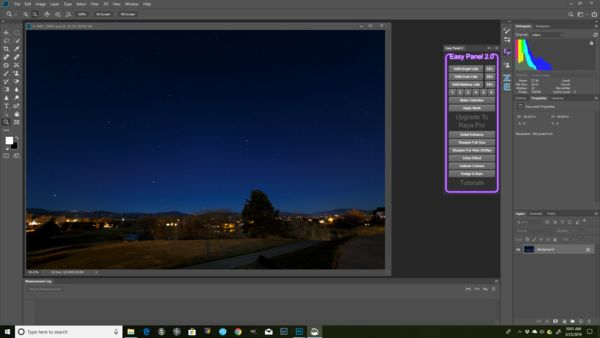
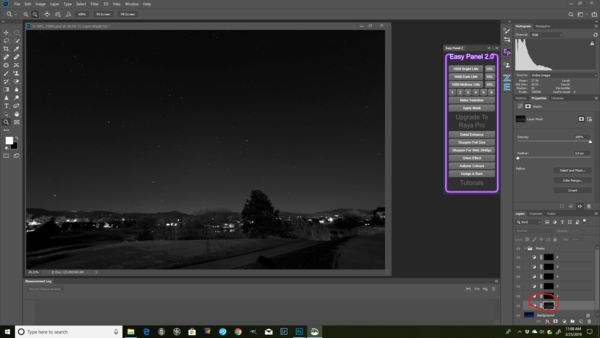
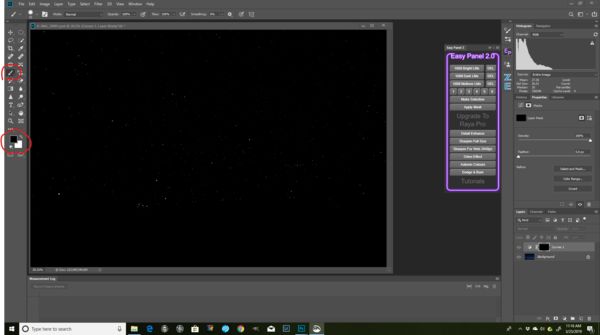
At this point, the photo should have been sharpened according to the procedure in Part 1. From now on, we will be in Photoshop. It is assumed the sharpened photo has been exported to Photoshop. Notice Easy Panel 2.0, on the right. (Figure 1)
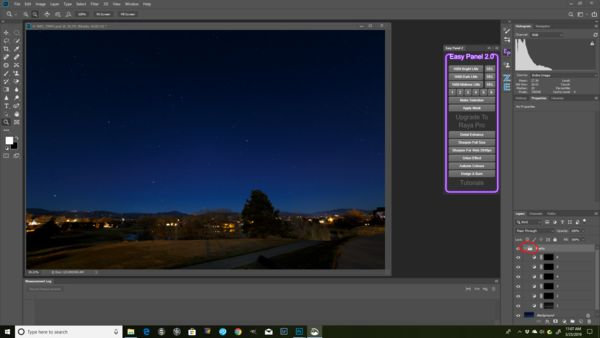
Since we are interested in stars, let’s create the Bright Luminosty masks, by clicking on “16Bit Bright LMs”. You’ll notice some new layers being created. You’ll want to open the group named Masks. (Figure 2)
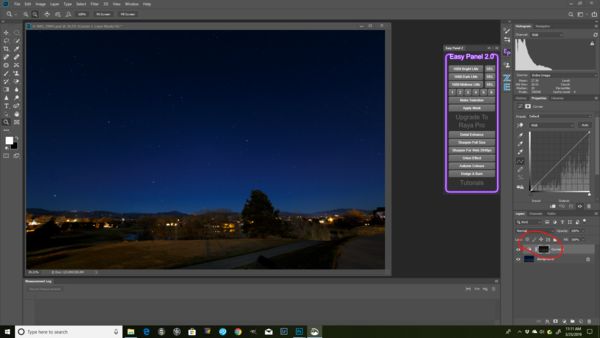
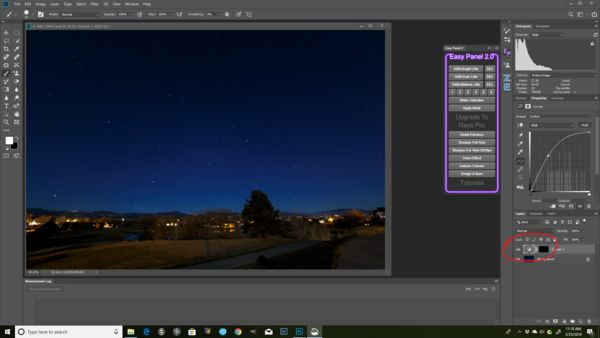
You will want to investigate what each mask looks like, in order to determine which one you will want to use. Do this by holding the Alt key (on a PC) while clicking a mask. That will show you the mask, in black and white. Use Alt while clicking the mask to get back to the original photo display. I have determined that Mask #1 is the one I want. (Figure 3)
That mask shows the stars, which is where my interest lies. But, this mask has too much other stuff, to be of use. I have to modify this mask.
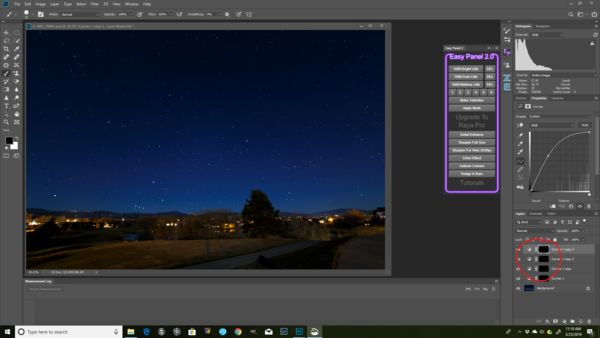
Go back to the original display (Alt + click). Select the appropriate mask layer (in my case, Mask 1). Then, click on “Make Selection” on Easy Panel 2.0. You might, or might not, see marching ants, depending upon how much was selected.
After you have made that selection, create a Curves adjustment layer. The selection you made in the previous step will automatically be applied to the mask of your new Curves adjustment layer.
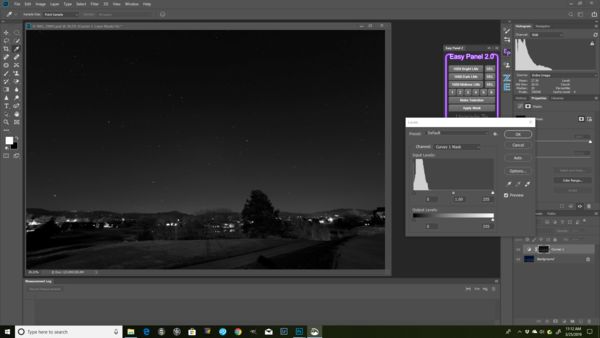
If we were to adjust the curve, right now, too much of the photo would be brightened. We have to adjust the mask, first. Press the Alt key while clicking on the mask of the Curves adjustment layer. You should see the black and white mask. While the mask is displayed, go to the “Image” menu item, at the top, select the “Adjustments” submenu, then select the “Levels” item. Your screen should look like this: (Figure 5)
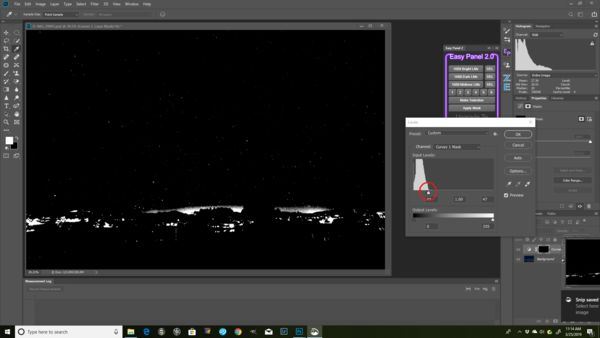
In the little Levels window, we will adjust the three sliders immediately below the graph. (This could get quite long, unless I assume that you have some knowledge of what these sliders do.) The idea, here, is to make the parts you want to be very bright (by sliding the right slider to the left), and the dark parts very dark (by sliding the left slider to the right). Most of the time you do this, you’ll have a lot of room between the left and right sliders, when you are finished, and you can use the middle slider to fine tune it. In our case, there won’t be any room. (Figure 6)
Notice the grouping of the sliders. If you were to look at the download, you’d see the stars being pretty bright. Click “OK”.
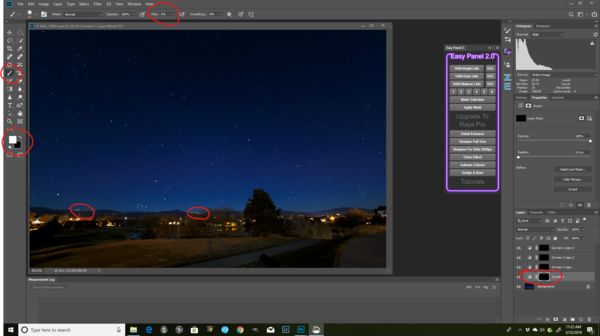
We now have a mask that will let us work on the stars, but there is still some stuff on the bottom that we do not want to be affected, when we adjust things. Use the brush tool, to paint black in those areas, on the mask. (Figure 7)
Notice that we’ve eliminated the lights on land, from this mask. If you look at the download, this will be more apparent.
Hold the Alt key while clicking on the mask icon. This will bring you back to the display of the photo, itself, instead of the mask. (Figure 8)
At this point, you can adjust the curve, as shown in Figure 8, and only the stars will brighten.
At this point, you can only brighten those stars, so much. What if you want them to be brighter? Simply copy that Curves adjustment layer, by hitting CTL-J (on a PC). Do this as many times as you feel necessary. In our case, I duplicated that layer three times, for a total of four layers. (Figure 9)
See how much brighter the stars are, compared with the original. But, there is more we can do.
Take a close look at the line of the mountains. On the left side, you see an area of snow-capped mountains. You can also see an area of snow-capped mountains just to the right of center. I want those be brighter, so the viewer can see them. I could have left those snow-capped mountains in the masks, but they would have been brightened four times. Trust me, that’s too bright. So, we’ll modify, slightly, the mask of the first Curves adjustment layer
Select the first Curves adjustment layer. Use the brush tool, and paint white over the snow-capped mountain areas. For this, I used a small brush with a very soft edge. Here may be the most important part of this step. Set the “Flow” parameter very low, for this step. I set it to 5. If the value of this parameter is less than 100, each time you use the brush over the same area, you will put down more of what the brush has (in this case, white). I did not want the mountains to be super bright, so I used a very low flow, with just a few brushes. And, I only did it to this one layer. (Figure 10)
Here is the finished product. Compare it with the original. The stars (and the snow-capped mountains) are the only spots brighter than they were in the original. The download really shows this. (Figure 11)
I hope this was easy enough to follow.
The original thread that generated a request for this explanation is here: Star light, star bright -- Where the hell are the Northern Lights?
There are various tools available that will create luminosity masks, and there are youtube videos that show how to use them. Personally, I use Zone System Express, from Blake Rudis. This product is not free, so I won’t go through what I do with it. Instead, I’ll use another product, which is free, from Jimmy McIntyre. The product is Easy Panel 2. Find it, and a tutorial on its use, here: https://www.shutterevolve.com/easy-panel-2-0-free-16-bit-luminosity-mask-panel/
At this point, the photo should have been sharpened according to the procedure in Part 1. From now on, we will be in Photoshop. It is assumed the sharpened photo has been exported to Photoshop. Notice Easy Panel 2.0, on the right. (Figure 1)
Since we are interested in stars, let’s create the Bright Luminosty masks, by clicking on “16Bit Bright LMs”. You’ll notice some new layers being created. You’ll want to open the group named Masks. (Figure 2)
You will want to investigate what each mask looks like, in order to determine which one you will want to use. Do this by holding the Alt key (on a PC) while clicking a mask. That will show you the mask, in black and white. Use Alt while clicking the mask to get back to the original photo display. I have determined that Mask #1 is the one I want. (Figure 3)
That mask shows the stars, which is where my interest lies. But, this mask has too much other stuff, to be of use. I have to modify this mask.
Go back to the original display (Alt + click). Select the appropriate mask layer (in my case, Mask 1). Then, click on “Make Selection” on Easy Panel 2.0. You might, or might not, see marching ants, depending upon how much was selected.
After you have made that selection, create a Curves adjustment layer. The selection you made in the previous step will automatically be applied to the mask of your new Curves adjustment layer.
If we were to adjust the curve, right now, too much of the photo would be brightened. We have to adjust the mask, first. Press the Alt key while clicking on the mask of the Curves adjustment layer. You should see the black and white mask. While the mask is displayed, go to the “Image” menu item, at the top, select the “Adjustments” submenu, then select the “Levels” item. Your screen should look like this: (Figure 5)
In the little Levels window, we will adjust the three sliders immediately below the graph. (This could get quite long, unless I assume that you have some knowledge of what these sliders do.) The idea, here, is to make the parts you want to be very bright (by sliding the right slider to the left), and the dark parts very dark (by sliding the left slider to the right). Most of the time you do this, you’ll have a lot of room between the left and right sliders, when you are finished, and you can use the middle slider to fine tune it. In our case, there won’t be any room. (Figure 6)
Notice the grouping of the sliders. If you were to look at the download, you’d see the stars being pretty bright. Click “OK”.
We now have a mask that will let us work on the stars, but there is still some stuff on the bottom that we do not want to be affected, when we adjust things. Use the brush tool, to paint black in those areas, on the mask. (Figure 7)
Notice that we’ve eliminated the lights on land, from this mask. If you look at the download, this will be more apparent.
Hold the Alt key while clicking on the mask icon. This will bring you back to the display of the photo, itself, instead of the mask. (Figure 8)
At this point, you can adjust the curve, as shown in Figure 8, and only the stars will brighten.
At this point, you can only brighten those stars, so much. What if you want them to be brighter? Simply copy that Curves adjustment layer, by hitting CTL-J (on a PC). Do this as many times as you feel necessary. In our case, I duplicated that layer three times, for a total of four layers. (Figure 9)
See how much brighter the stars are, compared with the original. But, there is more we can do.
Take a close look at the line of the mountains. On the left side, you see an area of snow-capped mountains. You can also see an area of snow-capped mountains just to the right of center. I want those be brighter, so the viewer can see them. I could have left those snow-capped mountains in the masks, but they would have been brightened four times. Trust me, that’s too bright. So, we’ll modify, slightly, the mask of the first Curves adjustment layer
Select the first Curves adjustment layer. Use the brush tool, and paint white over the snow-capped mountain areas. For this, I used a small brush with a very soft edge. Here may be the most important part of this step. Set the “Flow” parameter very low, for this step. I set it to 5. If the value of this parameter is less than 100, each time you use the brush over the same area, you will put down more of what the brush has (in this case, white). I did not want the mountains to be super bright, so I used a very low flow, with just a few brushes. And, I only did it to this one layer. (Figure 10)
Here is the finished product. Compare it with the original. The stars (and the snow-capped mountains) are the only spots brighter than they were in the original. The download really shows this. (Figure 11)
I hope this was easy enough to follow.
Mar 25, 2019 15:40:32 #
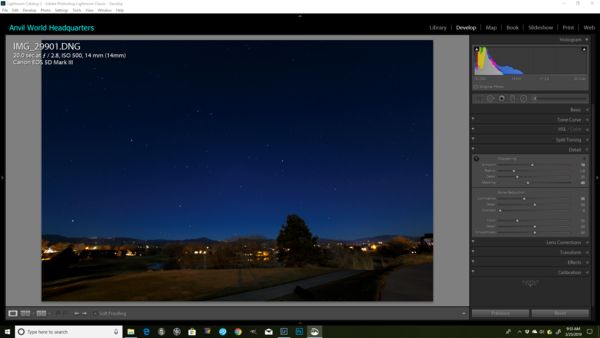
This is part one of a two-part explanation of the procedure involved in getting stars, in a nighttime shot, to appear brighter, but without making everything else look brighter. This is accomplished by using a luminosity mask, but, in order to get the best results from the luminosity masking activity, I believe the photo should be sharpened, properly, before attempting any luminosity masking. In other words, before getting into Photoshop. The original thread that generated a request for this explanation is here: Star light, star bright -- Where the hell are the Northern Lights?
I'll tell the tale of sharpening through the eyes of Lightroom, though the same things can be done in ACR.
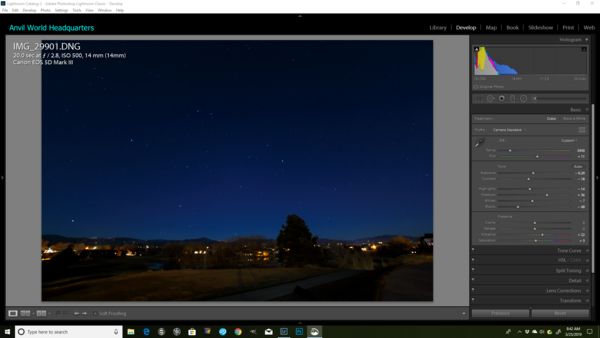
First, edit the photo the way you want it to look, but without sharpening or noise reduction. (Figure 1)
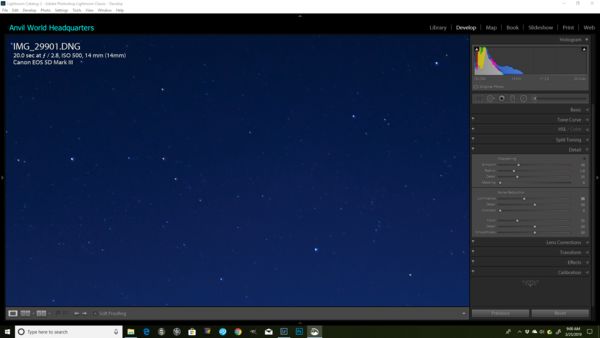
Zoom in on the photo, to get a closeup look at the noise in the night sky. (Figure 2)
Notice the digital noise. Bump up “Luminance” to get rid of that. For this shot, I set it at 35, but your requirements may be different. (Figure 3)
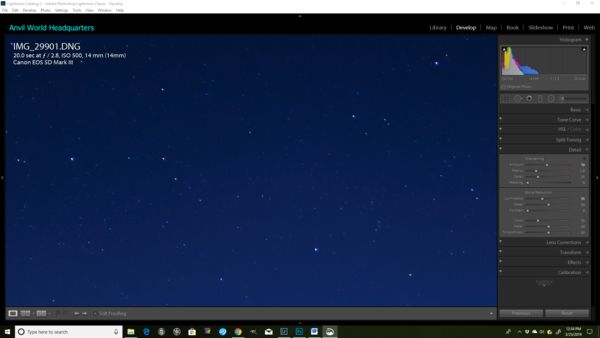
Now, set the Sharpening – Amount setting. Because of what we are about to do next, you might be able to set the Amount higher than you think. I put mine up to 70. (Figure 4)
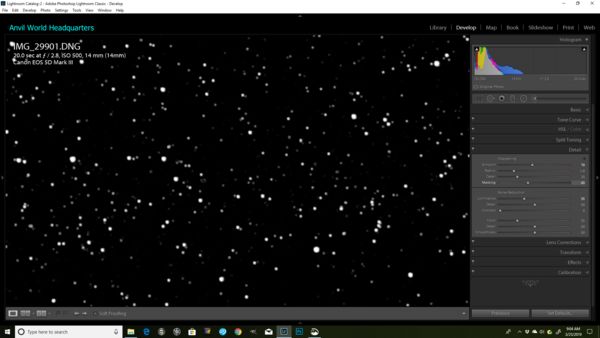
You might consider 70 too high, but we’re going to do something about that. If you were to press the Alt key (on a PC), while left-clicking the mouse on the Masking slider, you would see a totally white image. This key/mouse combination is showing you, in white, what parts of the photo will have sharpening applied. Because your mask is at zero, everything will be sharpened, but that is too much. While holding down the Alt key, move the Masking slider to the right, and more of a mask will be applied. Keep going until the sky (but not the stars) are masked away. I set my Masking to 40. This is what it looked like, when I pressed the Alt key while clicking on the Masking slider (while being zoomed in). (Figure 5)
I released the Alt key and the mouse, and zoomed out, and this is what I have. (Figure 6)
That sets us up for the next part. This part is useful, all on its own, if you’ve never learned how to use that Masking slider.
I'll tell the tale of sharpening through the eyes of Lightroom, though the same things can be done in ACR.
First, edit the photo the way you want it to look, but without sharpening or noise reduction. (Figure 1)
Zoom in on the photo, to get a closeup look at the noise in the night sky. (Figure 2)
Notice the digital noise. Bump up “Luminance” to get rid of that. For this shot, I set it at 35, but your requirements may be different. (Figure 3)
Now, set the Sharpening – Amount setting. Because of what we are about to do next, you might be able to set the Amount higher than you think. I put mine up to 70. (Figure 4)
You might consider 70 too high, but we’re going to do something about that. If you were to press the Alt key (on a PC), while left-clicking the mouse on the Masking slider, you would see a totally white image. This key/mouse combination is showing you, in white, what parts of the photo will have sharpening applied. Because your mask is at zero, everything will be sharpened, but that is too much. While holding down the Alt key, move the Masking slider to the right, and more of a mask will be applied. Keep going until the sky (but not the stars) are masked away. I set my Masking to 40. This is what it looked like, when I pressed the Alt key while clicking on the Masking slider (while being zoomed in). (Figure 5)
I released the Alt key and the mouse, and zoomed out, and this is what I have. (Figure 6)
That sets us up for the next part. This part is useful, all on its own, if you’ve never learned how to use that Masking slider.

Mar 25, 2019 13:32:00 #
I'm putting together a two-part tutorial, right now. The first part is about sharpening in Lightroom (or ACR). To do this sort of thing, it works better to have the photo properly sharpened, before getting into the luminosity masking. Those tips are also useful in learning how to sharpen, whether or not you are going to go on with the luminosity masks.
The second part is the masking, itself, and how to adjust the mask. I've got all my screen shots. I just have to figure out the prose, and how to get the shots inline, rather than all bunched up at the bottom of the post.
The second part is the masking, itself, and how to adjust the mask. I've got all my screen shots. I just have to figure out the prose, and how to get the shots inline, rather than all bunched up at the bottom of the post.
Mar 25, 2019 09:50:48 #
Thanks, all! Whenever I feel a photo is good enough to send through Photoshop, I always investigate whether any luminisoty masking might help. It allows you to get as much precision as you need.
Mar 24, 2019 11:58:30 #
Linda From Maine wrote:
Catchy title, Jim  Fantastic information about Luminosity masks! Thanks so much.
Fantastic information about Luminosity masks! Thanks so much.Thanks! My pleasure. I hope someone can use it.