Making stars stand out in the night sky -- Part 1: Sharpening
This topic is locked to prevent further replies.
Mar 25, 2019 15:40:32 #
This is part one of a two-part explanation of the procedure involved in getting stars, in a nighttime shot, to appear brighter, but without making everything else look brighter. This is accomplished by using a luminosity mask, but, in order to get the best results from the luminosity masking activity, I believe the photo should be sharpened, properly, before attempting any luminosity masking. In other words, before getting into Photoshop. The original thread that generated a request for this explanation is here: Star light, star bright -- Where the hell are the Northern Lights?
I'll tell the tale of sharpening through the eyes of Lightroom, though the same things can be done in ACR.
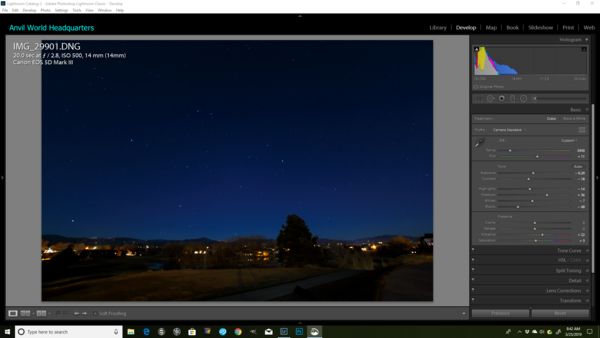
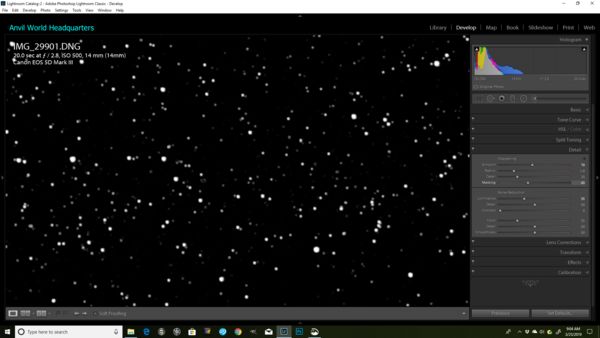
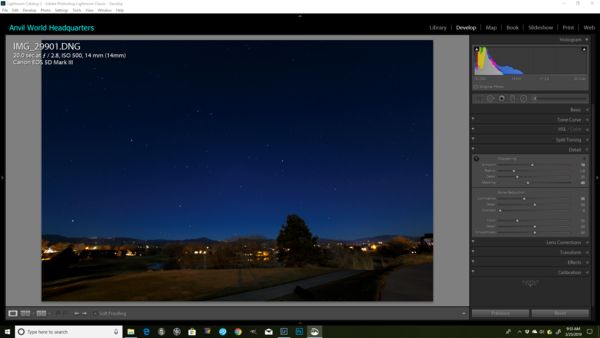
First, edit the photo the way you want it to look, but without sharpening or noise reduction. (Figure 1)
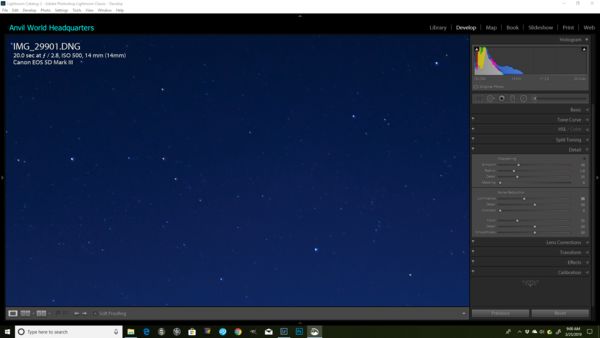
Zoom in on the photo, to get a closeup look at the noise in the night sky. (Figure 2)
Notice the digital noise. Bump up “Luminance” to get rid of that. For this shot, I set it at 35, but your requirements may be different. (Figure 3)
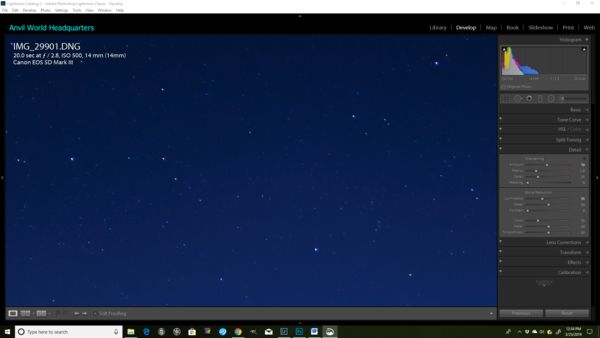
Now, set the Sharpening – Amount setting. Because of what we are about to do next, you might be able to set the Amount higher than you think. I put mine up to 70. (Figure 4)
You might consider 70 too high, but we’re going to do something about that. If you were to press the Alt key (on a PC), while left-clicking the mouse on the Masking slider, you would see a totally white image. This key/mouse combination is showing you, in white, what parts of the photo will have sharpening applied. Because your mask is at zero, everything will be sharpened, but that is too much. While holding down the Alt key, move the Masking slider to the right, and more of a mask will be applied. Keep going until the sky (but not the stars) are masked away. I set my Masking to 40. This is what it looked like, when I pressed the Alt key while clicking on the Masking slider (while being zoomed in). (Figure 5)
I released the Alt key and the mouse, and zoomed out, and this is what I have. (Figure 6)
That sets us up for the next part. This part is useful, all on its own, if you’ve never learned how to use that Masking slider.
I'll tell the tale of sharpening through the eyes of Lightroom, though the same things can be done in ACR.
First, edit the photo the way you want it to look, but without sharpening or noise reduction. (Figure 1)
Zoom in on the photo, to get a closeup look at the noise in the night sky. (Figure 2)
Notice the digital noise. Bump up “Luminance” to get rid of that. For this shot, I set it at 35, but your requirements may be different. (Figure 3)
Now, set the Sharpening – Amount setting. Because of what we are about to do next, you might be able to set the Amount higher than you think. I put mine up to 70. (Figure 4)
You might consider 70 too high, but we’re going to do something about that. If you were to press the Alt key (on a PC), while left-clicking the mouse on the Masking slider, you would see a totally white image. This key/mouse combination is showing you, in white, what parts of the photo will have sharpening applied. Because your mask is at zero, everything will be sharpened, but that is too much. While holding down the Alt key, move the Masking slider to the right, and more of a mask will be applied. Keep going until the sky (but not the stars) are masked away. I set my Masking to 40. This is what it looked like, when I pressed the Alt key while clicking on the Masking slider (while being zoomed in). (Figure 5)
I released the Alt key and the mouse, and zoomed out, and this is what I have. (Figure 6)
That sets us up for the next part. This part is useful, all on its own, if you’ve never learned how to use that Masking slider.
Figure 1
(Download)
Figure 2

(Download)
Figure 3
(Download)
Figure 4
(Download)
Figure 5
(Download)
Figure 6
(Download)
Mar 25, 2019 16:13:40 #

Fantastic tutorial, Jim. Thank you so much for your generosity; this took some time to create!
Mar 25, 2019 16:23:44 #

Wow! I echo what Linda said. I'm bookmarking this for future use.
Andy
Andy
Mar 25, 2019 16:27:33 #
AndyH wrote:
Andy, also please note I'm slowly updating Searcher's list of "Post Processing Tutorials" - it's the third stickied topic on the PP Forum home page. I've already added Jim's Wow! I echo what Linda said. I'm bookmarking this for future use.
Andy
Andy

Mar 25, 2019 16:33:46 #
Linda From Maine wrote:
Andy, also please note I'm slowly updating Searcher's list of "Post Processing Tutorials" - it's the third stickied topic on the PP Forum home page. I've already added Jim's

I enjoy reading these, as well as the various videos on the subject. Your diligence is appreciated.
Now all I need is the time to take more photos and process more photos. Life has been coming at me pretty hard the past six months...
Andy
Mar 25, 2019 16:46:26 #
Thanks! I hope it makes sense. I really wish I could have inserted the pics in the text, but, alas...
Mar 25, 2019 16:52:05 #
Anvil wrote:
The only way I know to do that is if the images are hot-linked from another site. You can write captions to the photos, but a couple of your related paragraphs are likely too long for the character limit (and if you've never tried to insert captions, it's a tricky business Thanks! I hope it makes sense. I really wish I could have inserted the pics in the text, but, alas...
 ).
).Mar 26, 2019 05:56:24 #
Heather Iles
Loc: UK, Somerset
Linda From Maine wrote:
Andy, also please note I'm slowly updating Searcher's list of "Post Processing Tutorials" - it's the third stickied topic on the PP Forum home page. I've already added Jim's
Linda, do you know what happened to Searcher?
Mar 26, 2019 06:24:27 #
AndyH wrote:
Wow! I echo what Linda said. I'm bookmarking this for future use.
Andy
Andy
Ditto! Thanks for taking the time to write this.
Mar 26, 2019 08:31:44 #
Heather Iles wrote:
Searcher's last post to UHH was in October 2015. In June 2015 he wrote that he'd been away "after a long illness." Since he wrote his final comments only a few months after that, it's likely he had a setback (or worse). We've lost so many wonderful and generous members due to health issues.Linda, do you know what happened to Searcher?
Mar 26, 2019 11:57:28 #

If you want to reply, then register here. Registration is free and your account is created instantly, so you can post right away.