Star light, star bright -- Where the hell are the Northern Lights?
Mar 24, 2019 11:49:37 #
There is a reason I'm putting this in the post processing section. I'll get to it.
Yesterday, there was a chance that some folks in Colorado might get to see a rare sight -- the Northern Lights. There was supposed to be some combination of forces that just might allow us to see the Northern Lights, if everything was just right, and if the sky cleared, and if the sky was dark enough. Before midnight, we were supposed to look east, then after midnight, we were supposed to look west.
The sky was cloudy, all day, but it cleared, beautifully, by nightfall. So far, so good. Of course, the sky had to be sufficiently dark, for us to see the Northern Lights, should they appear. There is a fair amount of light pollution, in this area, and there ain't much I can do about that. But other astronomical forces conspired against a good view. The moon wasn't full, but it was so bright it practically cast a shadow. So, we can forget the dark sky component.
If I'm going to stay up that late, preparing to take some photos, then, damn it, I'm going to take some photos. I wanted to see what I could do with the night sky.
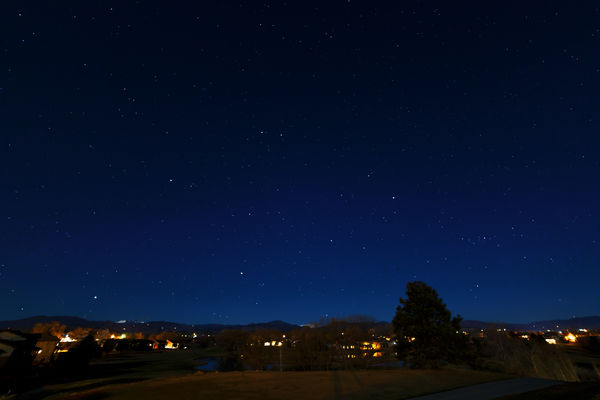
I took this shot with an ISO setting of 500, an aperture setting of f/2.8, and a shutter speed of 20 seconds, using a full frame camera, and a Rokinon 14mm, f/2.8 lens. Since I was more interested in the sky than I was in the horizon, the horizon is very low in the frame. Since it was such a wide angle lens, the distortion along the bottom of the photo was unavoidable, but I wanted to have some of the horizon in the shot.
Okay, so why is this in the post processing section? Most of us probably live in areas with significant light pollution, so nighttime shots of the starry sky might not end up as pleasing as we like. All is not necessarily lost, as long as you put the effort into the post processing end of things. I use Lightroom and Photoshop, and, in this case, Photoshop is necessary. (Actually, any product that gives you layers would work.)
First, I use Lightroom to get the shot in suitable shape for Photoshop. That doesn't mean that it has to be perfect. If I'm going to bring the shot into Photoshop, I usually go for a somewhat flat look, since Photoshop is so good at letting me tweak what needs to be tweaked. I do, however, use Lightroom for noise reduction and sharpening. Here is where one must be careful and knowledgeable about sharpening, in Lightroom. Learn how to use the masking feature. You can take sharpening up pretty far, as long as you take the mask up far, as well. Know how to use the "alt" key when applying the mask. In a night sky shot, it is easy to use the sharpening/masking sliders to make sure that none of the blank sky is being sharpened. This ends up being a border sharpening exercise.
Now, for the Photoshop part. There are all kinds of things one might do, in Photoshop, to enhance a night sky shot, but I'm just focusing on one technique, and it involves luminosity masks. If you are not fluent in luminosity masks, just do a Google search. You'll come up with all kinds of information, not to mention a few free tools that create masks for you. (Jimmy McIntyre has some nice, free things.)
You can create a luminosity mask that just gives you the brightest areas. You can further refine that mask by using the "levels" control on the mask, itself. You can even mask out unwanted areas. I refined my luminosity mask to give me only the stars, and I used the brush to get rid of the land area. (Many of your search results on luminosity masks will take you to youtube videos that will show how to do this.)
With your refined luminosity mask, you can create a curves layer, applying that mask. Raise that curve, and you'll see some subtle magic happening. But, it might not be enough for you. Just duplicate that layer, as many times as you see fit. On this shot, I have four, identical luminosity layers, giving me nice, bright stars.
I hope this made sense. Luminosity masks are your friends. (You'll have to look at the download, for this one.)
Yesterday, there was a chance that some folks in Colorado might get to see a rare sight -- the Northern Lights. There was supposed to be some combination of forces that just might allow us to see the Northern Lights, if everything was just right, and if the sky cleared, and if the sky was dark enough. Before midnight, we were supposed to look east, then after midnight, we were supposed to look west.
The sky was cloudy, all day, but it cleared, beautifully, by nightfall. So far, so good. Of course, the sky had to be sufficiently dark, for us to see the Northern Lights, should they appear. There is a fair amount of light pollution, in this area, and there ain't much I can do about that. But other astronomical forces conspired against a good view. The moon wasn't full, but it was so bright it practically cast a shadow. So, we can forget the dark sky component.
If I'm going to stay up that late, preparing to take some photos, then, damn it, I'm going to take some photos. I wanted to see what I could do with the night sky.
I took this shot with an ISO setting of 500, an aperture setting of f/2.8, and a shutter speed of 20 seconds, using a full frame camera, and a Rokinon 14mm, f/2.8 lens. Since I was more interested in the sky than I was in the horizon, the horizon is very low in the frame. Since it was such a wide angle lens, the distortion along the bottom of the photo was unavoidable, but I wanted to have some of the horizon in the shot.
Okay, so why is this in the post processing section? Most of us probably live in areas with significant light pollution, so nighttime shots of the starry sky might not end up as pleasing as we like. All is not necessarily lost, as long as you put the effort into the post processing end of things. I use Lightroom and Photoshop, and, in this case, Photoshop is necessary. (Actually, any product that gives you layers would work.)
First, I use Lightroom to get the shot in suitable shape for Photoshop. That doesn't mean that it has to be perfect. If I'm going to bring the shot into Photoshop, I usually go for a somewhat flat look, since Photoshop is so good at letting me tweak what needs to be tweaked. I do, however, use Lightroom for noise reduction and sharpening. Here is where one must be careful and knowledgeable about sharpening, in Lightroom. Learn how to use the masking feature. You can take sharpening up pretty far, as long as you take the mask up far, as well. Know how to use the "alt" key when applying the mask. In a night sky shot, it is easy to use the sharpening/masking sliders to make sure that none of the blank sky is being sharpened. This ends up being a border sharpening exercise.
Now, for the Photoshop part. There are all kinds of things one might do, in Photoshop, to enhance a night sky shot, but I'm just focusing on one technique, and it involves luminosity masks. If you are not fluent in luminosity masks, just do a Google search. You'll come up with all kinds of information, not to mention a few free tools that create masks for you. (Jimmy McIntyre has some nice, free things.)
You can create a luminosity mask that just gives you the brightest areas. You can further refine that mask by using the "levels" control on the mask, itself. You can even mask out unwanted areas. I refined my luminosity mask to give me only the stars, and I used the brush to get rid of the land area. (Many of your search results on luminosity masks will take you to youtube videos that will show how to do this.)
With your refined luminosity mask, you can create a curves layer, applying that mask. Raise that curve, and you'll see some subtle magic happening. But, it might not be enough for you. Just duplicate that layer, as many times as you see fit. On this shot, I have four, identical luminosity layers, giving me nice, bright stars.
I hope this made sense. Luminosity masks are your friends. (You'll have to look at the download, for this one.)
Mar 24, 2019 11:54:53 #

Catchy title, Jim  Fantastic information about Luminosity masks! Thanks so much.
Fantastic information about Luminosity masks! Thanks so much.Mar 24, 2019 11:58:30 #
Linda From Maine wrote:
Catchy title, Jim Fantastic information about Luminosity masks! Thanks so much.
Fantastic information about Luminosity masks! Thanks so much.Thanks! My pleasure. I hope someone can use it.
Mar 24, 2019 19:05:31 #

Luminosity masks intrigue me but I've not mastered them yet. I have the PS Actions that create them, and have stumbled on a few images that I was able to coerce them into doing what I wanted, but I am far from being able to use them as a regular tool. I do see their promise though. I had not thought about duplicating them to increase the effect. Thanks for sharing.
Mar 24, 2019 19:56:13 #

Thank you for running through the process, especially the luminosity masking.
Lovely shot, too. Maybe even better than the "automatic" beauty of northern lights.
Lovely shot, too. Maybe even better than the "automatic" beauty of northern lights.
Mar 25, 2019 09:50:48 #
Thanks, all! Whenever I feel a photo is good enough to send through Photoshop, I always investigate whether any luminisoty masking might help. It allows you to get as much precision as you need.
Mar 25, 2019 11:43:41 #
I found an excellent video that shows how to do luminosity masks in PS Elements. And it only took me three viewings to get it
https://www.youtube.com/watch?v=jtnWrOiGOvw
from How to Gurus
Once I find a photo that will best demonstrate the effect, I'll post. Thanks again, Jim!
https://www.youtube.com/watch?v=jtnWrOiGOvw
from How to Gurus
Once I find a photo that will best demonstrate the effect, I'll post. Thanks again, Jim!
Mar 25, 2019 13:32:00 #
I'm putting together a two-part tutorial, right now. The first part is about sharpening in Lightroom (or ACR). To do this sort of thing, it works better to have the photo properly sharpened, before getting into the luminosity masking. Those tips are also useful in learning how to sharpen, whether or not you are going to go on with the luminosity masks.
The second part is the masking, itself, and how to adjust the mask. I've got all my screen shots. I just have to figure out the prose, and how to get the shots inline, rather than all bunched up at the bottom of the post.
The second part is the masking, itself, and how to adjust the mask. I've got all my screen shots. I just have to figure out the prose, and how to get the shots inline, rather than all bunched up at the bottom of the post.
Mar 25, 2019 14:26:30 #
Mar 26, 2019 01:07:37 #
Anvil wrote:
I'm putting together a two-part tutorial, right no... (show quote)
I am looking forward to seeing your tutorial.
Mar 26, 2019 09:20:01 #
Mar 26, 2019 21:40:33 #
DougS
Loc: Central Arkansas
I am anxious to try this on a photo I took in the Norhtern Canadian Rockies, in the dead of winter (mid-January!), with an almost full moon, but no aurora that night. It was about 2 a.m. but bright moonlight, and a stiff breeze!
Mar 26, 2019 22:09:15 #
If you want to reply, then register here. Registration is free and your account is created instantly, so you can post right away.