Posts for: treadwl
Jan 20, 2012 07:45:57 #
The Swamp Gator is very wise.
ISO 1000 and up is for special needs only, it is never needed in full sun. Lower F stops will help isolate the bird from the background. Lower ISO and lower f stops might also help kill some of those VERY BLACK holes (shadows), which in my next to worthless opinion are quite distracting. Notice how the birds are blending into the background.
One more minor note on photo #1. You just nipped off the tip of the tail. Either try to get it all, or zoom in tighter to accent the action, but a little nip looks like a slip up.
Larry
Jan 20, 2012 07:36:43 #
I have the 70-300 VR Nikon lens. I have found it to be very sharp and I often use it for shooting small birds in flight. It tracks well in good light, the zoom does not slide and as noted it is wicked sharp. The VR helps while tracking moving subjects.
Larry
Larry
Jan 20, 2012 07:31:51 #
chef arno wrote:
Hi Larry, great suggestions. can you please clarify using 9-21 focus points? Thanks very much.
The autofocus menu on my Nikon D300 has a section which allows the user to select the number of focus points the camera uses. It offers several options where by you can select which is best suited for you in a given situation. The fewer points the less the camera "hunts" in low light situations.
Larry
Jan 19, 2012 19:39:04 #
Excellent job on those sheep. A rare opportunity indeed!! I like all three but would remove the shading on the third shot.
Larry
Larry
Jan 19, 2012 19:29:11 #
Jacko wrote:
Thanks for posting Larry. What type of settings do you typically use...ie: metering mode, shutter or aperature priority, etc.? Thanks...
As for my settings I shoot most often in aperture. (Sport shooting is a bit different--there the shutter speed take priority) As noted in one of my earlier posts my passion is wildlife photography and that is followed by nature photography. With Wildlife I am always concerned about the background and the only way i can control the background is in aperture mode. With nature I am really concerned about what is in focus so again the fstop is most important to me.
Consider this--most of us think in shutter speeds like 125, 250, 500 and so on. Well, if you shoot in aperture and set your fstop at f8 the camera selects the right shutter speed---which may be 135 or 162. so you actually get a more fine tuned exposure. I found this out several years ago looking at the exif info on several of my photos.
with bird I usually use a spot meter (12mm) and with mammals I'll switch to one of the other settings depending on the size of the critter.
With ISO I use the lowest I can get away with. I see no sense in getting a "killer" shot and not being able to print or sell it because of too much noise. Those high ISO are full of noise. This is not so say that I'll never use a high ISO---on occasion, but only if I can't figure out any other way. I can always shoot for peak action -- that split second where the critter are frozen on their own. It takes timing and practice.
For critters I always shoot set for continuous high speed burst. You never know what might pop up behind a rock.
Hope that helps.
Larry
Jan 19, 2012 07:19:34 #
Welcome to the world of middle &high school sports in arena where the lighting stinks. Some venues are little better than caves with candles. Yours is not quite that bad, but it is close. First, the yellow is due to the type of lights being used in the gym. You can correct this by using custom white balance. The best way, and what I do in all the gyms (arenas) where i shoot is to use Expodisk. Look it up on the web. It is a type of filter disk that you apply to the front of the lens before you start shooting and it allows for perfect white balance.
Next the photos you show--two are out of focus and all look a bit under exposed at least on my monitor. For middle school, you can drop that shutter speed to 500 and not 640 and that will help. I suggest manual setting since the lights are not going to change brightness during the game itself. I shoot b-ball with that same lens and you can and should zoom closer (get tighter on the subject). Try using 9-21 focus points and set the camera to continuous tracking.
In most gyms I prefer to get on the baseline, use a 50mm 1.4 or 1.8 lens set to f2. You have to be patient and wait forthe action to come to you but you can get some good shots. I also sometimes use a nikon sb-800 flash set to -2 and ISO 800. That will allow short bursts of shots.
Good Luck
Larry
Jan 18, 2012 19:06:57 #
Thanks Cappy for the kind comment. i appreciate it.
Larry
Larry
Jan 18, 2012 17:15:23 #
First the histogram is not about white balance. It simple shows the the distribution of tones in the picture. A shot with a white ibis against a dark mangrove swamp would show a very dark (to the left) histogram even when properly exposed. This would be the same in reverse (black glossey ibis against a grey sky). That said there is no such things as a correct histogram---you are the creator of the image and you can make it look anyway you want.
However if you are looking to get the correct "color" of light then if you don't like what your camera does try using expodisk. Look it up on line at http://www.expoimaging.com/product-overview.php?cat_id=1
This is the trick (gimmick) I use if I am shooting product (say a COKE red can and want to get the right red, or if I'm shooting college basketball indoors and want the right color uniforms under whatever lights the arena is using because every arena has different lights and they all yield different colors) Remember those orange shots you used to take indoors under tungsten lighting??
Expodisk make a huge difference I use it almost every time I shoot. Check it out.
Larry
Jan 18, 2012 17:01:37 #
Today several people sent me PMs questioning what I meant by using proper panning technique when I shot the GBH in flight.
I didnt answer earlier because this is a complicated topic and takes a bit of doing to understand.
Most novices think panning is about shutter speed but this is only partly right. Panning is about keeping the film place exactly parallel to the subject. If you do this correctly you will stop motion of the subject even if you are using a shutter speed of 1/60th of a second and panning an f-14 fighter plane because in relation to the film plane the jet has not moved.
Now the trick is to put this theory into practical application. My panning technique is designed to keep the film plane as close to perfectly parallel to the body of my target as possible. Shutter speed comes into play to allow me to stop the movement of those items in the photo that are NOT moving parallel to the film plane---that would be those darn wings! So, first my left hand is positioned under the barrel of the lens, and supports the weight of the camera and lens. Im letting gravity push the camera down into the palm of my hand. I firmly press the camera against my forehead so my head acts as a brace point for the camera. My left eye is at the eyepiece and my right eye is open to help track the subject. I spread my feet about a shoulder width apart and is on soft ground actually wiggle them into the surface to get a firm platform. My elbows are tucked tight against my sides From this basic stance I twist at the waist TOWARD the direction from which my subject is approaching. Thus I will untwist (is that a word??) as I shoot the subject. The most important part is when to shoot and when to stop shooting. Basically you begin the shooting (either burst or single) when the subject fill your viewfinder and you continue to shoot and untwist at the waist. I continue to shoot until the subject is directly in front of me and I am fully untwisted. This is when I stop shooting BUT NOT when I stop twisting. I continue to twist until the camera is finished making noises. Sorta consider this as coasting to a stop. If you stop early you will end up with several of the last frame blurred and out of focus. All of this needs practice, and then more practice. As I noted earlierI practice by tracking tennis balls as they bounce down the driveway.
OK---that is the hand held technique that I use. Put the camera on a tripod and some things have to change.
Larry
Jan 18, 2012 16:59:37 #
bravedoc wrote:
Thank you for sharing the tremendous shot! Recently visited
a water reclamation park in Delray to shoot birds. Realize
how much I can learn from your detail.
a water reclamation park in Delray to shoot birds. Realize
how much I can learn from your detail.
Which water reclamation park did you visit? There are two that are not very far apart Green Cay and Wakodahatchee.
Larry
Jan 18, 2012 14:19:20 #
Thanks again everyone for the kind comments. It is much appreciated. And Photoman74---I will thank the most cooperative bird. :-)
Larry
Larry
Jan 18, 2012 08:44:25 #
steve40 wrote:
Sorry, I forgot about blowing the lens off. But I have never got a lens that dirty, I can't figure out how to do it. Short of just picking a handfull of dirt, and dumping it on the lens.
Anytime the wind blows it is stirring dust up in the air and some of this settles on the lens. Always blow off the dust before you try rubbing it into the glass in the name of "cleaning".
When I travel with my camera in the car I always cover it with a clean white towel. If I'm on a dusty road I stop the car, wait a few moments for the dust to settle, before I remove the towel and open the door.
Larry
Jan 18, 2012 08:35:29 #
Nice job using the 800mm lens. It really does neatthings with the sun and is certainly not your usual landscape lens.
Good thinking.
Larry
Good thinking.
Larry
Jan 18, 2012 08:32:39 #
Did anyone notice that none of those photos were taken during the mid day period. Note the shadows, these were all taken during the magic hours of predawn to about 3 hours after sunrise or between 3 hours before sunset to after dark.
Mid day light would wash out the colors and end the shadows that provide depth and texture.
Larry
Mid day light would wash out the colors and end the shadows that provide depth and texture.
Larry
Jan 17, 2012 23:25:27 #
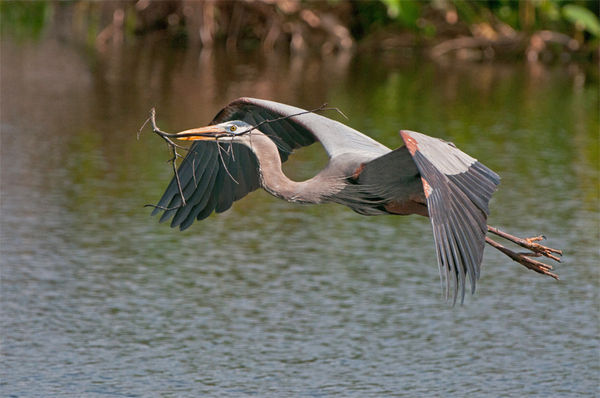
Getting the shot.
My passion is shooting wildlife and as such much thought goes into taking a shot. I set the camera up for possible shots before I even start walking away from my vehicle--just in case some opportunity should appear.
So here is the shot history. Water creates a glare issue and putting a polarizing filter on a Nikon 200-400 VR lens is not a good option. Thus I waited for an overcast day. I hiked out into the Florida Everglades and located a nesting pair of Great Blue Herons. Then I hiked around the marsh to get the right sunlight direction for the flight of the herons as they built their nest. Because the sky was a dull grey I had to adjust my angle of view to keep the sky out of the photo. Next came the issue of background and subject. I needed to get subject separation from the background. This required a low f-stop setting. I chose f5.6 (the lens would have allowed f4 but the heron is a big bird with wide wings and i wanted sharp focus on the wings. 5.6 gave me a bit more DOF but still allowed for blurring the background. I spent a great deal of time working for the best background possible. I did not want to shoot at the extreme focal length of the lens (400mm) because by shooting at 300-320 mm I would get a greater blur on the background which was the major concern. This required moving me to get into the optimum position. I set the camera on aperture (I always shoot wildlife in aperture mode because it gives me control of the background (DOF) I'll let the camera adjust the shutter. I prefer to shoot at the bottom of the ISO range (200 on my Nikon D300) but due to the light and the speed of the subject I had to raise the ISO to 400. Shutter speed ended up between 1/2000 and 1/2499 for the burst of seven shots. I needed at least 1/1500 to freeze those wing tips.
The camera was set on continuous focus tracking and on spot metering. I used 9 focus points instead of the 54 to help with tracking focus. I used good panning technique (proper elbow and foot positioning) as well as follow through. (all of which I practice in my driveway following bouncing tennis balls) For the flight photos the camera was hand held. It took nearly 90 minutes to allow the bird to make 4 trips to collect sticks. I got about 7 shots on each return trip firing in high continuous mode but waiting for the bird to fill the frame before beginning the burst. Out ofthe 30 plus frames I "kept" 5 frames discarding the others for such issues as framing (lost a few wing tips), twig position, (blocking the eye) or wing position. Over all, I consider this a good flight photo, not a great one. This is a full frame shot with only a tiny bit of cropping to straighten the water line.
Thanks for looking. Feel free to critique the photo or the technique.
Larry