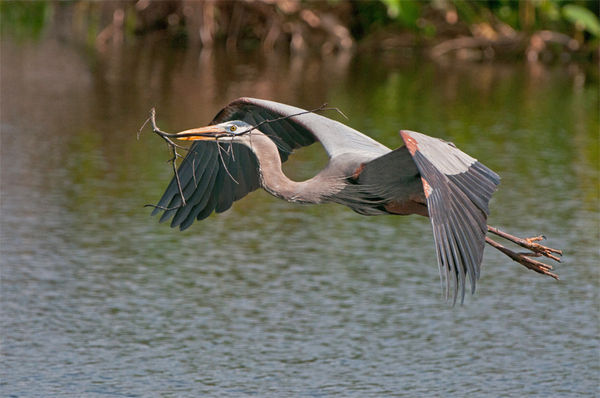
Great Blue Heron in Flight
Jan 17, 2012 23:25:27 #
Getting the shot.
My passion is shooting wildlife and as such much thought goes into taking a shot. I set the camera up for possible shots before I even start walking away from my vehicle--just in case some opportunity should appear.
So here is the shot history. Water creates a glare issue and putting a polarizing filter on a Nikon 200-400 VR lens is not a good option. Thus I waited for an overcast day. I hiked out into the Florida Everglades and located a nesting pair of Great Blue Herons. Then I hiked around the marsh to get the right sunlight direction for the flight of the herons as they built their nest. Because the sky was a dull grey I had to adjust my angle of view to keep the sky out of the photo. Next came the issue of background and subject. I needed to get subject separation from the background. This required a low f-stop setting. I chose f5.6 (the lens would have allowed f4 but the heron is a big bird with wide wings and i wanted sharp focus on the wings. 5.6 gave me a bit more DOF but still allowed for blurring the background. I spent a great deal of time working for the best background possible. I did not want to shoot at the extreme focal length of the lens (400mm) because by shooting at 300-320 mm I would get a greater blur on the background which was the major concern. This required moving me to get into the optimum position. I set the camera on aperture (I always shoot wildlife in aperture mode because it gives me control of the background (DOF) I'll let the camera adjust the shutter. I prefer to shoot at the bottom of the ISO range (200 on my Nikon D300) but due to the light and the speed of the subject I had to raise the ISO to 400. Shutter speed ended up between 1/2000 and 1/2499 for the burst of seven shots. I needed at least 1/1500 to freeze those wing tips.
The camera was set on continuous focus tracking and on spot metering. I used 9 focus points instead of the 54 to help with tracking focus. I used good panning technique (proper elbow and foot positioning) as well as follow through. (all of which I practice in my driveway following bouncing tennis balls) For the flight photos the camera was hand held. It took nearly 90 minutes to allow the bird to make 4 trips to collect sticks. I got about 7 shots on each return trip firing in high continuous mode but waiting for the bird to fill the frame before beginning the burst. Out ofthe 30 plus frames I "kept" 5 frames discarding the others for such issues as framing (lost a few wing tips), twig position, (blocking the eye) or wing position. Over all, I consider this a good flight photo, not a great one. This is a full frame shot with only a tiny bit of cropping to straighten the water line.
Thanks for looking. Feel free to critique the photo or the technique.
Larry
Jan 17, 2012 23:52:13 #

thanks for great picture an lesson on preperation an setting up an what to think about. i've found using a rubber band on panning handle an pulling on rubberband really smoothes the panning espically videoing
Jan 18, 2012 00:11:09 #
Thanks for the detailed explaination (and great shot).
This kind of generous sharing is invaluable for me (and many of us).
This kind of generous sharing is invaluable for me (and many of us).
Jan 18, 2012 03:49:56 #
Jan 18, 2012 05:20:30 #

Jan 18, 2012 06:22:40 #
Jan 18, 2012 06:22:49 #
Jan 18, 2012 07:07:00 #
Really good info. Thanks for sharing. Preparation is the key to getting the great shots.
Jan 18, 2012 07:30:44 #
Larry, thanks for the wonderful and detailed description of how you obtained such a great shot. I love it!
Jan 18, 2012 08:00:51 #
Very very nice shot. But the real pleasure in viewing it is knowing how an expert did it. Thanks so much for the setup info.
Sarge
Sarge
Jan 18, 2012 08:26:08 #
treadwl wrote:
Getting the shot. br My passion is shooting wildli... (show quote)
Awesome shot! Very nice..
Jan 18, 2012 08:39:51 #
I used good panning technique (proper elbow and foot positioning) as well as follow through.
I wonder if you would please describe more detail on proper positioning?? I shoot some of the same ways as you and this might be helpful. I thought to practice panning using kids on a swingset, but I don't have kids and don't wish to spend time in jail so.......
Thanks
I wonder if you would please describe more detail on proper positioning?? I shoot some of the same ways as you and this might be helpful. I thought to practice panning using kids on a swingset, but I don't have kids and don't wish to spend time in jail so.......
Thanks
Jan 18, 2012 09:12:31 #
Jan 18, 2012 09:21:09 #
Jan 18, 2012 09:23:16 #
Hard work pays off. Great shot. Thanks for the info. Thank the birds also.
If you want to reply, then register here. Registration is free and your account is created instantly, so you can post right away.