Posts for: Elmerviking
Jan 22, 2019 14:01:00 #
RG..it is even simpler than you say when you,like most more advanced cameras, have command dials(wheels). For example on my Nikon D7100 the front wheel adjust aperture and the rear wheel adjusts shutter speed. With auto ISO you chose what is most important, either aperture (DOF) or shutter speed(camera or subject movement).
For example:
Landscape photography: You probably want more DOF and low ISO with the camera on a tripod.
So what to do
1/ chose aperture
2/Adjust Shutter-Speed until you reach the low ISO (probably base ISO=100)
Take the photo. Check result. Too bright? Set EC to minus take another shot and check and adjust EC if needed.
You have full control just as you say!
In the studio with constant light:
Exactly the same procedure. If nothing changes the auto ISO will not change!
Some here claim that the light is constant in a studio and they therefor don’t need to change ISO.
Auto ISO actually is an advantage even in a studio! The light intensity can vary due to sudden voltage changes. One of the lights can be dimmer without the photographer notice it. Murphy’s law...if anything can go wrong it will sooner or later! Auto ISO will adjust to compensate, which is an advantage.Fixed ISO will need a manual operation, iF YOU DETECT THE DIMMED LIGHT!
If the light suddenly changes ISO will change maybe one step..but nobody can tell the difference in noise!
To sum it up:
There is NONE advantage in choosing a fixed ISO!
It doesn’t matter if the rock has been in the same spot for millions of years...it doesn’t matter if you are in a studio or whatever.
Manual mode with auto ISO gives you full control in most situations!
The only exception I can think of now is when you use spotmetering where the exposure is measured where the focus point is. Then you have to lock in the ISO manually. But...if the light changes you have to adjust shutter speed, aperure or ISO. Handheld you can program a button, for example the Fn button to lock exposure, but you have to press the button down .,hold it pressed and take the photo.
Shortly..I agree with everything you said!
There is unf
Jan 21, 2019 14:07:46 #
BebuLamar wrote:
No I am talking about the ISO rating must be specified with both the old ASA and DIN values not just the ASA value alone. Nowaday, I see most people only specify the old ASA number for example ISO 400 and not ISO 400/27.
It all depends of your background. I am Swedish, and we only talked about DIN, never ASA.
If you check B$H photo for example, they specify TriX as ISO400/21. They do never explain what 21 degrees stand for, but as an old film guy I know that it is the DIN “speed”.
Jan 21, 2019 13:10:49 #
rmalarz wrote:
The key to this is "correct".
--Bob
--Bob
Let me clarify:
UHH is a “ mutual admiration society “ that seems to hate people with different opinion even if the guy with different opinion is correct.
Many hoggers stick to their opinion even if they are proven wrong! Steve Perry for example pointed out that ISO is not sensor sensitivity but gain or amplification, but you still say that ISO is sensor sensitivity.
Is Steve Perry wrong or could it be that YOU are wrong?
Jan 21, 2019 12:25:39 #
selmslie wrote:
I suggest that you read the article and what I said with an open mind.
I did not mention the Zone System until after Bob brought it up.
If you want to have a hissy fit and stop learning at this point, it's your loss. We will all benefit from your absence.
I did not mention the Zone System until after Bob brought it up.
If you want to have a hissy fit and stop learning at this point, it's your loss. We will all benefit from your absence.
UHH is just a “ mutual admiration society”. They hate people with different opinion even if it is correct!
Jan 21, 2019 11:37:52 #
I can’t see ANY illustrations! Where are they?
Jan 20, 2019 15:53:14 #
rmalarz wrote:
Elmer, thanks for weighing in on this. That is app... (show quote)
As I said, I am experienced (probably more experienced than most ppl here) and totally understand. You don’t have to explain to me. I just thought your description was confusing for a beginner. You don’t have to fill the 100 ISO glass all way up to the rim to get a good exposure. You just adjust to a higher ISO.
Or in other words..you don’t have to saturate the sensor to get a good exposure. Understand what I mean?
Jan 20, 2019 14:47:52 #
rmalarz wrote:
Ok, folks, we’re off on another adventure in photo... (show quote)
I appreciate your effort to explain exposure for beginners. But...it doesn’t work for me if I pretend to think as a beginner. Here is why:
You have same diameter glasses and say that they represent sensor AND ISO. A taller glass represent lower ISO?
That is for a beginner really hard to understand.
The fact is that no matter how you change “the diameter” (aperture) or how long you fill the glass (shutter time) or HOW MUCH YOU FILL THE GLASS (half full or any fraction) you adjust ISO to give you the “correct”exposure.
The size of the glass actually represent amount of light hitting the sensor which has nothing to do with ISO!
As I read it (thinking as a beginner) more volume is lower ISO.?
To a beginner I would say that it doesn’t matter what aperture you use or what shutter speed you use..you can always get a correct exposure by adjusting ISO.
The time might be to long and give you motion blur, the aperture might be to small or too large and give you unwanted depth of field, but that is another issue. Too high ISO will give you unwanted noice etc.
Well, I am very experienced and understand what you are saying, but honestly doubt a beginner will.
I don’t mean to underestimate your effort, I am just giving my opinion...like it or not.
Jan 20, 2019 12:23:19 #
ggenova64 wrote:
Thank you Mr. Bob
Now I have a better concrete understanding of the balance.
ISO is Camera.
Aperture (AKA F-Stop) and Shutter Speed is that 1:1 Relationship.
Now I have a better concrete understanding of the balance.
ISO is Camera.
Aperture (AKA F-Stop) and Shutter Speed is that 1:1 Relationship.
LOL....you got it!
Jan 20, 2019 01:21:22 #
BebuLamar wrote:
It's supposed to be marked that way. Marking only the 100 number is not correct. The ISO has 2 numbers and not 1.
Ha,ha...nobody noticed that I mistyped! The marking is 400/27 degrees there 27 degrees is the old DIN speed.
BebulLamar...what are you talking about? ISO 400 is 27 degrees DIN
ISO 200is marked 200/24 degrees
ISO 100 is 100/21 degrees and so on
Jan 19, 2019 22:58:37 #
Are many beginners going to UHH to learn basic understanding of exposure etc.?
Is this the right forum to learn photography?
Just wondering.
Is this the right forum to learn photography?
Just wondering.
Jan 19, 2019 18:19:05 #
selmslie wrote:
Then you are not the one who is "totally confused". Maybe my explanation will help johntaylor333.
I’m on your side selmlie!
They complicate it too much, specially for beginners!
It’s simple:
If the picture is to dark you can chose
1/ Higher ISO or
2/ longer shutter speed or
3/ bigger aperture
If the picture is too bright:
Lower ISO or
Faster shutter speed or smaller aperture.
Voila!
Jan 19, 2019 17:47:17 #
selmslie wrote:
At a fixed ISO, more exposure collects more photons and record as bigger numeric values in the raw file.
At a fixed exposure (constant number of photons), a higher ISO records bigger numeric values in the raw file.
You can blow out the raw file when you reach the maximum recordable value (16383 or '11111111111111' for a 14-bit raw file). That can happen if the ISO is too high for a given exposure or if the exposure is too much for a given ISO.
That is what I said. Number of photons on the sensor gives a certain input. Higher ISO gives a higher output of the signal from the sensor and vice versa. Too high ISO can give blown out highlights as you said. Maybe we talk about the same thing but in different wording?
Jan 19, 2019 17:16:20 #
johntaylor333 wrote:
ISO is similar to film speed, but not quite the sa... (show quote)
Yeah...I am totally confused! You are saying that ISO is sensitivity(?) and higher ISO collects less photons?
Sensitivity is either Volt/number of photons or number of photons/V. The sensor sensitivity does not change, what is changing is amplification. Less number of photons need more amplification (higher ISO) to present a viewable picture. The more amplification=the more noice! This has been discussed a number of times here.
ISO is in a way comparable to film speed, but not exactly the same.
It is the amount of light (number of photons)that is collected on the sensor that determines what amplification you need of that “signal” to view the picture. Complicated?
Shortly said:how much light that is hitting the sensor has to be balanced against ISO.
More light=lower ISO
Less light=higher ISO
Jan 19, 2019 11:08:11 #
One minor problem is that you have to refocus if you zoom in or out. Not a big deal, you just have to be aware of it.
High end zoom lenses lets you zoom in and set focus and zoom out to what composition you need without refocusing. ( My old Nikkor 80-200 Ai works that way, but that is a professional lens)
High end zoom lenses lets you zoom in and set focus and zoom out to what composition you need without refocusing. ( My old Nikkor 80-200 Ai works that way, but that is a professional lens)
Jan 19, 2019 10:23:53 #
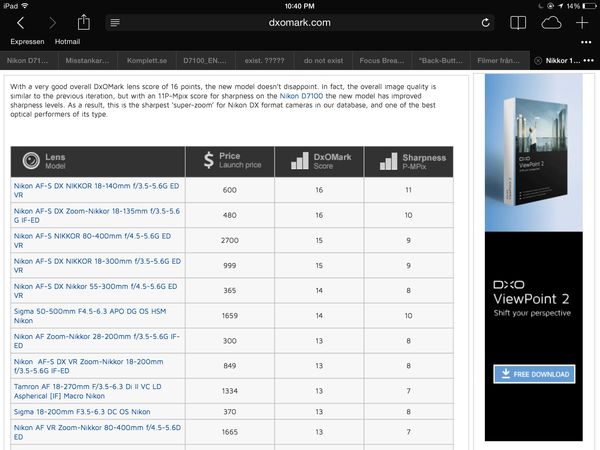
According to dxo-mark it is the sharpest lens in the category!