Light Tent DIY
Jan 6, 2016 11:53:08 #

hswader,
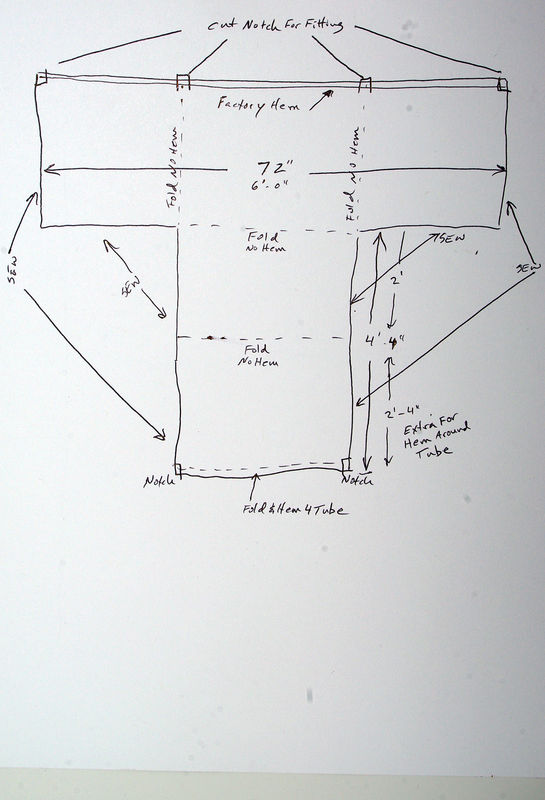
Not the best quality photo. I added some dimensions and cut (notch) and sew markings.
I used the factory hem and slid tubes thru hem on 3 sides of my box the cut the last box at 2' - 4'' and hemmed it for my 4th tube them sew the other 4 seams. I made it pretty tight fitting.
EDIT UPDATE:
See photo for Notch and how tube fit into factory seam and my BEAUTY seam. I do not think I would make it as a tailor...:-)
hswader wrote:
I think I'd like to make a copy of your light tent, but could you supply the measurements for cutting the sheet? Or do I go with the sizes of the pvc pipe you gave?
I could go by that, but it may be easier to some if they were mentioned.
Thank you for providing the info on the tent.
Yours, Hswader
I could go by that, but it may be easier to some if they were mentioned.
Thank you for providing the info on the tent.
Yours, Hswader

Jan 6, 2016 12:03:23 #

Highplains Coyote wrote:
I wanted a light tent and being a DIY'er I decided... (show quote)
GREAT stuff here ! - Thanks for sharing !
Jan 6, 2016 12:30:08 #
hswader
Loc: Bedford, PA
Thank you for the information on cutting the sheet. Now that I have all the information I think I'll need, I'll be getting the material need ASAP.
Thanks again
Yours, Haskell
Thanks again
Yours, Haskell
Jan 6, 2016 12:33:12 #
I had most of the pipe and fittings left over from other projects. My wive had some old bed sheets and I talked her out of one. See a pattern here ;-)
I went on line this morning and priced these items for you:
HOME DEPOT:
4-10' PVC Schedule 40 1/2 - 2.03ea
8-1/2x1/2x1/2 Side Outlet - 0.98ea
4-1/2 cap - 0.38ea
2-1/2x1/2x1/2 T-fitting - 0.54ea
2-1/2x1/2 90 elbow - 0.28ea
3-Clamp Lights - 6.97ea
3-Daylight Compact Bulbs - 2.25ea
1-Sheet approx Amazon - 8.00ea
Total w/o sheet = $47.31
Total with Sheet = $55.31
Satisfaction of DIY =PRICELESS
DO NOT GLUE TUBES TO FITTINGS - Allows for ez take down & storeage.
1 MORE thing I used a couple of pieces of 22x28 inch white poster board to line inside box. You need a curved back so you don't get a shadow line. If you are shooting larger objects you will need a longer sheet of poster board to eliminate seam where the two sheets overlap. Seam WILL show up in your photos!
catfish252 wrote:
Looks like a great light tent Coyote, thank you for sharing the plans and material list. I was just thinking of getting one off of the net. I may try this instead. What was the final cost including the lights and stand -- if you don't mind?
Jan 6, 2016 12:40:13 #
hswader
Loc: Bedford, PA
Thanks again for the added info for that light tent. I think I have most of the pipe pieces in the shed (along with a lot of other s**t (LOL). If I need more, I'll just go to my local Lowe's (don't have a Home Depot anywhere close).
hswader
hswader
Jan 6, 2016 12:53:02 #

[quote=Highplains Coyote]I had most of the pipe and fittings left over from other projects. My wive had some old bed sheets and I talked her out of one. See a pattern here ;-)
I went on line this morning and priced these items for you:
*******************
Thank you Coyote for going to all that trouble of gathering those prices, I was only looking for a ball park price, having never bought PVC piping before. Your effort is appreciated. Have a great day.
I went on line this morning and priced these items for you:
*******************
Thank you Coyote for going to all that trouble of gathering those prices, I was only looking for a ball park price, having never bought PVC piping before. Your effort is appreciated. Have a great day.
Jan 6, 2016 19:11:37 #
Jan 6, 2016 20:07:59 #
I have been building my own photographic equipment for years. Good for you.
I see a potential problem with your design. I am a former jewelry photographer. A piece of jewelry, or any reflective object, can be thought of as a mirror that is able to see in all directions. Although often easier said than done, there is a way to overcome this challenge. It sounds like a simple trick: You don't light the mirror, you light what the mirror sees.
The potential, possibly inevitable, flaw in your design is that whatever you photograph (no matter how non reflective you think it may be) will "see" the PVC pipe. See everything, right down to the bar codes. The frame, PVC or otherwise, should be external, rather than inside of the tent.
Fortunately, you have what is otherwise a very good design. Structurally, it is very sound, and your choice of materials makes it versatile. Modification (should you decide it necessary) would be easily achieved.
A rule of thumb for most things is, "You can always cut more off, but you can't put it back." In your situation, the existing lengths of PVC pipe can be extended quite simply with couplings and glue.
If you would like, I can share some ideas about how to support the existing fabric once the frame has been enlarged. But I don't want to waste your time or mine. My observations are that and nothing more; my reply is not meant to be critical in any way. Please do not take offense. I reiterate that your design is very good and add that your forethought and craftsmanship both are admirable. What you have completed, ingeniously, may perfectly well suit all of your needs.
Jan 6, 2016 20:22:03 #
DJO wrote:
I have been building my own photographic equipment... (show quote)
I have been watching this wonderful thread! Another possible plus to an outside frame ( perhaps supported by stitching) is ease of modifying the shape. Perhaps a curved roof/sides for example...
Jan 6, 2016 21:54:32 #

Thank you for the plans. I was going to try my luck at designing one, but your plans look better then anything I would have come up with.
Jan 6, 2016 22:42:00 #
No offense taken.
I love to hear new thoughts and ideas. It is like iron sharpening iron, it should make us both sharper.
I could easily build another and design it with the sleeves for tubes sewn in such a way that the tubes are on the outside of the tent.
I never thought of the reflections showing everything, though I do see silly reflections in some the photos I've taken.
Thank you for the very good help.
DJO wrote:
I have been building my own photographic equipment... (show quote)
Jan 6, 2016 22:44:59 #
Now you got me thinking even more.
Would the curve help disperse the light and help reduce flare, hot spots and shadows?
I have a feeling I may be making several tents to test different designs and shapes.
Thank you for stimulating my brain.
Would the curve help disperse the light and help reduce flare, hot spots and shadows?
I have a feeling I may be making several tents to test different designs and shapes.
Thank you for stimulating my brain.
pfrancke wrote:
I have been watching this wonderful thread! Another possible plus to an outside frame ( perhaps supported by stitching) is ease of modifying the shape. Perhaps a curved roof/sides for example...
Jan 6, 2016 23:00:38 #
Highplains Coyote wrote:
Now you got me thinking even more.
Would the curve help disperse the light and help reduce flare, hot spots and shadows?
I have a feeling I may be making several tents to test different designs and shapes.
Thank you for stimulating my brain.
Would the curve help disperse the light and help reduce flare, hot spots and shadows?
I have a feeling I may be making several tents to test different designs and shapes.
Thank you for stimulating my brain.
Concave shaped diffusers are very effective in the macro world. And a larger light tent (why not concave also) surrounding an existing lighting solution might very well increase available light allowing faster light. Anyway for the world I play in, I am getting some PVC fittings!!
Jan 7, 2016 01:37:11 #

Did I miss seeing some of the photos that came out of using this interesting rig?
Jan 7, 2016 08:24:08 #
JohnFrim wrote:
Did I miss seeing some of the photos that came out of using this interesting rig?
Here are two links to post showing photos taken inside this light tent.
http://www.uglyhedgehog.com/t-359584-1.html
http://www.uglyhedgehog.com/t-359951-1.html
If you want to reply, then register here. Registration is free and your account is created instantly, so you can post right away.