Posts for: DragonTom
Dec 31, 2015 17:49:11 #
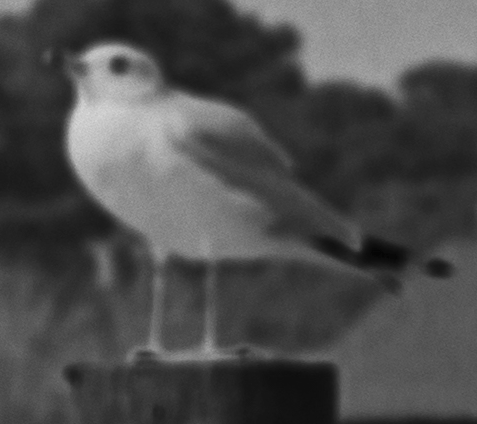
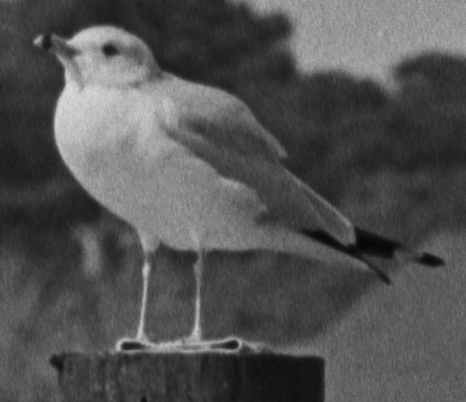
Emulsion side is better. Here are sections from a negative I just tested. Clip 1 is through the support media and Clip 2 is a photograph of the emulsion side. Actually, quite a difference.
Through the film.
Emulsion side
Dec 31, 2015 14:35:34 #
Greenebroke wrote:
Any thoughts about the color mask inherent in negative stock such as Ektacolor, Kodacolor?
Not yet. The negatives I'm interested in now are all B&W; mostly on TriX film. Color would be a subject for another thread that's probably already done to death. :-)
Dec 31, 2015 14:14:59 #
BobHartung wrote:
DragonTom,
PM (private message) me. I may have an old and unused Nikon slide copy adapter in a box at home. I am currently on the road and will not be home until the 6th of January. If I can find it, you can have it for the price of the postage.
Your PM will be my memory jogger to check.
HTH
PM (private message) me. I may have an old and unused Nikon slide copy adapter in a box at home. I am currently on the road and will not be home until the 6th of January. If I can find it, you can have it for the price of the postage.
Your PM will be my memory jogger to check.
HTH
Thank you. I have a Nikon copy adapter and bellows that I kept but, frankly, it was easier to use the lightbox method than to get all the adapters, etc. necessary to connect all that together with the newer lenses that do not use the Nikon 52mm standard of yore. Appreciate the offer however.
Dec 31, 2015 13:42:19 #
burkphoto wrote:
1) Use a super-diffuse light source of high color ... (show quote)
Thank you. I am using a 105mm macro lens at f5.6 on the Nikon D7100 with a large (sturdy) tripod and remote trigger. The lens has a long shade on it to kill reflections from the side. The work is being done in a darkened room for just the reason you mention as my initial testing showed light reflections. I will be shooting emulsion side up based on discussion here and the fact that I thought that was probably the right thing to do. The film is mostly 35mm TriX; sometimes pushed when I was shooting night football games and had to use a faster shutter than ASA 400 allowed. Air and fine brush will clean the negatives and they are being held in a holder similar to what I used to use in the darkroom so many decades ago. :-)
Dec 31, 2015 13:29:56 #
Zone-System-Grandpa wrote:
Hopefully, you won't mind my asking what purpose i... (show quote)
You got it. I no longer have all the chemicals, darkroom, etc., etc. and don't care to go that route any longer but do have many negative strips from the 1960s that it would be nice to (1) archive in digital form and (2) perhaps edit a few of the images using all the digital methods available now. The first step however is converting the negatives to digital form and doing that in the best way possible (e.g., sharpest image, image with least amount of scratches, dust, etc.) which reduces the amount of later editing that must be done.
I could send these out to a service but, frankly, most are snapshot quality so paying for the service would be a waste of money when I can do it easily with a good camera on a sturdy mount over a lightbox and then edit the results as needed.
Dec 30, 2015 16:54:54 #
Rongnongno wrote:
So, same as slide the emulsion needs to be toward the camera (or scanner) to (partly) avoid going through the support that may add artifacts due to old age...
Other wise, as you said, PP can adjust for the reverse orientation.
Other wise, as you said, PP can adjust for the reverse orientation.
That's largely what I was worried about; the support material artifacts. I can do all the necessary flipping, inverting, etc. in post quite easily.
Dec 30, 2015 15:40:27 #
I've set up a lightbox and macro lens on my Nikon D7100 (on a tripod) in order to take photos of old negatives; mostly for archive info but perhaps, for some, to enhance for other uses. Simple question: Do you take the photograph emulsion side up or down? It would seem that up would be the right answer as you would be focusing on the emulsion where down you would be focusing through the film.
I suppose it would be best to experiment but thought I'd ask first.
Any thoughts on the "right" way to do it?
I suppose it would be best to experiment but thought I'd ask first.
Any thoughts on the "right" way to do it?
Sep 28, 2015 13:58:20 #
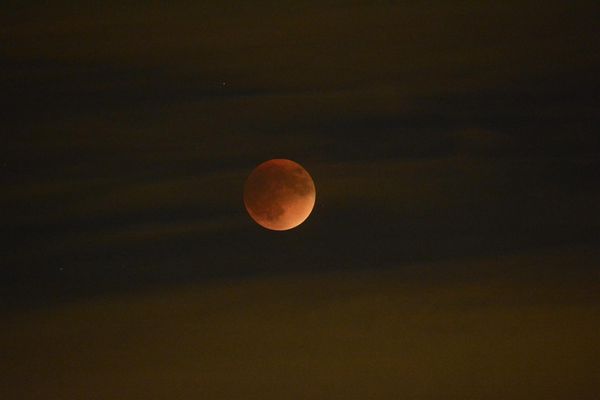
Thousand Oaks, California had bands of clouds. This shot was one of three I was able to get as the moon passed between bands. Was surprised at how dim the eclipsed moon was and had to go to ISO 6400 with 1/2 second at f5.6.
Nikon D7100, 300mm FX zoom (450mm equivalent), ISO 6400, 1/2 second, f5.6
Jun 21, 2015 15:05:59 #
CooledgeR wrote:
Sounds like something I'd like to do if I was savvy enough to understand fully what you are describing. Is there a "Backup for Dummies Using Raid 0" anywhere that lays out the steps, etc. in really simple Kings English? :roll:
Probably but I've been dealing with computers since the 1960's and have lost track of the "For Dummies" series of books. :-)
Basically, there are several RAID levels. The simplest is RAID 0 where you have two disks connected to a controller that writes to both at the same time and periodically checks to see that both disks have the same information on them. Higher levels will have more complex routines that use checksums and other algorithms to write data across multiple disks and be able to both check the accuracy of that data and also fix any errors that are seen. So, a RAID 0 setup will basically give you a double backup and if one of the disks goes bad you can replace it (maybe even hot swap with the device running in some cases) and the internal software will then copy from the good disk to re-make a redundant backup. In my case, the device (a Trendnet server -- there are many others) is also an FTP server on my local network (i.e., behind the router) and I have a backup program that gives me the ability to back up to an FTP server rather than to a device that looks like a hard disk in Windows. With the latter your backup is always at risk for a malware attack as the malware can "see" it but can't see the FTP device.
It's actually easier than it sounds. Here is a link to a video that shows the software I use. Again, there are many others...
https://www.youtube.com/watch?v=V8O7LJ_z6aE
Jun 20, 2015 14:02:22 #
One alternative you can consider would be a local drive set up as a network drive. For example, I use a Trendnet device that serves as an FTP server on my local internal network. It has a RAID 0 setup for dual drives having the same data on each. As an FTP server it's not seen by the operating system so is not affected by ransomware. Each day I do an incremental FTP file backup to the Trendnet server. Right now I just keep a mirror of my hard drives but could set the system up to do incremental storage so I had older versions of the files if needed. Being on my local home network backup (and restore) is quite fast. Then, after the file backup is done, an image (or incremental image) backup is done to another drive which is swapped out weekly and rotated through a several week cycle. That whole process takes no more than a half hour each night (except when I do the full image which takes about 6 hours overnight) and is done while I get ready for bed. The older image disks are kept in a fireproof safe and could just as easily be put off site if one wanted to be really safe.
Tom
Tom
Mar 18, 2015 12:47:18 #
Earworms wrote:
I doubt it.
Assuming you are talking about the Q-Tips you find at the drug store and not optical grade cotton swabs, see here...
http://www.thorlabs.com/tutorials.cfm?tabID=26066
"Note: cotton-tipped applicators are NOT Q-Tips or other drugstore applicators. These are optical grade applicators that will not deposit contaminants on an optic and the applicator material (frequently cotton) is free from abrasive fibers found in drugstore applicators."
...or when talking about metal tape heads...
http://www.bobbynathan.com/key16.htm
"It may not matter as much with the guides, but Q-tips are abrasive. Rubbing too hard and in the wrong direction can scratch your heads."
...or looking at microscopes...
http://www.microscopy-uk.org.uk/mag/artfeb04/cdclean.html
"Cotton, which is a natural product, can retain small silica particles from soil, (for that reason synthetic Q-tips are suggested). Little scientific scrutiny has been applied to fibre deposition from such products, however: crude evaluation can be made by 'rubbing' a slide for each new batch of material as part of a quality control regime."
...and so on.
Feb 12, 2015 11:47:43 #
Also consider using Creatspace or one of the other book services to create a bound book of the pictures. Will probably last longer than a DVD.
Dec 26, 2014 12:44:50 #
I recently got one for the lighter weight due to back problems. Am a long-time Nikon user with the D7100 being my latest. For what I do, I'm finding the A6000 an excellent camera. I do a lot of low light shooting indoors at events at a senior center and the high ISO, even with the noise, works quite well for me. Indeed, using Lightroom luminosity settings to smooth out the noise also helps make the faces more palatable for the people I'm shooting candid shots of! Using Topaz DeNoise on top of that (or instead of that) also works well for me. The two things I miss are the ability to add longer telephoto lenses (for wildlife) as they are not available and a good manual. The manual that comes with the camera leaves out all the detail of what the various menu items do. I've found various links (posted by others in the thread) that help. As to lenses I could get an adapter to use the Nikon glass but then we're back to weight problems.
Bottom line: I'm quite happy with my purchase. It's a fine camera for many uses.
Bottom line: I'm quite happy with my purchase. It's a fine camera for many uses.
Sep 18, 2014 10:55:29 #
jerryc41 wrote:
Is there a quick way to rotate an image 90° in LR?
If you prefer the keyboard rather than mouse, use Control-SquareBracket for 90 degree increments.
Aug 1, 2014 11:15:51 #
Just for reference, 5.4 was 931,011K, 5.5 was 942,254K. So, 953,28K isn't so much bigger than before. Mine's installing now. Took about 3 min over TimeWarner Cable to get.