Ugly Hedgehog - Photography Forum
Home Active Topics Newest Pictures Search Login Register
Posts for: brucewells
Page: <<prev 1 ... 4 5 6 7 8 9 10 11 12 ... 235 next>>
Jan 22, 2019 21:20:04   #
markwilliam1 wrote:
I find it Very Useful to use the adjustment brush to change the exposure in the Develop Module of Lightroom. I shoot Raw and can use the brush to lighten (or darken) exposure in certain areas of my photos with Amazing results! Anyone else?


The auto-mask functionality of the brush is very good. If you aren’t familiar with what it does, do some reading. It’s quite powerful. The brush can give (as you say) amazing results.
Go to
Jan 22, 2019 19:02:08   #
abc1234 wrote:
Sounds like a solution in search of a problem. I suggest that you take a picture and adjust it in both LR and PS and time it. When done, ask yourself if the difference, if any, matters. I prefer the radial and linear gradient tools in LR but the shake reduction, by-pass sharpening, stamp and healing tools in PS. However, I do use LR's heading tool and adjustment brush but sometimes I need to go into PS for the better versions.

I need to get a lot of pictures out quickly than optional esoteric adjustments. No doubt PS is more powerful but for most of my work, LR does a great job. Plus, I have keywords. That being said, everyone needs to find the tools best suited for one's needs and skills.
Sounds like a solution in search of a problem. I ... (show quote)


Well stated! Thank you.
Go to
Jan 22, 2019 17:13:14   #
Blenheim Orange wrote:
UHH member Curmudgeon asked on another thread "should I crop the photo before or after I do the other pp?" I almost always crop as the last step, but it occurred to me that I wasn't sure why people crop images and that might affect how when and why they crop. I crop images for two reasons: to get a preferred aspect ratio, especially when printing an image; and to alter the composition of the image. Linda suggested a thread to explore the topic more.

Just to get the discussion started, here is my workflow, which is a little different than that used by people with Adobe software and so may be of some interest. I have been using this workflow for years and I don't think about it much. I hope this is reasonably intelligible.

I start with raw files, Canon.cr files, and the first stop is Canon's Digital Photo Professional. Typically I will make minor changes to the image there - brightness, contrast, shadows, highlights, more rarely straighten a horizon, adjust tone curves. The result then gets exported as a 16 bit TIFF file and saved in an appropriate folder. I create folders as I go through the season, that can mean 20 folders of a few hundred images each over a year.

All other work is done in a 15+ year old version of Paint Shop Pro - unsharp mask, resizing, cropping, and I also can create adjustment layers, work with masks, and use all of the various tools just as with Photoshop. Not as fancy as Photoshop, but fast, stable, easy to use, and much more affordable.

So I open the TIFF file for the image I want, and then make a copy - I'll call that copy one - to work on (edit > paste as new image) in the PSP proprietary lossless format. The raw files and the TIFF files are never altered. I close the TIFF file now and work with the PSP copy of the TIFF file. I then make a second copy with "paste as new image" - I'll call that copy two - and shrink that image 5-15%, and flood fill it with a solid color to save any confusion. I think of that as a "cropping template" and I want it to be the final size and aspect ratio for the image. I finish copy one with any processing needed - I do unsharp mask in PSP, in part because I like the unsharp mask function in PSP better than the one in DPP, and also because I don't want to sharpen images that are going to be focus stacked before they are stacked, as the stacked image will be too "crunchy."

Now I paste copy one into copy two as a new layer. This lets me move the image around in the "template" to fine tune the composition. Usually the composition is pretty close to where I want it in the original image, but on the rare occasions that a more severe crop is needed, I will shrink "copy two" more, as appropriate.

Last, "copy merged" and "paste as a new image" and then save that image - copy three - into the appropriate folder as a JPEG or TIFF, depending upon what it is going to be used for. I usually keep copy one and copy two open until I am sure I have what I want, in case I want to make any changes there. I can always go back to the TIFF if I screw it all up badly, or even go back to the raw file and make changes in export from DPP. Assuming that all went well, I close copy one and copy two without saving them.

Why crop? To improve composition, and/or to change the aspect ratio.

When? As the last step when I can concentrate solely on composition.

How? I like to put the image into a smaller "template" as a layer and then move it around until I think the composition is optimal. That way I can see what different ways to approach the composition will look like before the actual crop is done.

All of that takes me about 120 seconds per image typically, but as I write it out it looks pretty complicated. I like this method because it is so unambiguous and because it is easy to go back and start over when the inevitable screw ups or distractions happen.

Why, when, and how do you crop your images?

Mike
UHH member Curmudgeon asked on another thread &quo... (show quote)


Thanks, Mike, for your explanation of your workflow. It seems you have thought through all aspects of things. I read the thread you referenced and initially thought someone was having a difficult time with a relatively simple process, but as it turned out, I really had to think about things as I read the posts. It isn't as straightforward as it might seem.

I use Lightroom for all my crops. I will usually crop to:
- Straighten a horizon
- Change the orientation of an image (i.e. in a landscape orientation, there may be persons I want in a portrait orientation image)
- Improve a composition
- Change aspect ratio

It depends upon the reason for the crop as to when I will perform the crop. For example, if the crop is to change aspect ratio, I'll make a virtual copy of the finished image in LR and crop to the required ratio. But, in a case where I want to change the orientation of the image or straighten the horizon, I'll do it before processing. I'm not sure there's a 'one size fits all' to the process.

Thanks again!! Good subject.
Go to
Jan 22, 2019 14:31:02   #
kenievans wrote:
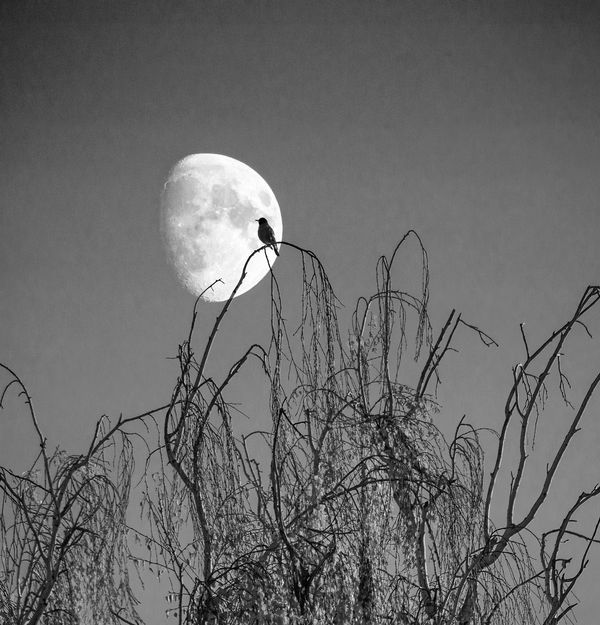
I thought with this treatment and a little cropping this would look great as the cover to an Agatha Christie novel. Its always easier to be creative in PP when you have a great photo to work with.


I like!!
Go to
Jan 22, 2019 14:26:28   #
lsimpkins wrote:
Bruce, I'm with you. I have added Auto as part of my Import on each batch of raw files. I think it does a good enough job that I can more readily decide which images to cull out and which deserve additional tweaks in LR and/or PS. The latter are my Picks that may end up in a book or printed for the wall, while the former are just deleted. Prior to Adobe's improvement of the Auto function, I had to spend more time just in the culling stage.


I'm quite surprised there are so many that do use the button. I ignored it for so many years. But, of course, it was just updated a few months ago, and it is much better. I believe your points to be spot on. Thanks for sharing!!
Go to
Jan 22, 2019 14:22:50   #
charlienow wrote:
Yes, it is a great starting point....usually make a few tweak from there...sometimes use without tweaks...i use elements 19 and start by batch processing a bunch of photos with auto...it saves a lot of time...


I think it does too, Charlie. Thanks for you viewpoint!
Go to
Jan 22, 2019 14:19:46   #
abc1234 wrote:
Bruce, you have opened a Pandora's box. I see two big issues here: the auto button and going to PS. I would like to share my experience with you. When Adobe upgraded the auto button a few months ago, it was a vast improvement over the previous version. I liked it at first but after a while I found it helped in much less than half the time. It was either way off in exposure or gave an unreal look to the shot. I now rarely use it.

Here is my development workflow. I start by adjusting exposure visually, applying +30 clarity and the medium contrast tonal range. Why the last two? Because I shoot raw with no adjustments and the shots are very flat and lifeless. The clarity and contrast bring the picture alive. Then I straighten, crop, adjust the other exposure sliders, make local adjustments, adjust the noise for high ISO pictures, vignette and then readjust the exposure as needed. If the picture needs something special, then I go into PS. I found, the hard way of course, that nailing the exposure is the best way of staying out of PS. I do about 90% of my editing in LR only. If I were interested in moving objects around or certain complicated effects, then I would spend more time in PS.

I have ranges for presets. For example, my clarity presets range from 0 to 60 in increments of 10. I have presets combine noise reduction, chromatic aberration and a lens profile. These do save a lot of time.

You mentioned you have many pictures from a family gathering. I go through the same thing but with basketball. The goal is to shoot your pictures well enough that you can stay in LR. PS is a time hog. Use only if you cannot find a way of doing it in LR. To be specific, you should explain in detail, possibly with pictures, why you think you have to use PS. Perhaps someone here can show you how you can do it in LR instead of PS.

Let me suggest one thing that is great for family shots. If you have any closeups of older people who are often self-conscious about skin lines, LR has a preset brush for softening them. Your subject will not even know you used it.
Bruce, you have opened a Pandora's box. I see two... (show quote)


I must admit, this revelation (of the AUTO button) came about as a result of my desire to spend more time in PS. I want to do that so I can learn it. A typical workflow for me right now is to start in LR, make any necessary crop, keywords, map and then hit the AUTO button. You're correct, in that, the AUTO button won't work every time, but it doesn't take long to tweak the AUTO adjustments, if need be. Then, I take the image to PS where I create a LEVELS layer to adjust the brightness, a CURVES layer to add contrast then a SATURATION layer to adjust color. From there, the image dictates what else I use, but it isn't uncommon to DODGE and BURN, each of which is on their own layer. I simply appreciate the range of adjustments that are available to me in PS, over those available in LR. I started with LR in version 3 and feel I became rather adept at using it, but it bothered me that I had PS sitting out there not being utilized. It still does, because after nearly a year of practice in PS, I still don't feel that I know it well enough. But, I do have a good starting base of knowledge that lets me venture out to try new things.

None of this should indicate that I don't use LR, for I do. When I work with my images, LR is the first app opened and it is from there that I work. And I use the sharpening tools in LR, for I believe them to be better, and some of the other LR tools (i.e. the graduated filters) just work easier than in PS.

I want to continue my quest of learning/using PS, simply for the knowledge/expertise I can gain about the tool. But, know that I appreciate your insight and your words of wisdom. You aren't wrong. It's just my different impetus involved. Thanks.
Go to
Jan 22, 2019 10:15:58   #
Thanks, Linda!! Fun stuff.


(Download)
Go to
Jan 22, 2019 09:57:48   #
IreneAC wrote:
This photo was taken in 2016 while visiting the wonderful little coastal town of Camogli (silent "g"), located on the Italian Riviera. The photo has not had any post-processing; hope you enjoy making it your own. :-)

Feel free to download this photo to your computer and edit it anyway you wish. Color shifts, composites, black and white conversions, adjustments are all good. When you are finished with the edit, post it in this thread. We will accept edits until 9pm on Thursday when we will go to voting. Thank you.
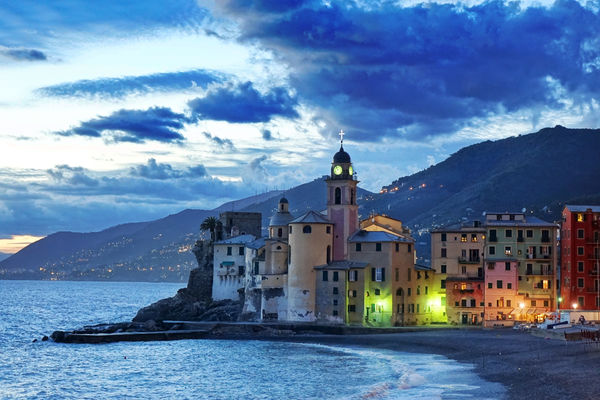
This photo was taken in 2016 while visiting the wo... (show quote)


Nice capture! Hope my processing has done it some justice. I tried to bring the buildings out a bit, for as someone else said, the buildings have some nice color. I also wanted to tone down the sky in the left half of the frame. A bit of dodging to bring some detail out of the mountain behind the buildings. A bit of dodging of the wave breaking I thought led the eye a bit. Fun stuff.


(Download)
Go to
Jan 22, 2019 07:50:40   #
melueth wrote:
Wow - great info, Bruce. I've never bothered with that, just assuming it wouldn't produce what i want, but i'll give it a go. Thanks!

Marylea


Well, that's where I had been. It was quite the revelation to me how quickly it yields good basic adjustments. Give it a try and let us know.
Go to
Jan 22, 2019 07:48:58   #
bsprague wrote:
I've been experimenting with a custom preset that uses Auto with a touch of sharping, clarity and noise reductions added.


Great idea, Bill. Let us know your results.
Go to
Jan 21, 2019 22:19:31   #
AzPicLady wrote:
I have a preset that works well. But sometimes I find myself fighting with an image. In that case, I hit "reset" and go to "auto."


It yields, what seems to be, a point we’re mostly comfortable with. Appreciate your input.
Go to
Jan 21, 2019 22:03:20   #
bsprague wrote:
I use it a lot. The code behind it was rewritten a few months ago. It went from not so good to quite useful.


I knew you work in LR, Bill. It’s good to see your endorsement of the tool. Thanks for jumping in!
Go to
Jan 21, 2019 20:57:22   #
Bunkershot wrote:
I'm in your camp Bruce. Start in LR, hit the Auto button, fine tune that adjustment, move to PS and make further changes that can't be done in LR, then back to LR for printing...


I appreciate your confirmation that I’m not way out in left field! It seems to be a great way to work. Thanks for your interest.
Go to
Jan 21, 2019 20:52:47   #
Curmudgeon wrote:
I always start with the Auto button. Scott Kelby told me to (in his book). It does not eliminate your continue pp but in my estimation it provides a good starting point.


Scott is a great resource! I typically follow him, but I missed that one. Your points are spot on! Thanks for sharing,
Go to
Page: <<prev 1 ... 4 5 6 7 8 9 10 11 12 ... 235 next>>
UglyHedgehog.com - Forum
Copyright 2011-2024 Ugly Hedgehog, Inc.