Posts for: architect
Aug 6, 2014 16:24:32 #
Violameister wrote:
Thanks for the hints. I know that if your shot were done with a camera capable of lens displacement, the resultant image would not have a bulbous patio top as your corrected image has. Is there any transform available anywhere that could properly simulate a lens shift in PP?
Photoshop's Lens Correction does the exact same geometric changes as a view camera would do. The bulbous shape of the entrance canopy in my edit is caused by being too close to the subject. It is a good example of where only a partial perspective correction might be aesthetically preferable.
Aug 6, 2014 15:52:41 #
Violameister wrote:
While I like the overall look, the purple Princess Tower in the right center still does not look properly round.
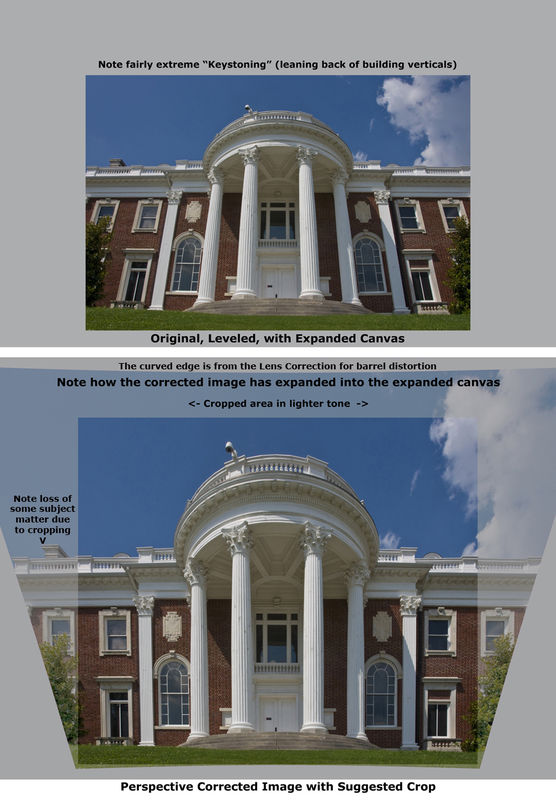
In any extreme wide angle lens shot, a circular form off to the sides will be distorted. As for different programs cropping more than others, I doubt that. Before using a Lens Correction, it is good to enlarge the canvas. That will allow the entire image to be rotated so the top does not get cut off as in some of those posted above. My example below, done with Photoshop's Lens Correction, shows why some of the image gets cropped.
Whatever program is used, it is important to first get the horizon perfectly level. In architectural subjects that is best done by making a vertical element in the CENTER of the image perfectly vertical.
The Crop tool with Perspective checked can also be used for perspective correction by moving the corners, but it will distort the height, requiring the editor to adjust the image height arbitrarily. The Lens Correction tool maintains the proper perspective.
Aug 6, 2014 11:31:32 #
R.G. wrote:
I've seen quite a few UHHers suggest that it's usually not a good idea to lose all of the perspective tilt, and I personally prefer to leave a little, even in cases where I could get rid of all of it without any unwanted consequences if I wanted to.
Your two pics are both a bit extreme, and I suggest you try to find the balance that suits your eye. And you could try a little vertical stretching to counteract the squashing that's happening to the people.
Your two pics are both a bit extreme, and I suggest you try to find the balance that suits your eye. And you could try a little vertical stretching to counteract the squashing that's happening to the people.
The original is an extreme wide angle which caused the keystone effect of the buildings leaning backwards. As an architectural photographer that would be unacceptable. Professional architectural photographers would use a view camera with a swing/tilt lens, which can make the verticals vertical, which is the way the human eye perceives them when looking at the horizon.
But as the people appear to be the subject, the original distorts them as well, as they are near the bottom edge of an extreme wide angle.
I tried correcting the perspective using Photoshop's Lens Corrections, but it requires two passes of the vertical distortion slider, which means that the quality of the image is reduced by excessive interpolation by the software.
Next time, try to keep the camera as level as possible, composing so the tops of the tallest buildings are near the top edge. That will result in excessive foreground, which can then be cropped. The resulting photo could then be perspective corrected with minimal distortion of the people or the buildings.
Aug 1, 2014 18:50:29 #
kymarto wrote:
You can also use the eyedropper to sample pixels, ... (show quote)
I am a strong believer in the KISS Principle (Keep It Simple Stupid), and this method seems to be quite simple and easy to use. As for trial and error, I would also be looking for the best creative choice of white balance, rather than the textbook perfect one. So this method works for me.
Jul 29, 2014 10:23:52 #
Dngallagher wrote:
Same here.I convert all my NEF files (raw) to DNG on import ... (show quote)
Jul 29, 2014 10:21:10 #
fjrwillie wrote:
I do a lot of traveling on my motorcycle and take... (show quote)
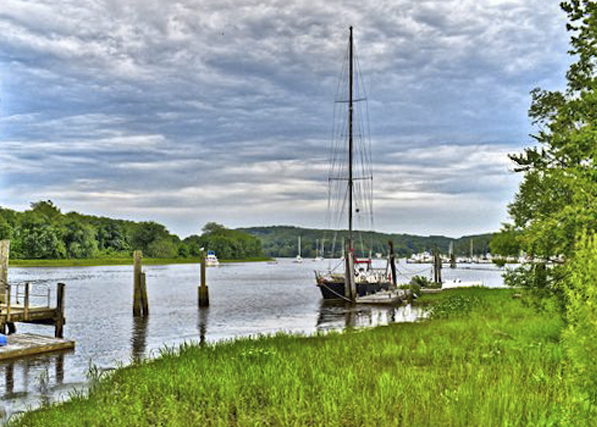
If this is your intended use of the images, then what you are doing is fine... "trying to capture it all." But if your goal is to create a well composed image, it is best, in my opinion, to eliminate elements that do not support the main subject. In this case the pole in No. 1 is distracting, and the framing elements on the left in No. 2 is too complex and is also distracting even though it is a nice framing element. Below is one possible composition based on No. 2. The suggestion above about stepping forward a bit and including more of the pier is a good one.
Jul 27, 2014 12:10:50 #
Although the left edge of No. 2 is a bit complex and distracting, it does frame the image nicely. The horizon in No. 1 looks more level, but easily corrected in No. 2. Both show halos near the edges of the trees, possibly from an attempt to Dodge the trees for more detail. No. 2 has a much more aesthetic location of the boat in the composition. Cropping a bit off the bottom might improve it as well.
Jul 26, 2014 18:33:56 #
If you can tell it is an HDR edit, it is overdone. HDR is a wonderful process if it is used to expand the dynamic range of an image in a realistic way, meaning no blown out highs in the clouds, for example, and no blocked areas in the shadows. Basically it means using all of the tonal range in the scene that cannot be captured in a single exposure. It also means that brights are bright up to the point of overexposure, not beyond, and shadows are quite dark but with still some detail.
Jul 19, 2014 11:35:02 #
For travel, it is really hard to beat the Nikon 18-200 VR lens. Fairly compact, very versatile and you can avoid changing lenses in adverse conditions. You can correct the minor distortion easily in Photoshop/ACR.
Jul 12, 2014 11:26:49 #
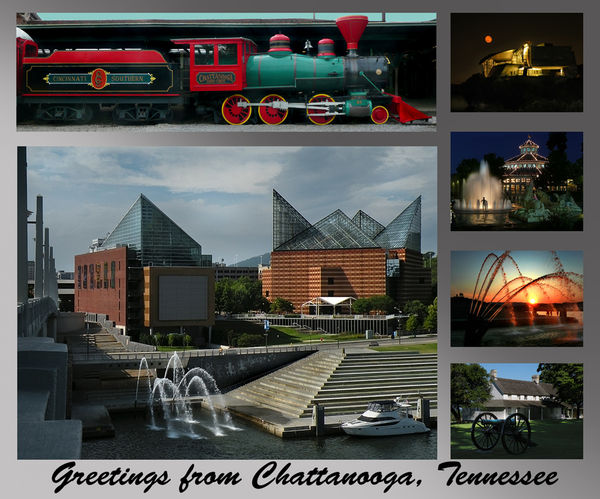
Moved to Chattanooga in 2008 from California's Bay Area. Miss the variety in California (where I lived for 67 years), but not the high cost of living or the traffic.
Jul 11, 2014 21:32:54 #
My great uncle had a 1955 Studebaker, which he was very proud of, and maintained meticulously. The Corps of Engineers used Studebaker Lark V8s in the early 60's. I used one to do a recreation survey from San Francisco to Crescent City, California, and drove the hell out of it. Raymond Loewy designed some exceptionally beautiful cars for Studebaker.
Jul 7, 2014 12:52:16 #
As I do so much architectural photography, I am a perfectionist about getting the images level. BUT, even though I use the grid in the viewfinder, 95% of my architectural images require straightening in post processing. Seems I am almost always off a degree or more. For many subjects, leveling is not important though.
Jun 30, 2014 10:08:37 #
Jun 29, 2014 16:12:35 #
OzJohn wrote:
The only thing I'd be concerned about is why this ridiculous question was asked in the first place . . .
Gee John. The question is not ridiculous, and it elicited a broad range of opinions, which is helpful, from many of us who have done some cruise trips. Are you just bored? Or just a mean old man?
Jun 23, 2014 20:32:31 #
DalerDad73 wrote:
BTW, not sure if other people have had this problem on cruise ships, but if it's really hot and humid outside and the inside of the cabin is air conditioned, the lens can fog up a bit on the inside. If youre planning on taking pics right away allow some extra time so your camera can can get to the right temp, it took mine about a half hour.
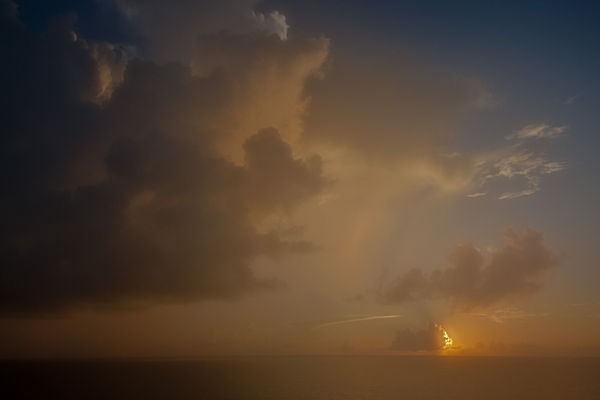
Definitely had this problem. Not only the lens fogs up but the viewfinder and internal lens surfaces too. I missed one of the most spectacular sunrises I have seen because it took about 25 minutes to clear. Solution is to keep your camera in a waterproof bag, or, as I did, put it out on the balcony at night.
Shot with fogged lens after waiting 20 minutes and missing the best part