Posts for: abc1234
Nov 19, 2011 08:58:20 #
You need a lens with an infinitely small aperture, a camera with a infinitely fast shutter and processor that removes all noise. In other words, you have to defy the laws of physics.
Perhaps more than any other kind of shot, close-ups bring you close up to the limitations of photography. To get the flower and background in focus, you need a very small f-stop due to the closeness of the flower. Even if you can get adequate depth-of-field, the shutter will be slow risking camera and subject movement. Hence, motion may offset sharpness. If you crank up the ISO, you crank up the noise too. The long and short of it is that probably no single click of the shutter will get all you want.
Time to compromise. Settle for depth-of-field or no moving flowers. Or shoot more than one picture, hoping the breeze does not move the flower and you keep the camera in the identical spot, and do a composite in an editing program.
Perhaps someone has a more promising answer than this.
Good luck.
Nov 19, 2011 08:44:37 #
There are also data recovery services. Seagate has one.
Nov 19, 2011 07:19:54 #
I have similar equipment and experienced the same problem with both the Canon Elan II, Digital Rebel and 60D with two of their flashes. I suspect they designed or manufactured the equipment with this problem built-in. However, in my case, it happens when the flash is on the camera. I rarely take it off.
Try Googling the problem.
Try Googling the problem.
Nov 19, 2011 07:07:11 #
silver wrote:
HDR is very over rated. So many people think that HDR is the perfect way for presenting there images. The answer is to be a better photographer and learn how to use light properly. Dont lean on digital effects to improve your images. Learn to shoot your images properly and there will not be a need for image manipulation in post.
Like most other absolute statements, this one a patently false.
I do not care how well you shoot, sooner or later, you will need to tweak even the best shot photo. Cameras have technical limitations and photographers can miss something when shooting or change their minds about how they want the final picture to look. An exception might be the highly staged photographs of a by-gone era when photographers had whole crews to adjust scenes, lighting, subjects (human and otherwise) to get that "perfect" negative. And I am sure they still manipulated it in the darkroom. In this brave new world, those of you who never heard of "darkroom" should Google it. Examples of this "perfect" photography are anything from Kodak, Hollywood publicity shots and O Winston Link, http://www.linkmuseum.org/.
Only a "purist" might eschew manipulation. He is either a naive or too lazy to learn and use an editor. Photojournalists and documentarians are exceptions to this.
I do agree that touching up is not an excuse or not learning the craft and taking bad photos.
Happy shooting....
Nov 18, 2011 13:48:12 #
Negative. Right now, we have 40 mph winds and I would shoot with both a tripod and image stabilization. However, in general, one or the other.
Nov 18, 2011 07:21:21 #
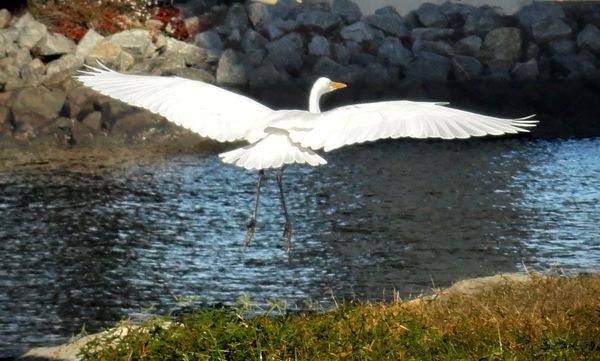
PNagy wrote:
Try using the shadow/highlight option in Photoshop... (show quote)
I decided to give a try to. I did a lot of masking but my result is essentially the same as Pnagy's. The main conclusion is that the file lacks a lot of information to do justice to the bird. By time you dial up the detail, you are blowing out the highlights. What works in both our versions is to create drama by increasing contrast and tonal range. As a result, the bird pops out from the background and this alone is an improvement over the original.
Two lessons learned here: get the right exposure (hard to do in a shot like this, the bird is not going to freeze in mid-air) and work the shot in post-process.
Nov 18, 2011 06:24:25 #
Arnold, those are certainly excellent examples of HDR. Free of that over-cooked look that seems to be so much in vogue and being passed of as art. I am not a fan of HDR for that reason but your pictures show me great possibilities.
I do not want to burst your bubble but please help me with this. Could you have had similar quality with conventional masking and adjusting methods? At what point to you switch from ordinary fixing to HDR? Are you using raw or jpg? How many exposures are you using? How do you bracket them? I would like to see a tutorial on how you work your magic.
On an unrelated matter, I think (right or wrong) that Photoshop is the gold standard for photo editing. There are so many alternatives out there. Whole programs as well as plug-ins. The others have their unique user interfaces (just about anything is better than PS) and many of them are more intuitive than PS. You have to learn PS's way of doing things. The others seem to have learned how you want to do things. A more agreeable situation. My question is whether the underlying math differs a little or a lot from one package to another. Anyone know?
Nov 18, 2011 06:04:06 #
This is not a white balance problem. Strictly an exposure issue. Follow people's advice and stop down. Unless your camera displays a histogram, you will have to bracket and hope you are lucky. Now, the next problem is getting that bird to stand still while you fiddle with your camera.
Here is the bad news. Once you learn more about your camera, you will want a camera that saves as raw, displays a histogram and will shoot bracketed pictures rapidly and automatically. What is bad about this? $$$$$
The other challenge is to learn a photo editing program. You might be able to see the details upon proper editing. Mask the bird and to see if you can bring out any detail without killing the background. If you post the original file, I am sure some here will give it a try.
Good luck.
Nov 18, 2011 05:47:58 #
Rangerfan, when you say the lens is not sharp, is that looking at the picture on a computer monitor or print?
I would test it by putting it on a tripod and shooting a newspaper taped to the wall at various focal lengths and apertures.
I would test it by putting it on a tripod and shooting a newspaper taped to the wall at various focal lengths and apertures.
Nov 18, 2011 04:36:59 #
lleach wrote:
Hi, Folks br br I'd appreciate help to clarify so... (show quote)
Here is what I meant when setting white/color balance and exposure are science. Science is about measuring things. You can measure color temperature and tint and you can measure how much lightness a scene has. You can use that information to describe what the camera and you see. And, of course, you can override that information later as you reinterpret what you want in the final picture. Art trumps science here.
Composition? You cannot measure composition. It is not science, it is art. All you can do is compare it to your own personal esthetic or to the community's rules for composing.
You can have a "perfect" picture scientifically but it can still be as boring as a weedy lawn in August. And you can have a great looking picture but unable to see what is lurching in the shadows or with a sickly yellow-green cast to the white clouds.
As for white balance versus color balance, I have been using the terms loosely and interchangeably. I do not know if that is correct. To me, white balance is setting color temperature and tint so that if the shot has white in it, your final presentation of it will also have the same white. Once you do that, the colors will fall in line and be free of any cast. For me, that is color balance.
I will be glad to learn if this is wrong and what the accepted definitions of these terms are.
Nov 17, 2011 08:32:25 #
TNGator wrote:
Great points ABC....thanks for your insights. At this point, I'm thinking of going with Adobe Elements 10 and then adding a couple of Topaz items as I get further into it.
You are welcome. One word of caution. By time you add those plug-ins, you may up to the price of PS.
I have only one plug-in: Viveza 2. Sometimes it is better than PS, sometimes not. Consequently, I use both PS and Viveza to tweak my pictures. When it is better, it simplifies the steps but does have its limitations. I guess if I spent enough time mastering PS, I would not need Viveza. The end result is pretty much the same either way; it is the journey that is different.
Another benefit of plug-in's is that the presets give you hard-to-create effects in fewer steps. However, I prefer not to add special effects. I usually prefer sharp images with vibrant colors, a little more contrast and saturation/warmth and a nice tonal range. And a lot of local fixing. Old-fashioned. All I need for that is PS and Viviza. I find the PS tools adequate for what I do though they are not the most intuitive or easiest to use.
Before you stock up on plug-in's, scour the Internet for how-to-do's, tutorials and the like. Or post your pictures here and see how others edit them. Here are a few links I like.
http://russellbrown.com/tips_tech.html
Scott Kelby
http://infiniteskills.com/blog/category/adobe-photoshop-cs5/
http://www.good-tutorials.com/
Good luck.
Nov 17, 2011 06:26:00 #
The problem with all this is that learning any program takes so much time. And figure the more you spend on the program, the more time you need to learn it. And then you go thru a second round of spending by buying plug-in's and upgrades.
What happens in reality? After having invested all that money and time, we are reluctant to go thru that same exercise again. I, for one, prefer to learn one program to make better pictures than to be chasing for ideal program, camera, lens....
Start off by deciding how much you can afford (not how much you want to spend), how involved you want to get in fixing pictures, what you are going to do with your pictures, and do a little research about programs. I am not a big fan of free trials because I need more time to figure out the program than the free period allows. Look for a program with a lot of free support such as on-line tutorials and support groups. Or take a class.
Good luck.
Nov 17, 2011 06:07:38 #
You can always make a good picture worse but you cannot always make a bad picture better.
And, yes, white balance matters.
Start with a reasonably good file/negative and then do as you please. Part of my definition of "reasonably good" is being faithful to the scene. This means an accurate color balance because we will not remember how the shot looked. Getting an accurate white point is not that hard to do and avoids the nasty business of eliminating unpleasant color casts later. Generally, you only have to do this once, at the beginning of a session.
Next, try to get a good composition. You have only one chance at that. Photoshop can fudge the result only just so much (or little).
And finally, have the camera collect as much information as it can and this information used to be stored on film. Today, a computer file on a storage medium saves the information. Raw collects more information than jpg.
Think of these steps as SAS: science, art, science. The great thing about digital is that the two science steps are now relatively trivial and second nature allowing you to concentrate on the art, the fun part of this whole thing.
Once you do these three things, use the editing software to make the picture you really want.
In my world, what all this means is 1.) set the color balance rationally; 2.) compose and shoot; 3.) look at the histogram and adjust exposure as appropriate for a possible repeat shot.
Nov 16, 2011 22:51:34 #
pspix2007 wrote:
quote=abc1234 No global adjustment will fix this ... (show quote)
Do not despair. Photoshop is difficult to learn. As I said, the picture has highlights that just are too bright for a simple, global adjustment. A good starting point is to print out the original, sit down with it and a pencil to circle what you do not light and what has to be done. In PS, mask off the areas that need fixing and apply simple adjustments like brightness to them. If you are not sure of what is wrong or how to fix it, ask someone for help. And take notes.
It does not matter how the camera was set or if the file was raw or jpg. You have to have a sense of what you like about a photograph, view it on the camera, and change the exposure until that looks right. You had a bad lighting day here: very bright light and shadows. If the highlights had been exposed properly, then you would have lost the rest of the faces in the shadows.
Good luck and do not give up.
Nov 15, 2011 22:25:36 #
cgchief wrote:
Gradient Map, in the Adjustment panel, is what I would try.
I forgot that detail. I used a gradient on the masked grass background. A very useful tool.