Check out Film Photography section of our forum.
Need help for overexposed photo
Nov 14, 2011 06:09:52 #
pspix2007
Loc: Illinois
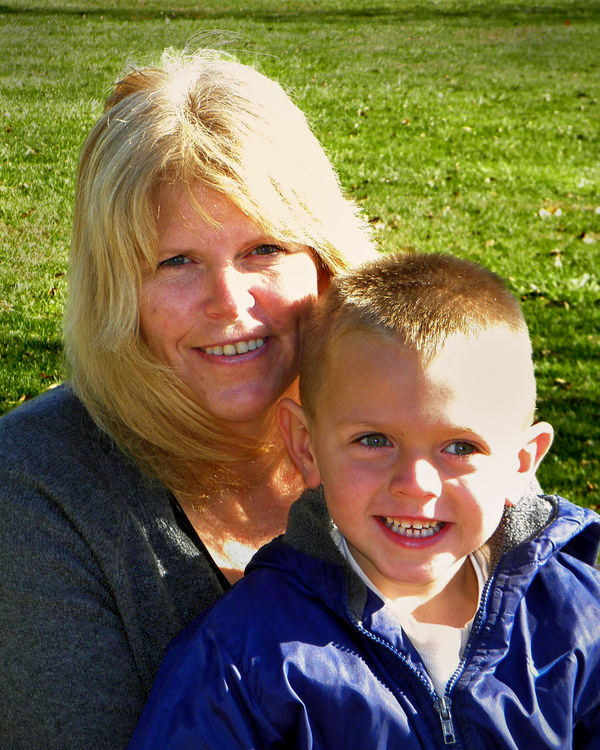
Hi! I have a picture I would like to fix, but have not been able to. It was taken in bright sunlight and the people look washed out. If I darken it, the rest of the picture looks bad. I have looked at tutorials and tried adjusting things in CS5 and Elements, but I cannot make it look good. Any suggestions?

Nov 14, 2011 06:16:41 #
Nov 14, 2011 06:59:59 #
Check out True Macro-Photography Forum section of our forum.
Nov 14, 2011 07:22:02 #
Happyshack
Loc: Loveland Ohio
Its very hard to get the over exposed parts of a JPG fixed. These photos are stripped of many pixels due to the compression. So when you try to adjust the exposure there are less pixels to work with. RAW files have all the pixels so its easier to correct these types of photos. I was shooting in JPG until a couple months ago. I switched to RAW and will never go back. I am just an amateur but I am particular about being able to adjust my photos to make them look there best. I just started using Lightroom 3 and love it. Sorry, I know this won't bring you photo back to the way you desire. Its a learning curve and can be quit confusing. I just google the topics I want to learn about and read, read ,read. :)
Nov 14, 2011 07:45:44 #
pspix2007
Loc: Illinois
I have never had a camera capable of shooting in RAW mode...maybe next year :) I am currently in an image editing class. I love it! I am no where near professional, but I love to take pictures and know my way around Photoshop. It has been a passion of mine for years. I would love to take some photography classes, but they are not offered in my online courses.
Nov 15, 2011 08:15:27 #

No global adjustment will fix this to your liking. I turned to Photoshop to make a number of local adjustments. I masked off the background to tone it done. I then made numerous local adjustments of brightness and warmth using Viveza. Finally, some vignetting helped focus the viewer on the kids.
This is a mere start. Others with a better knowledge of PS can make this look like a million dollars.
Digital photography is like film photography. The camera is only a starting point. The darkroom/computer is what really makes the picture.
Good luck.
This is a mere start. Others with a better knowledge of PS can make this look like a million dollars.
Digital photography is like film photography. The camera is only a starting point. The darkroom/computer is what really makes the picture.
Good luck.
Nov 15, 2011 22:14:21 #
Nov 15, 2011 22:25:36 #
cgchief wrote:
Gradient Map, in the Adjustment panel, is what I would try.
I forgot that detail. I used a gradient on the masked grass background. A very useful tool.
Nov 15, 2011 23:13:10 #
Without anything in the over exposed areas, as mentioned by others it's not easy. Something has to be there to work with.
In Photoshop Elements, I goofed around with the healing tool. (It turned out like I really was goofing around too!)
In Photoshop Elements, I goofed around with the healing tool. (It turned out like I really was goofing around too!)
Nov 15, 2011 23:14:11 #
GENorkus wrote:
Without anything in the over exposed areas, as mentioned by others it's not easy. Something has to be there to work with.
In Photoshop Elements, I goofed around with the healing tool. (It turned out like I really was goofing around too!)
In Photoshop Elements, I goofed around with the healing tool. (It turned out like I really was goofing around too!)
With the shadows, it looks sort-of like they were under the "Yum-Yum Tree" LoL

Nov 16, 2011 00:12:26 #


Check out Professional and Advanced Portraiture section of our forum.
Nov 16, 2011 04:10:45 #
pspix2007
Loc: Illinois
abc1234 wrote:
No global adjustment will fix this to your liking.... (show quote)
I have tried several adjustments, but nothing seems to work. I am taking a digital imaging class and right now am using CS5...at least till the trial period is up! Then it is back to Elements 5 and learning GIMP! I just really wanted to make this picture look good for her! She likes it the way it is just fine....I will keep thinking about it and trying different things! Thank you!
Nov 16, 2011 22:51:34 #
pspix2007 wrote:
quote=abc1234 No global adjustment will fix this ... (show quote)
Do not despair. Photoshop is difficult to learn. As I said, the picture has highlights that just are too bright for a simple, global adjustment. A good starting point is to print out the original, sit down with it and a pencil to circle what you do not light and what has to be done. In PS, mask off the areas that need fixing and apply simple adjustments like brightness to them. If you are not sure of what is wrong or how to fix it, ask someone for help. And take notes.
It does not matter how the camera was set or if the file was raw or jpg. You have to have a sense of what you like about a photograph, view it on the camera, and change the exposure until that looks right. You had a bad lighting day here: very bright light and shadows. If the highlights had been exposed properly, then you would have lost the rest of the faces in the shadows.
Good luck and do not give up.
If you want to reply, then register here. Registration is free and your account is created instantly, so you can post right away.
Check out Professional and Advanced Portraiture section of our forum.