Check out Digital Artistry section of our forum.
Posts for: sjb3
Sep 28, 2020 11:17:42 #
It sometimes seems like the only descriptive words in the English language these days are "awesome" and "amazing".
Sep 26, 2020 22:20:12 #
Sep 15, 2020 16:58:05 #
Xume Magnetic Filter Holders (Here's a blurb from their site):
"The Xume [pronounced "Zoom"] Filter Holder is a precision-machined metal ring that attaches to any circular screw-in filter to provide instant and secure attachment to lenses when a Xume Lens Adapter is installed on the lens itself. NdFeB Rare Earth magnets are integrated within the lens adapter to attract the filter holder and provide a strong, but easy to remove, connection. By using magnets to attach the filters, changing them goes much more quickly and eliminates the chance of cross-threading or jamming. The ring is approximately the same thickness as most step-rings and should not cause vignetting on most lenses."
I use them myself, though I wasn't having trouble with filters falling off; in my case they sometimes didn't want to come off without a fight, and a couple of times got thoroughly cross-threaded.
Check out Software and Computer Support for Photographers section of our forum.
Sep 15, 2020 16:23:06 #
Bobspez wrote:
I don't know much about stabilization rigs. I can't get level, shake free video without a tripod. But congratulations on the upgrade to the Lumix FZ1000. That is a great camera. The one inch sensor will give great results on video and still pics. Shooting 4K video will be very sharp. That camera also has built in stabilization and I believe you should have full control over over all settings for video and stills if you desire as well as auto modes. Also great continuous autofocus for video.
I completely agree; in researching this camera, all the points you mentioned (and more) were stated numerous times by a variety of reviewers at many different places on the web; the most persuasive was a man named Graham Houghton who had nothing but good to say about it and provided some excellent tutorials). The ability to control all settings in what Lumix calls "Creative Video Mode" is what got me to place the order. I got my FZ1000 for a good price at B&H, and they threw in a Ruggard bag and 32-gig SD card.
As for the stabo rig, I'm building it mostly to pass the time while being stuck in the house; it could quite possibly act like a tripod does when a camera with good built-in stabilization is mounted: interfere with the stabilization, especially when panning. If I notice that when I eventually start using my homemade rig, I'll treat it the same as I would a tripod and simply turn off in-camera stabilization.
Sep 15, 2020 01:01:26 #
I am assuming that the folks who subscribe to this part of the UHH forum dedicated to video have heard of Scott Eggleston, better known as the Frugal Filmmaker. He was the guy who got an idea for a "two-handed stabilizer rig" (as he called it in the July 2010 video he made about it).
https://www.youtube.com/watch?v=qZtlSVgG1h8&feature=emb_logo
I built my first one of these rigs about 4 years ago, following Scott's instructions as given in that original video. I'd always had a difficult time when hand-holding my bridge camera (Fuji S1), trying to produce a straight, smooth video; it never seemed to come out right, but when I saw him using that homemade rig I knew right away that it was well worth trying. Admittedly it wasn't very stylish (of course it wasn't meant to be) but one thing that was always something of a minor annoyance was the spring-loaded bolt that you mounted the camera on after first turning the rig on its side and then using a flat-tip screwdriver to secure it.
Over the years there've been a number of re-designs of the original by many different folks, and even the FigRig started showing up as a pvc-pipe construct (in an octogon) but all the versions of both that I saw had the camera still being mounted that same way: with a screwdriver. Heck, in some the bolt was fixed rigidly in place and the camera was screwed onto it; clumsy arrangement at best. I thought back to (and then watched) Scott Eggleston's original video. Right at the beginning of the video, on the very first rig (which didn't look anything like what he ultimately made and demonstrated) he had a small tripod head with a panning arm that the camera was mounted on, almost certainly with a quick-release plate.
Which leads to what I'm writing this post for (finally!). I did some minor surgery on my current Frugal Rig, one which has some modifications in the frame which I learned from watching a German video that was very well-illustrated. I'd also taken pains to size this one specifically for the Fuji S1, to allow me to reach the zoom button and to keep the opened LCD screen unobstructed.
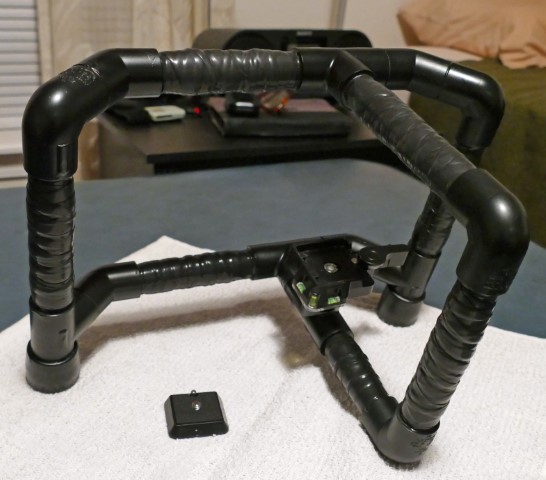
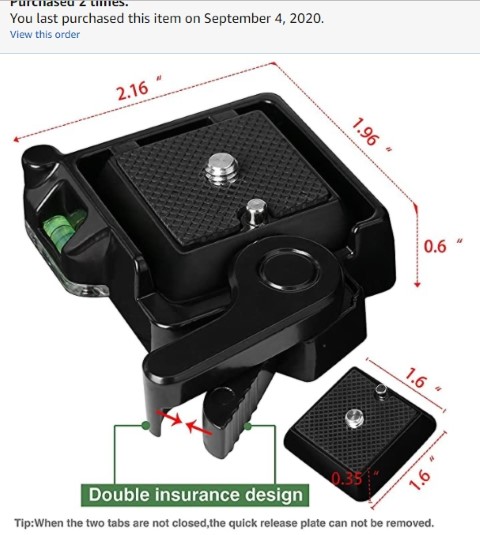
I cut off the end of the pvc cap and pulled out the old bolt & spring, then substituted a slightly shorter bolt minus the spring back through the bottom of the Tee. It stuck up out of the Tee just far enough to enable me to permanently attach the base of the Tripod head/quick-release plate I'd found on Amazon; I had enough length to put a steel sandwiched to a rubber fender washer between the Tee and base plate. I mixed and applied some epoxy down in the inside bottom of the Tee and some more on the threads of the bolt going into the base plate, then tightened it gently but firmly and let the whole works cure for 24 hours.
Link to Plate I found: https://www.amazon.com/gp/product/B07411HRF6/ref=ppx_yo_dt_b_asin_title_o03_s00?ie=UTF8&psc=1
I ended up with a good solid platform; the end of the bolt was flush with the inside of the base plate, ready to receive the quick-release plate as attached to the camera, which fit perfectly and was a breeze to install on the rig. You can see the results.
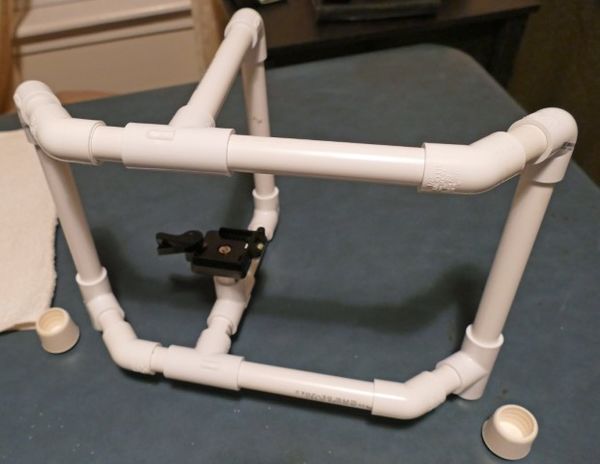
I've recently acquired a Lumix DSC-FZ1000, which does really good video, so I want to make a stabo-rig for it, too. While cutting the pieces I decided it would be nice to show an in-progress view in case anybody here wants to make one. I am doing the camera mount part with the same Konsait brand tripod head/quick-release plate as before, only with my own take on how to integrate it into the frame of the rig. Sorry for being so long-winded; it's been hard for me to get enthusiastic about much of anything for a long time now, but on this I'm feeling a lot better. Anyone who in fact would like to make one of these (I made my own version of the octagonal FigRig, too) is cordially invited to PM for any info you might want.
https://www.youtube.com/watch?v=qZtlSVgG1h8&feature=emb_logo
I built my first one of these rigs about 4 years ago, following Scott's instructions as given in that original video. I'd always had a difficult time when hand-holding my bridge camera (Fuji S1), trying to produce a straight, smooth video; it never seemed to come out right, but when I saw him using that homemade rig I knew right away that it was well worth trying. Admittedly it wasn't very stylish (of course it wasn't meant to be) but one thing that was always something of a minor annoyance was the spring-loaded bolt that you mounted the camera on after first turning the rig on its side and then using a flat-tip screwdriver to secure it.
Over the years there've been a number of re-designs of the original by many different folks, and even the FigRig started showing up as a pvc-pipe construct (in an octogon) but all the versions of both that I saw had the camera still being mounted that same way: with a screwdriver. Heck, in some the bolt was fixed rigidly in place and the camera was screwed onto it; clumsy arrangement at best. I thought back to (and then watched) Scott Eggleston's original video. Right at the beginning of the video, on the very first rig (which didn't look anything like what he ultimately made and demonstrated) he had a small tripod head with a panning arm that the camera was mounted on, almost certainly with a quick-release plate.
Which leads to what I'm writing this post for (finally!). I did some minor surgery on my current Frugal Rig, one which has some modifications in the frame which I learned from watching a German video that was very well-illustrated. I'd also taken pains to size this one specifically for the Fuji S1, to allow me to reach the zoom button and to keep the opened LCD screen unobstructed.
I cut off the end of the pvc cap and pulled out the old bolt & spring, then substituted a slightly shorter bolt minus the spring back through the bottom of the Tee. It stuck up out of the Tee just far enough to enable me to permanently attach the base of the Tripod head/quick-release plate I'd found on Amazon; I had enough length to put a steel sandwiched to a rubber fender washer between the Tee and base plate. I mixed and applied some epoxy down in the inside bottom of the Tee and some more on the threads of the bolt going into the base plate, then tightened it gently but firmly and let the whole works cure for 24 hours.
Link to Plate I found: https://www.amazon.com/gp/product/B07411HRF6/ref=ppx_yo_dt_b_asin_title_o03_s00?ie=UTF8&psc=1
I ended up with a good solid platform; the end of the bolt was flush with the inside of the base plate, ready to receive the quick-release plate as attached to the camera, which fit perfectly and was a breeze to install on the rig. You can see the results.
I've recently acquired a Lumix DSC-FZ1000, which does really good video, so I want to make a stabo-rig for it, too. While cutting the pieces I decided it would be nice to show an in-progress view in case anybody here wants to make one. I am doing the camera mount part with the same Konsait brand tripod head/quick-release plate as before, only with my own take on how to integrate it into the frame of the rig. Sorry for being so long-winded; it's been hard for me to get enthusiastic about much of anything for a long time now, but on this I'm feeling a lot better. Anyone who in fact would like to make one of these (I made my own version of the octagonal FigRig, too) is cordially invited to PM for any info you might want.
Fuji S1 Rig with QR plate removed
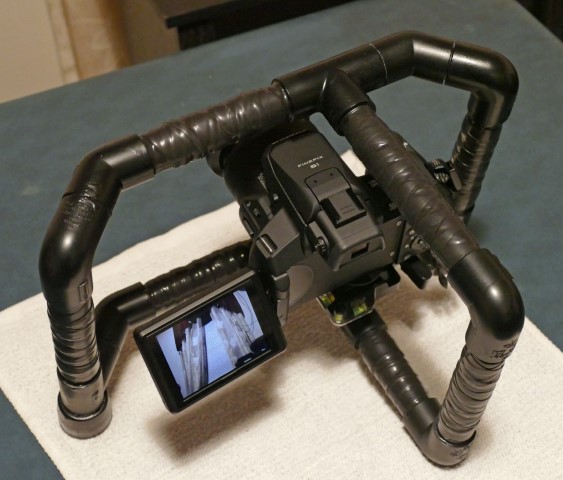
Fuji S1 attached to rig with QR plate
Stabo Rig for Lumix FZ1000 under construction; pieces cut to size and loosely put together. It will be identical to the Fuji Rig except for being an inch taller.
Closeup of the Lumix camera mount w/tripod head/QR. Shown upside down. I will use epoxy to fix internal components in place but will not install onto the stabo-rig frame until fully cured. Aftrewards, the QR plate will be the only removeable part.
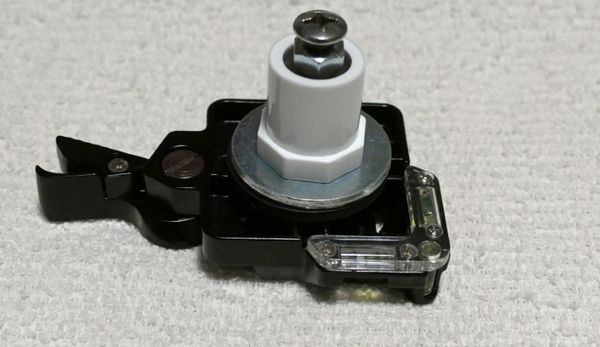
Closeup view of the Tripod Head/QR PLate used in all my Stabilizing Rigs (Fuji S1, Lumix FZ1000 and General-use FigRig
Sep 11, 2020 16:22:25 #
ecblackiii wrote:
Nonsense! The President does not carry the "codes" on his person. They are contained in a special briefcase carried by a military aide who accompanies the President. The "codes" could not possibly fit into a coat pocket, even if one tries.
I agree. The aide is usually an Army CW3 or 4 Warrant Officer who never lets that briefcase (known as the "Football") out of his sight or possession.
Sep 6, 2020 21:06:14 #
I've had my ups & downs over the years with disc burners and the software to use them, but I have a very good thing going with the Verbatim exterior burner I bought last year that functions even better with BurnAware Premium ($19.95 and worth every penny, with free lifetime upgrades) burner software. Produces perfect blu-ray, DVD & Cds formatted for data, music, video, multi-media, etc. You can even burn an .Iso image to disk. I haven't begun to list what BurnAware can do, quickly and efficiently, and for an excellent price. There's a fully operational free version available to try it out.
Check out Software and Computer Support for Photographers section of our forum.
Aug 24, 2020 19:46:11 #
Rusty69 wrote:
https://www.boredpanda.com/ups-drivers-meets-animals-dogs/?utm_source=google&utm_medium=organic&utm_campaign=organic
Sorry you have to do some scrolling to get the whole picture, but it is worth the time. What's your favourite?
Sorry you have to do some scrolling to get the whole picture, but it is worth the time. What's your favourite?
You're definitely right about it being worth the time; thanks very much for posting something guaranteed to put just about anyone into a happy frame of mind (and it sure worked that way for me!).
At the end of the list as presented in the link, there was another link that takes you to the original, full-length post which contained a total of 110 images. Number 42 caught my eye and immediately reminded me of a meme I saw at least 5 years ago. Couldn't resist trying an update.

Aug 13, 2020 10:40:55 #
[quote=kymarto]My guess is that the camera is varying ISO.
Good call! Thanks very much. You are exactly right, right down the line. When I did my little test shooting session, switching between manual and auto, with and without that ND64 filter attached, I hadn't even messed with ISO. I always shot mainly outdoors; years ago I'd just set the ISO to 200 and forgot about it.
According to the owner's manual, in the Fuji S1, available ISO adjustments are shown as the first item in each of the Shooting Menus, with a separate menu for each position of the Mode Dial. With the mode dial at M, ISO is also a completely manual function, allowing one to set it from 100 up 12800 (with the appropriate warning that photos will most likely be grainy and of low quality at these really high settings).
In Full Auto mode, ISO is greyed out in the shooting menu, which tallies with your assessment that the camera, in Auto setting at least, will adjust aperture, shutter and ISO as needed for the lighting conditions.
With A, S and P mode there are manual ISO settings allowed from 100 to 12800, but also AUTO settings: 400 max, 800 max, 1600 max and 3200max. I didn't use any of these Mode Dial positions during the test.
The camera has a fixed optical superzoom (50x) lens but it was not zoomed out at any time during the shoot, so the available aperture range was from wide-open f/ 2.8 to all-the-way-stopped-down f/ 11. I did the light-to-dark test in Manual and Auto modes, filter on and off, same shutter & aperture in manual as in the test, and as you predicted, the camera adjusted exposure immediately in each case.
I fully understand about how that happened in Auto, but I'm not quite grasping how it happened in manual since there's no provision for auto ISO adjustment in that Mode Dial setting. Yet the camera acted exactly the same way going from bright light to dark both with filter mounted and without.
Anyway, all my long-winded (sorry) verbiage aside, in the end I'm still satisfied that the video function is just a push-button, on/off function, with no real creativity possible, though I'll probably continue to experiment with ND filters since the test video did show at least some difference with and without them. Thanks again for your interest and valuable information.
Aug 12, 2020 21:25:28 #
When I started the first thread, the last word on it was that I was convinced that my camera's video function was in fact full auto, though I was also pretty sure the sensor's reading could be affected if there was a Neutral Density filter on the lens. I'd made some test footage doing that, but it was sloppy and disorganized, so this afternoon I did it over, so to speak, shooting about 10 minutes of footage which I then trimmed down and organized into a sequence. It was about 5 in the afternoon and still very sunny & bright.
There are a total of four 45-second clips , each with a title bar at the start; I edited them in Premiere Elements and made a single 3-minute long video. I started out shooting in Manual with the shutter set to 1/125th to match the camera's default 60 fps for Full HD 1920x1080, and the aperture wide open at f/ 2.8. Since the day was so bright (and I started out facing West) the footage should have been overexposed with completely blown-out highlights, and the exposure meter was in fact pegged at the far right up against the + sign.
The next was with the Mode Dial set to Auto. The 3rd one was back to Manual, same shutter & aperture, only this time I had a 6-stop ND64 filter attached. The exposure meter wasn't pegged at the blown-out side anymore. I didn't fiddle with the setting because I wanted to stick with the test settings (wasn't looking to take a photograph!) The last clip was in Auto, with the ND64 filter still attached.
Looking at the finished clip, I still think the video function is fully automatic, irrespective of the Mode Dial setting, but the sensor's perception of the scene is affected when it's looking through an ND filter. Comments and opinions solicited; thanks!
Here's the YouTube Link: https://www.youtube.com/watch?v=fiOIcH96Ee4&t=37s
Aug 8, 2020 15:11:44 #
At 50 percent slomo it kind of dragged, but looked and sounded pretty cool at 75 percent!
Check out Printers and Color Printing Forum section of our forum.
Aug 7, 2020 20:17:44 #
Bobspez wrote:
Great video. I also viewed it at 1/2 speed on youtube and liked it even better with the video and music at half speed.
I gotta try that; in fact, I think I'll do it right now! Thanks much for your interest!
Aug 7, 2020 20:09:06 #
Bobspez wrote:
Does the camera let you shoot video in manual mode?
Thanks much for your interest; I can say for positive sure that the video function on the Fuji Finepix S1 is fully automatic, setting (and adjusting) the aperture & shutter speed according to how it sees the scene, although I can affect that scene by making the camera see it a bit darker by mounting various strengths of ND filters. I'm also pretty sure that changing the ISO would affect video too.
I made some test footage, the same subject and shooting time for each situation: first with no filter, just pressed the video button and started shooting. I moved the mode dial to different positions, though I was in fact most interested in what would happen when I was in Manual. I set a number of Aperture/Shutter speed combinations, some of which would have seriously under- or over-exposed the footage. Made no difference, the footage was all perfect no matter what I dialed in.
It was when I started using ND filters that things were different. I used ND 4, 8 and the whopping 6-stop ND 64. I realize that since I can't do any real input, using these filters calls for a fair amount of guesswork, at least until I've gotten familiar with what works and what doesn't, according to lighting conditions and the filter I'm using.
If I sound like I'm complaining, I'm not; the only reason I started checking into all this was I wanted to produce motion blur in my video footage. I may still be able to do that, at least sometimes, and the camera itself is a gem; it does so many other things very well. I wouldn't think of replacing it.
Aug 7, 2020 10:22:04 #
Thanks for your nice review! I am pretty much stuck at home due to my wife's health so I can't get out often or for very long when I do, but I'll try to make some more of these little videos. The GoPro is certainly not limited to folks who like to skydive with one clamped to their head or ride a 20-foot wave with one attached to their surfboard (there's [i]plenty[i/] of those on YouTube). You can have a lot of fun with it simply mounted on your car's dashboard like I did, and it's great for vlogging, though I'm not into that myself.
BTW, I got my Hero 7 Black (which is actually exponentially better than the Hero 5 in terms of capability) just last month for almost 60 percent less than the initial price when it first came out in September of '18--from $399 to $239 (I ordered it thru Adorama Camera, a great company). I keep the 5 for mounting on tripods and such (like dashboards!); the 7, with its Hypersmooth stability, is for handheld shooting.
BTW, I got my Hero 7 Black (which is actually exponentially better than the Hero 5 in terms of capability) just last month for almost 60 percent less than the initial price when it first came out in September of '18--from $399 to $239 (I ordered it thru Adorama Camera, a great company). I keep the 5 for mounting on tripods and such (like dashboards!); the 7, with its Hypersmooth stability, is for handheld shooting.
Aug 6, 2020 11:55:42 #
About a month ago I mounted one of my GoPro cameras (a Hero 5 Black) on the Subaru's dash to do a drivelapse video; the only other one I tried was 3 years ago, and it had no audio track (which all timelapse stuff needs) since at the time I didn't have any idea how to add a separate audio track that wasn't part of the original footage.
So I set up the little camera and drove to the store and back, stopping for gas on the way back and recording footage all the time the car was actually moving. I recently moved up to Adobe Premiere Elements 2020 and did the post-process work there, this time (having a bit more know-how) sucessfully adding a fast-paced music track, itself a minute & 50 seconds long, cutting it down to fit my 54-second video and placing it so it didn't start playing until the 5-second title block passed. I got the music from YouTube's free audio library. I posted to my still-very-small-channel. Here's the link, please let me know what you think. Thanks!
https://www.youtube.com/watch?v=thBA3fGRAnk
Check out Travel Photography - Tips and More section of our forum.