Posts for: rond-photography
Apr 18, 2019 09:15:29 #
Tom DePuy wrote:
My son who is a truck driver sent me these photos he took while near the Badlands...
These were taken with his Pixel2 phone.
These were taken with his Pixel2 phone.
Once again proving that subject, lighting, and composition are more important than the tool used.
Apr 18, 2019 09:01:57 #
E.L.. Shapiro wrote:
Perspective control in post processing can somewhat correct what was done with view camera image management techniques or tilting of the enlarger easel.
Attached is a quick edit.
Attached is a quick edit.
In LightRoom, you use the "Upright" tool under the "Transform" tab. Uncorrected vertical perspective bothers the heck out of me. Often, the first adjustment I make is the vertical correction. "AUTO" works very well in "upright". When taking the picture, use a slightly wider angle lens than you might normally because you will lose part of the image to cropping.
My Olympus has an anti-keystoning feature that will take care of it in camera, but the resulting image is a jpeg (you will still have the raw as well).
PS also has perspective control hidden somewhere in a drop down menu. Check help for that. It is likely in every editing package available now since all producers want to be competitive with Adobe.
If you want to take care of it in camera, there are perspective control (tilt-shift) lenses available, but not for all brands and expensive.
Apr 18, 2019 08:22:48 #
KerryF wrote:
First of all, thank you to everyone for their suggestions on how to proceed with editing my tiger picture. The question that yesterday's discussion raised is why do I need to make a copy before working on the picture? I realize that PS is a destructive program and that makes sense, but I have Lightroom and it is nondestructive so there shouldn't be any need to work on a copy, unless you are being ultra conservative.
The point of making a copy (with LR adjustments) is that LR does not do anything to the file you are working on. It displays the photo as if you have made certain adjustments (brushes, exposure, contrast, etc) but there is nowhere on the disk that an actual file with those changes exists (until you export it to a jpeg or whatever when you are satisfied with the look).
If you don't make a copy, then what you modify in PS is the original file, and it will not have all of those nice adjustments you just made.
Yes, you can then "save as" in PS and your original will be unchanged, but you will then need to make adjustments on the file you just created by cloning out some distraction.
Apr 18, 2019 08:05:44 #
DAN Phillips wrote:
SOOC is always best! It's not fake or make believe!
Ahh! But it also does not look like what we visualize when we make the shot. We don't need to make it surreal, but we should make it look as good as the actual scene - often, the camera does not present that view without adjusting contrast, exposure, and setting black and white points. Also, sharpen - a requirement. Sharpening is not a fix for poor focus, but is an adjustment for the physical design of the sensor that breaks the photo into tiny separate pixels.
Apr 17, 2019 13:13:55 #
RonMe wrote:
I know that Peak Design gets many great reviews, but I don't like their straps because of the very large "clunky" pieces of plastic the connectors are made of. While shooting in landscape mode I find the PD straps to be fine, but when I shoot in portrait mode I find the large clunky parts of the connector in my way and very annoying. I'm interested to hear what others have to say.
I know what you mean about the clip. Although, they hang to the end of the camera that becomes the bottom in portrait position, so not really an issue. Do you have them mounted with a body clip on one end of strap and quick release plate on the other end? That is how I do it and it works. If you mount them as you would a traditional neck strap, they would be in the way.
Apr 17, 2019 08:25:20 #
photogeneralist wrote:
My old film SLR's all had depth of field preview b... (show quote)
Do you have the image in the viewfinder enhanced (a menu option). In that case it will be bright no matter the light. I can't say for sure it would make a difference to turn it off because I have mine on.
Also, if you snap the shutter, you will instantly see the result (unenhanced) and know if it was too dark. All you waste is a - uh - well nothing!
Apr 17, 2019 08:22:19 #
Greer wrote:
My Nikon camera strap that came with my D750 is giving me fits. It's loose ends sometimes get in the way of the viewfinder and other times rubs my head and face. It's an annoying strap. Anyone out there have suggestions?
Peak Design. The strap is made of seat belt material. It unclips easily if you are on a tripod and need it out of the way. I have mine connected (per the instructions) so it hangs at my side and I can put it to my eye in an instant. Because it is on my shoulder instead of around my neck it is comfortable for long periods. I have one on each of my cameras. Have not looked at another strap system since I bought it 3 years ago.
Apr 16, 2019 09:54:35 #
Hereford wrote:
My Canon 6D mk II takes 26 mp photos. When I want to downsize the pictures to send to friends over the internet I always use Photoshop to resample it to a lower resolution. I have an accomplished photography friend who always downsizes by increasing the jpeg compression instead to make a smaller file. He thinks this amounts to the same thing because both discard pixels to downsize. Any thoughts about which method will cause the least photo damage?? Any better alternatives??
I use FastStone Image Viewer. Free. It has a great resize tool. As far as damaging goes, your original image is untouched. Since the recipient is viewing on the internet, they will not be missing any detail.
On the other hand, if you are delivering photos for them to print, publish, or whatever, you should upload the full size jpeg to Dropbox or some other online storage for them to download.
Apr 15, 2019 13:52:24 #
jmmcgrath17 wrote:
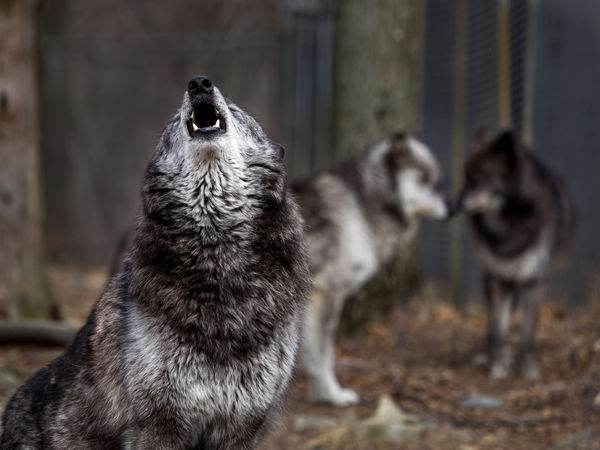
Looking for suggestions on taking pictures at local zoo. Mostly though chain link fencing and/or small mesh fencing. Is there a setting that will minimize or eliminate the fencing?? Thanks, Jim
If you can get your lens hood up against the chain link fence you will hardly see an indication of the fence. Center the shot in the opening and shoot at wide open aperture. Indication of fence should be a very slight vignetting, and that can be adjusted by cropping, post processing adjustments, etc. Smaller mesh will be more of a problem, but if you manually focus, you can get the camera to focus on the animal, and the mesh will reduce sharpness, but will still yield some nice shots - practice at home shooting through a window screen.
Example below of a wolf at a preserve shot through chain link fence:
Apr 9, 2019 08:42:39 #
Keith S wrote:
Hi UHH members,
My camera memory card is full and I was wondering what method anyone is using for filing and storage.
At the moment I am just storing it in an old lens filter container.
Any and all suggestions welcome.
Thanks 😀😀
My camera memory card is full and I was wondering what method anyone is using for filing and storage.
At the moment I am just storing it in an old lens filter container.
Any and all suggestions welcome.
Thanks 😀😀
Don't depend on the memory card for long term storage of your photos. Consensus I have been able to find is that after 5 years, you may not be able to read the data, or at least not all of it.
The card will last much longer if used, but the memory cell voltages drop over time and the stored data becomes corrupted. Back up externally; reformat and shoot again.
Apr 9, 2019 08:40:17 #
gvarner wrote:
I’ve used the same two SD cards in my camera for years, religiously formatting them in-camera when files have been unloaded. Am I pushing their limit? Your thoughts.
I too have multiple SD cards, but usually remove the one from my laptop, putting it in my camera, formatting, and go. Repeat as necessary. So even with multiple cards, I have been using mostly 2 for several years now.
I just Googled lifespan of SD cards and the main factor is number of read/write cycles, which is now considered to be around 100,000. You will not likely hit that! The website I ended up at was Superuser.com.
However, I have heard of many people that just get a new card and keep the full one on file.
NOT A GOOD IDEA! According to what I have been able to learn, 5 years is about the max for being able to read that card once it sits with static data!
Apr 8, 2019 09:13:31 #
PixelStan77 wrote:
Color one. Has nice tonality
Black and white. Now the bench is the subject, with the bright area and fence leading your eye to it. The colors distract from the subject.
Apr 8, 2019 09:10:33 #
nana989 wrote:
I can't get the standard crop sizes to suit me on this one from a favorite vacation several years ago. I probably am missing out on how to go about fixing it, as I am not a Photoshop expert at all. I had in mind getting something around a 16x20 print. Can I do it easily without losing a lot of the photo? Suggestions please. Thanks.
I have to agree with others, print at original crop. 16 X 20 with right edge against side of crop works, but not sure which element of the photo is the intended subject? Cropped to 16X20, the hill in the background becomes the subject, with log pointing to it, but then the grass in the foreground becomes a distraction instead of an element, and the tracks on the left get partially cropped out.
If (like me) you tend to print in what used to be the standard sizes (roughly 3:4 ratios), you will need to allow room in the frame when shooting to crop out stuff that does not fit in that ratio. If you have a mirrorless camera, you can set the ratio in the menu and you will see what fits your intended crop, but you will still have the full frame if you want it later.
Apr 8, 2019 08:06:33 #
Davethehiker wrote:
I subscribe to PhotoShop CC and pay my monthly fee... (show quote)
Affinity is no subscription and very, very compatible with PS. As someone else pointed out, Adobe will require connection now and then so the subscription can be verified, but since you have a hard time maintaining the connection, it might be prudent to switch to other software.
Apr 7, 2019 09:01:46 #
crazydaddio wrote:
Looking for some techniques for creating that crea... (show quote)
I have a question first of all - did you shut off image stabilization on the tall falls? On a tripod, that can cause blurriness as the camera tries to stabilize a stable image.
It appears to be a hazy day. Misty, perhaps. That will also give you the blur seen throughout the photo. Not a bad thing - I often get up on a foggy day and jump in the car to shoot! You will never get ultra sharp photos in those conditions, though. It is like shooting through a pane of glass with a slight fog on it.
Also, F18 could be less sharp, but to get the low shutter speed, probably the best you can do.
In the photo with the people, I see it could be a little sharper. Once again - image stabilization on? Is the ND filter introducing haze? Try some shots with and without and compare.
Last, yes, your tripod could do it. I have a MeFoto travel tripod and when I rented a Nikon D700 to try before deciding on my Olympus, I found that the tripod is definitely not up to the task of such a heavy camera. I got a much better, carbon tripod (Feisol) and not much will move it.