Posts for: frankie c
Feb 5, 2020 08:54:38 #
newtoyou wrote:
FYI for you and Frank.
It is easy, just takes time.
Google " how to get an orchid to rebloom".
Good luck and enjoy.
By the way, the scent has been lost in breeding orchids.
Ever smelled a blooming group of them? A client had a collection in a greenhouse many years ago. Heavenly.
Nero Wolfe's hobby.
Bill
It is easy, just takes time.
Google " how to get an orchid to rebloom".
Good luck and enjoy.
By the way, the scent has been lost in breeding orchids.
Ever smelled a blooming group of them? A client had a collection in a greenhouse many years ago. Heavenly.
Nero Wolfe's hobby.
Bill
Thanks Bill. I did Google that. That's how I discovered that I needed Orchid to agree :) Patients is not one of my virtues :( I am trying. thanks for the advice and for taking the time to look and respond. I preciate it.
Feb 5, 2020 08:48:31 #
merrytexan wrote:
lol...enjoyed your story , and it's a very nice closeup shot.
Thank You :) sometimes pictures are a little better with the story.
Feb 5, 2020 08:46:18 #
Thank You :) sometimes pictures are a little better with the story.
Feb 5, 2020 08:43:36 #
Dixiegirl wrote:
Well I take it all seriously, Frankie, and now I've just got to find out a way to make an orchid agree to rebloom on my windowsill. Beautiful, clear shot of blooms to be...and I'm always thrilled to see your posts! Also looking forward to seeing these little buds become blooms! 
Really! WOW.... thrilled. Thank you. You made my day. Now I just gottsa wait for some bloomin little Bud's to post.

Feb 4, 2020 22:21:25 #
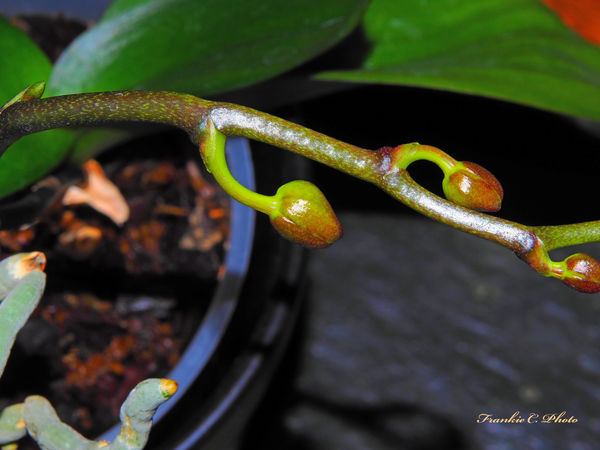
I have in the past posted some of my Orchid pictures. I Started with a couple of really high quality plants I purchased on SALE from grocery store. Anyways, after the Blooms went away, instead of tossing them out and start a new collection, I decided to attempt re-blooming (I don't think that is a word). I was successful and managed that a few times. I know nothing bout re-blooming. I did find out once the stems are gone there gone (Mostly you can't rejuvenate them. You has to grow new ones (but only if the Orchid agrees). It is interesting learning to differentiate air roots and stems. After, meticulous care (squirting with the sink hose thingy to my window sill), I think I gots a new stem. Maybe some more re-blooms soon.
Anyways, here is a picture using my refined close up artistry and highly specialized camera and lenses and stuff and very expensive and intricate lighting system.
em10 mark iii, ISO 200, M. 45mm f 1.8 lens with a 10 mm extension tube and the little pop up flash.
I know you can't help being impressed :) I can only hope no one takes any of this seriously.
Feb 4, 2020 21:51:01 #
vicksart wrote:
I am in the process of using a new computer and new software, an Apple desktop with Affinity Photo for processing. It has been a bit challenging, but I thought I would do a test run here for feedback purposes. I had forgotten what it feels like to be a rank beginner.
Please feel free to give an honest review and any suggestions. Thanks.
Please feel free to give an honest review and any suggestions. Thanks.
The Bird is the Word :) very nicely done. Could you have done it better? I don't know. It's a good picture. Good exposure nicely presented. It's a small bird (does not require a massive file size). Thanks for sharing.
Feb 3, 2020 18:37:51 #
cameraf4 wrote:
I'm going to play the Devil's Advocate a bit since... (show quote)
NOTE: I did not address the TIF part. TIF's are non lossy files really good when printing
RAW FILES
Generally people refer to a RAW file as a digital negative.
However, lets kick that back a notch. I will use the film process in photography as my analogy.
When you make an exposure to film that exposure is a latent image on the film (the film has not yet been processed). The silver halide on the film has been affected by light/the exposure (no visible change can be seen by the naked eye).
This is film, you have no ability to see the results of that exposure without processing the film.
You discover that you have made some mistakes when exposing the film.
Perhaps you did not have the right ISO set for the film used.
Perhaps you see that you accidently under exposed the image.
Perhaps you were using a film with a high ISO which world render more grain than you want.
Or and other exposure mistake you recognize before processing the film.
At this point there are some things you can do to help correct some of those errors.
You can process in a stronger developer to or use a longer time in the developer to bring some development to some slightly of unexposed silver halide to correct for under exposure.
You can process the file in a 3 to one solution (slightly less developer to reduce the amount of grain you see in the film.
So you can fix some things you could not normally fix in processing. Can only be fixed or somewhat corrected before you process the film.
There are some different techniques depending on film type or positive or negative films.
Once you have the negative there are some things you can do but recovery is more difficult or nearly impossible. (All of the exposed silver halide converts to pure metallic silver and the unsensitized silver halide is fixed out (discarded) what remains is forever).
While exposing for the print (you final product of the image). You can dodge and burn for areas of the negative to bring out overexposed or under exposed areas which can help some. There are limits and usually once the highlights are blown out there is no recovery possible.
Now your camera sensor (think of pixels as film grain). Size and number relate to resolution and grain. Once exposed take on the same characteristics of film (Latent Image).
With digital photography we have the unique ability to preview the processed image as we shoot. We also, have computerizes processors that can do some of the steps to correct the latent image. Even so that can only do so much. So we depend on software to make corrections that we use to make in the film process and on the print easel. Were doing the same things with a much really cool tool kit.
So getting the exposure exactly right is paramount. That happens pretty much never.
Ever since they put the light/exposure meter’s in camera and tied it to the focus point has pretty much been a guarantee for failure. The camera will determine the focus/metering point to be 18% gray and all other tonal values will be determined from that point. If you can discern/determine the 18% gray and meter on it you will be as close to the best exposure you can achieve. It not your exposure will lack precession.
Expose for the highlight (always a good idea) will keep you from blowing out the highlights (once the highlights are gone there pretty much not recoverable).
Understand exposure compensation for your camera. If you know what the dynamic range is on your camera you can and expose for the highlight you can use exposure compensation to adjust for a well balance exposure.
The two schools of thought are spot metering (on the highlight) lock the exposure and re-compose and focus. Your exposure compensation will be PLUS. If you use matrix metering and expose for the highlight you exposure compensation will be MINUS. Either way works pretty well. My choice is usually scene dependent.
Else, matrix meter the scene at your focus point and make all adjustments in post processing.
Conclusion: Try to get the exposure with as much precision as you can (don’t take it to the level of missing the shot cause your messing with exposure).
RAW will give you the most amount of latitude for making adjustment to you image.
JPEG will give you enough most of the time to get an acceptable result providing you have a really good exposure with no blown highlights or totally black shadows.
If you are really always happy with the results you get with your camera and love shooting jpeg’s only. Un-read all of the above and keep enjoying photography :)
Jan 27, 2020 20:02:15 #
Bob Mevis wrote:
A beautiful set.
thank you Bob. I appreciate you taking a look and the positive feed back.
Jan 26, 2020 22:32:49 #
Playing with aspect ratio an POP

Jan 26, 2020 15:28:28 #
Kenmull wrote:
I recently upgraded from the Nikon D3400 to the Z7 and love the new features. However the Z7 does not have a pop up flash which can be a drawback. I own the SB-700 flash but a small fill flash would be more convenient when out and about. The SB-700 is a bit bulky to carry around. Has anyone found a small flash that can be easily put in a pocket for just such times?
I appreciate your quest. I am still on that quest for the perfect carry flash. Especially if you want to maintain that smaller foot print. When I was shooting Nikon I found the best flash to fill that niche was the SB500. perfect size and weight and truly stellar performance. Good luck, happy shooting :)
Jan 22, 2020 14:58:33 #
MJAbe wrote:
As a hobby photographer would Photoshop Elements be sufficient for editing landscapes, sunsets, and occasional portraits? I found the 2019 version new on Craigslist for under $50. Would it be worth the invest?
Let me chime in too. I also have been using Photoshop Elements for several years. Prior to switching to elements I was using Photoshop Pro version 7 I started with version 1 I think in 1992. At that time it was job related. I switched to Elements I think at version 3 in about 2005 (about). I have been using consecutive upgraded versions ever since. I have tried and used other editing software. I always came back to Elements. It has a powerful tool kit, It is for me more intuitive, and covers mostly all the bases for my edits. Each version gets better. One of the problems I had with it was the ability to write print profiles (which you could do with Photoshop). You now have some control over that in Elements. It is not the only step in my workflow but it usually is the final. Really if you get it for 50 dollars you miss going out to dinner once. Try it :)
Jan 20, 2020 22:36:09 #
stavros wrote:
2010. The last time I jammed with my best friends Bob on drums and Jimmy on keyboards before they passed away. They only passed away a couple of years ago. No more conversations. That's the sad part about friends passing. You can't have any more conversations . Scott had a great studio. He moved into a farm and built a studio in the barn. Fun times in that venue!
Great picture and a nice memory for you to cherish. Thanks for sharing. That amp on the chair looks like an old Fender Vibrolux Reverb. The photo brings back some memories for me too :) thanks again.
Jan 14, 2020 21:26:24 #
Dixiegirl wrote:
You're always a delight, Frankie, and so is your photography! Beautiful portrait of your ducky buddy!
right back at you duckie :) How you doin? Your comments always make my day a little better, thanx :)
Jan 14, 2020 17:31:08 #
frankie c wrote:
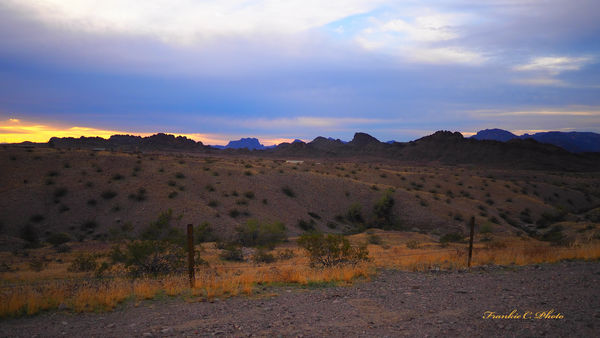
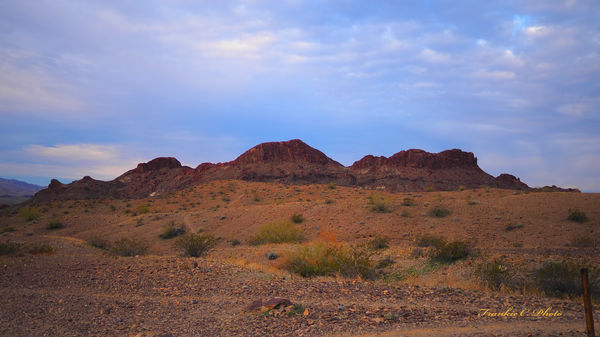
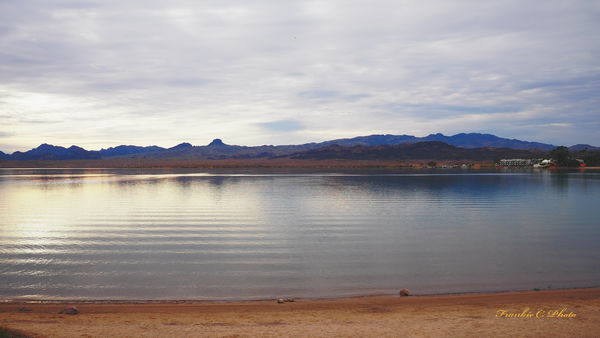
Shots from Lake Havasu City Balloon Fest 2020. It was a windy weekend, so balloons did not get up much. So catching some shots was a bit of a challenge. I decided to try some photo merge. Done with Photoshop Elements 2019.. Captures were with My EM10 mark iii Using the 14-150 and the 40-150 lenses.
fixed version. hope I got it all :)

Jan 14, 2020 17:15:52 #
Jim-Pops wrote:
I like what you are doing here. I shot some hot ai... (show quote)
Your welcome. thanks for looking. I have only done this before to enhance my fireworks pictures. Oh and I did do some with moon shots and blood moon to create a less boring presentation. I forgot bout those :(
thank you, good luck and happy shooting :)