Post processing primarily of landscapes
Apr 30, 2018 08:34:58 #

One can do extreme sharpening of an image starting in Adobe Camera Raw, in the Detail Panel.
Later, the full Photoshop can further sharpen an image, in two ways:
1) with the Camera Shake Reduction filter; and,
2) the High Pass filter (among others).
Note that the HPF sharpens edges for a limited effect that avoids sharpening noise or artifacts.
The test for sharpness involves the eye. If the sharpening calls attention to itself, then too much sharpening has happened.
I hope this reply helps.
SAVH wrote:
I'm not sure exactly how to phrase this. I see qu... (show quote)
Apr 30, 2018 08:38:32 #
Very interesting topic. Thanks to all who have responded as I am very interesting in this subject as I have macular degeneration in both eyes and can no longer manual adjust my focus. So am looking at how I can use my auto focus to the best of my cameras. Again Mahalo to all.
Apr 30, 2018 08:43:00 #
In my humble opinion in see lots of landscapes. A photo can never capture the true color, smell, feel of the air, sounds and many times the isolation of just being there. I frequently use a John Muir quote. Experiences on not captured in photos alone but enter every part of the body where they remain forever."
Apr 30, 2018 09:24:16 #

One point that may or may not apply to your question is the light and the angle of the light. Shooting with your back to the sun is about the worst thing you can do, and almost always gives flat and lifeless results. Shooting with the sun low (early morning or late afternoon) is also an excellent idea, no matter what your relationship to the sun.
Apr 30, 2018 09:42:00 #
LtGhOsT
Loc: Argentina
SAVH wrote:
I'm not sure exactly how to phrase this. I see qu... (show quote)
Hi Scotty! I'm relatively new in photography, and to the forum as well, and I think you and me are having the same concern.
Could you please upload some of these pics you took so I can compare with mine?
Thanks!
Ale.
Apr 30, 2018 10:07:04 #
Apr 30, 2018 11:34:45 #

My D850 has focus shift shooting ..so I’m betting yours does tooooo..you can set the D850 to do many things .. in camera HDR .. multiple exposure overlay ...
Look under “tips and Tricks “ For the D850 for a starter ...
Look under “tips and Tricks “ For the D850 for a starter ...
Apr 30, 2018 11:56:21 #
mikegreenwald
Loc: Illinois
In addition to all of the above, I find two things very helpful in Post Processing:
1. Use the merge function: Put the camera in portrait mode on the tripod with a longer lens than you might use for the photo otherwise, level the tripod carefully, and take multiple photos with substantial overlaps (around 20-30%). Merge on the computer, not in camera. This will create a substantially more detailed photo, with a larger file.
2. The "dehaze" function can often sharpen photos substantially, followed by sharpening, both in the computer.
Occasionally it's necessary to work with contrast, exposure, light, shadows and darks, and sometimes other functions.
Apr 30, 2018 12:18:52 #

Nikon D850 does have built-in focus stacking. Photoshop will process it. I'm sorry I can't report that I've tried it. My 850 is new and I've not tried a lot of it yet.
Apr 30, 2018 12:20:02 #

I hear that pictures are worth a 1,000 words. Show me something and quit "talking my leg off." If you have the best technique and don't mind sharing it, demonstrate it with some images.
Apr 30, 2018 12:28:44 #

I have no aversion post processing- I do it all the time and it is certainly an important part of the digital photographic process just as good darkroom craftsmanship was important in the film era. Problem is, many photographers are becoming so dependent on the computer/electronics aspect of their craft that the are neglecting good solid camera work.
Back in the day great landscape work was produced on transparency film, properly exposed precisely handled and normally processed- just about right out of the camera. I am not pining for the past but a look into some old National Geographic magazines and similar publications will prove my point. I mention transparency or slide film, because there is no intermediate printmaking process that affords corrections- if the details, texture, contrast, saturation, balance, composition ain't on the film it is lost.
So...put aside post processing for a little while and check off a few boxes:
Approach: You want striking landscape images with saturated colors, sharp detail and dramatic contrast. Your approach is important, this is not a sporting event and you can take your time in performing good camera work. You need to prepare you equipment for the best results. Make sure you lenses are clean and everything is in good working order before going out on location. Familiarize yourself with the characteristics of your lens to determine the aperture at which it it performs best. Use that aperture if it provides sufficient depth of field and practicable shutter speeds.
Lighting:You first observation should be the lighting. There are times of day when any given scene will be best rendered as per texture, the direction of lighting the how resulting highlights and shadows are rendered. This goes to relief and the illusion of depth form and dimensionality . Unless you are on a tour schedule, you may wish to revisit the lactation at a better time of day. In the latter part of the day and progressing toward sunset, the lighting changes more rapidly so it pays off to hang in there for a while and capture more than one effect. Of course, weather conditions play in important role in landscape work. Bright sunny days with blue skies and puffy clouds will give you that “picture postcard” look, however, overcast, rain, dew, rainbows, haze and other conditions can add mood and drama to your interpretation of the scene.
Composition: This does not necessarily effect contrast, sharpness or color saturation but shooting from a good viewpoint, incorporating foreground framing and exploring different angles, will add depth and impact to you images. Oftentimes, just moving the camera position a few inched makes for a significant improvement. If you fill the frame exactly as you would like to display it, you won't need to crop excessively which affects sharpness as well.
Exposure: Just like in transparency work, a well exposed file has better potential. Careful metering is essential and exposure bracketing is advisable. Again, there is no rush and those additional exposures may be the ones that will yield the best results. Select the lowest ISO setting that will afford you sufficient depth of field and practical shutter speeds. With a solid tripod you can use slower speeds when required to obtain you desired aperture or to capture motion blur in waterfalls etc.
Preventative medicine: There are many issues that can rob your images of clarity, color saturation and sharpness. Even a small amount of camera shake, movement or vibration can be detrimental to image quality. Use a rock steady tripod, lock up the mirror (on DSLRs) prior to exposure and use a cable or electronic shutter release. Lens flare from extraneous light striking the lens will diminish contrast. Make certain to use a lens shade that is deep enough to prevent any flare without vignetting the image. If a protective or skylight filter is not necessary, negate or remove it as it can, in certain cases, exacerbate the potential for flare. In extreme back-light or side lighted conditions you may need a gobo or larger black flag type accessory to manually shade the lens from a distance where it, the gobo, will not show up in the field of view. Sometimes I just use my hand or block the extraneous light with my body.
Perspective: If you want the scene to photograph in the perspective as you eyes see it, select a focal length that is slightly longer than normal. On a full frame body, I like my 60mm prime lens.
Focus: Focus carefully and keep in mind the hyperfocal distances and depth of field considerations for you lenses at your selected aperture. Focus stacking and other post-processing manipulations are fine but most focus issues can be addressed and handled in the camera.
Reflections: Some reflections in water or other reflective surfaces will enhance you landscape work but certain kinds of reflection on foliage, flowers, wooden and other surfaces can de-saturate their color. A circular polarizing filter is a great accessory that can remedy some of theses issues. It is not a cure-all that should always be employed for every image but in certain lighting conditions and angles of incidence it is highly effective for eliminating undesired reflections, darkening skies and improving color saturation. The good and easy thing is, as you rotate the filer in its mount, you can observe the exact effect.
OK Folks- I know this is all very rudimentary and basic- rookie stuff but folks are becoming so preoccupied with high technology and sophisticated gear they are tending to shoot sloppily and end up processing and editing their heads off. Most of the steps I have outlined are quite routine and take only a few seconds or minutes to employ. When you have camera-crafted a great original file you have created great cannon fodder for you post processing software. If you find necessary you can slightly sharpen the image but not enough to create false outlines and exaggerated textures. You can increase or decrease the color saturation just like photographers used to chooses their favorite films as per contrast, saturation and palette. You can use selective dodging, burning to tweak details but with proper exposure you won't end up with burned out highlights or vacant shadows. You can fine tune color balance according to your taste. If you shoot in RAW you will have a full range of corrective measure to employ but with good camerawork you probably won't require multiple layer of correction.
There is no need to become a purist unless you want to. Post processing offers tons of special effects, textures, multiple exposures, extreme contrasts, solarizations, cross-processing effects and more. You are the artist and should express yourself as you prefer.
Good luck- I hope this helps!
Apr 30, 2018 15:00:50 #

Scotty, my landscapes are taken with the same lenses I use for any other work I do. The thing I do is make sure they are clean, completely throughout. I also make sure they focus sharply where they are supposed to focus sharply. I'm fortunate in that a friend of mine is a physicist whose work involves optics. Outside of that, I really don't do much in processing to increase sharpness, as that can backfire and produce undesired results.
--Bob
--Bob
SAVH wrote:
I'm not sure exactly how to phrase this. I see qu... (show quote)
Apr 30, 2018 17:54:24 #
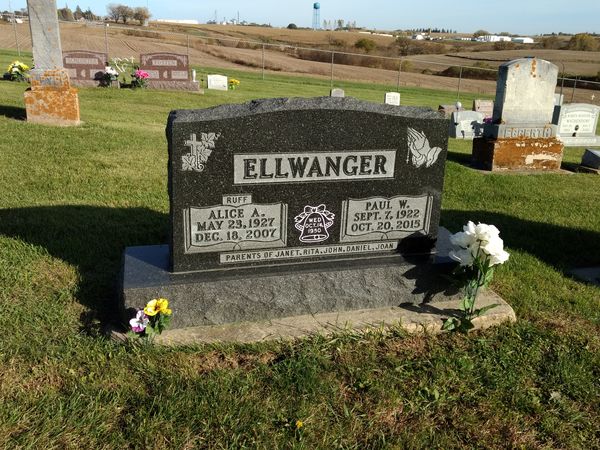
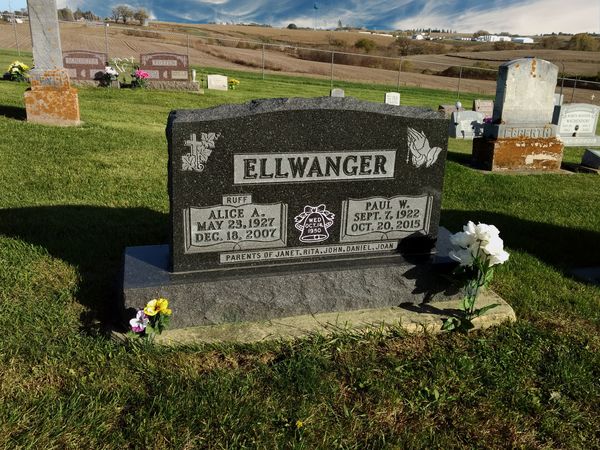
You asked about enhancing a landscape photo in post-processing. I use program "Landscape Pro" to enhance such. In the example pictures (ignore the gravestone and just consider it a landscape picture), the first image is off the camera, and the second is the enhanced. The grass and brown ground is richer, and the sky is changed from light blue to a richer blue with clouds. If there were trees or buildings or water in the photo, those can also be enhanced.
Apr 30, 2018 18:29:22 #
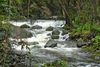
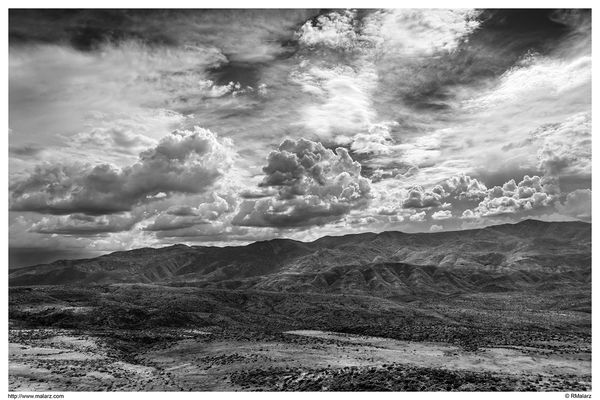
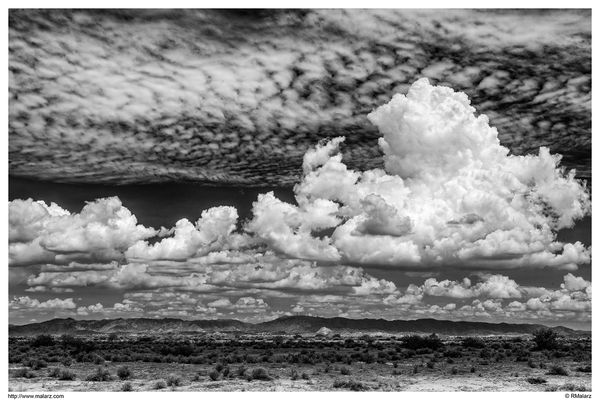
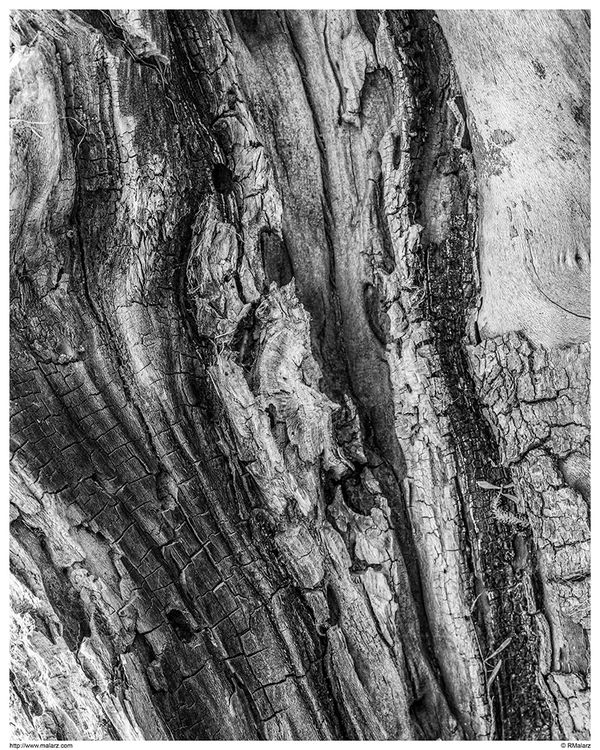
OK, gessman, here's few to fulfill your request. None of these use any plug-ins, as I'm not really fond of "push button" processing.
In the first two, I exposed for the highlights (ETBR) and processed for the mid-tones and shadows after normalizing the histogram in ACR. The third photo was exposed for the shadows, or dark areas of the scene and processed to bring the highlights to an appropriate level.
My usual process is to normalize the histogram, contrast, burning and dodging.
--Bob
gessman wrote:
I hear that pictures are worth a 1,000 words. Show me something and quit "talking my leg off." If you have the best technique and don't mind sharing it, demonstrate it with some images.
Apr 30, 2018 18:34:21 #
jimglaze
Loc: Asheville, NC
There's a lot of good advice above, but I think R.G. has the answer you're looking for. The telling clue: "I just have never seen landscapes that really looked like that. I find the pictures to be very good and generally quite striking but they do not reflect what I think I have seen." The photos you are seeing have been adjusted beyond what your camera or eye sees. He is also spot-on concerning the over use of these adjustments; there can be a fine line between making the photo pop, and making it look like a three year has been at play. Study the logic behind those tools, practice, and get feedback. Have fun, and start popping :)
If you want to reply, then register here. Registration is free and your account is created instantly, so you can post right away.