White balance ? What is correct WB?
Oct 3, 2016 06:07:09 #
Hi my fellow hogs,
Once again I turn to your wisdom and knowledge.
Last time I was discussing DoF. And I can say, I've been practicing a lot. It seems I am more aware of my aperture settings and the results are showing. My question now is this WB. What s right and wrongs ? I've learned to use LR and correct the WB. Besides the normal White and Black slider we also have the presets for white balance. (As shot, Auto, Daylight, Cloudy, Shade, tung..fluor..). For some time I've been either just use the sliders or chose a presets. Until this weekend I have not given much thought. But I do now. I had the pleasure to take some pictures for a good friend of mine who wants some new pictures of her. For this session I took my Sigma 1.4 ART and my newly Nikon 105mm 2.8 macro lens. I decided to start on the afternoon , when the sun was lower, but I see I could have waited a little longer. I tried to have my back to the sun , while the sun was shining on her for best light. I still dont own a good blitz yet, so I am relying a lot on the natural light I have. I was pretty happy with the results, but upon importing them to LR and going through the pictures, I saw they were very warm. So I tried to correct a little. What surprised me was the big difference between "Auto" and "As Shot". From the original warm state, the Auto goes pretty cold. And that's how my question was born. Is there like a correct white balance for those photos or is it a matter of taste. I do like them both, I just don't know what would be optimal, and therefore I turn to you. What's your verdict? Or what should have I done?
I am attaching some examples so you get the idea.
Taken with 105mm. This lens blew me away how sharp it is. This is Auto WB.
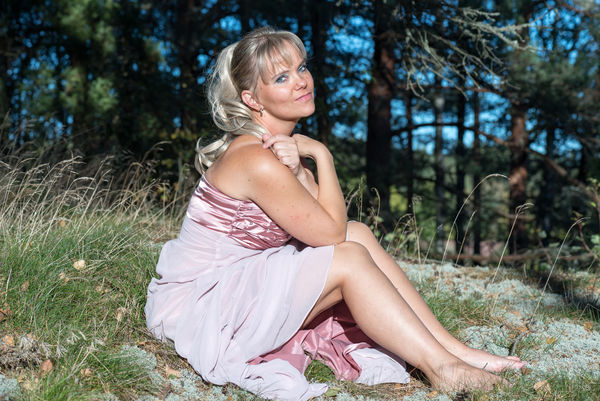
(Download)
As shot, just minor changes on White and Black slider.
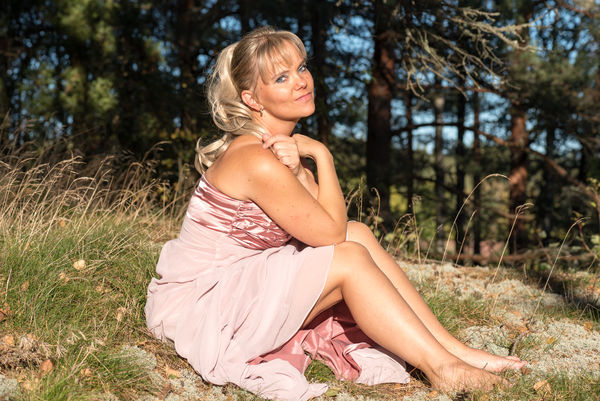
(Download)
Taken with Sigma 1.4ART, Auto WB
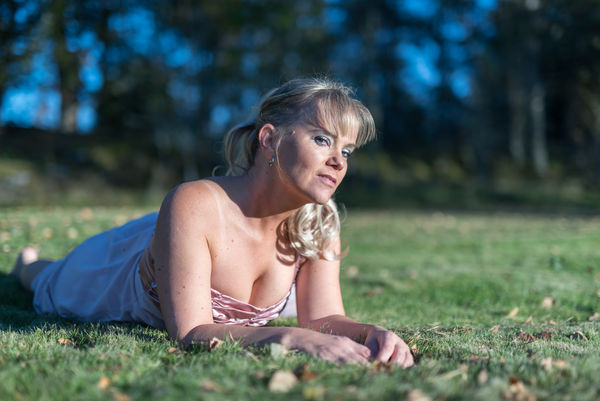
(Download)
As shot, just minor changes on White and Black slider.
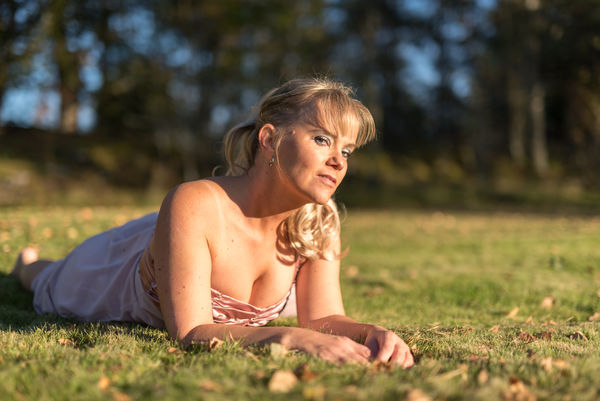
(Download)
Oct 3, 2016 06:52:18 #

Oct 3, 2016 07:07:49 #
Longshadow wrote:
Correct WB might be Individual volition?
That's what got me thinking also, and therefore thinking about making two sets, one with Auto and one with as shot.
Oct 3, 2016 07:23:20 #


Oct 3, 2016 07:56:33 #
catalint wrote:
Hi my fellow hogs, br Once again I turn to your w... (show quote)
Both look excellent and the WB would be your choice. Also if for a client consider what their desire is.
Correct WB is complex and a color meter is frequently used to get a starting point.
But I prefer the warmer look but that is my choice.
Oct 3, 2016 08:01:44 #
My opinion, its personal. No right or wrong, just what you like. Nice that you have various options to change it at your discretion.
Oct 3, 2016 08:06:01 #
Architect1776 wrote:
Both look excellent and the WB would be your choice. Also if for a client consider what their desire is.
Correct WB is complex and a color meter is frequently used to get a starting point.
But I prefer the warmer look but that is my choice.
Correct WB is complex and a color meter is frequently used to get a starting point.
But I prefer the warmer look but that is my choice.
What gotta me thinking about this is the fact that the color of the dress and her eyes are pretty much correct on the cooler version. But it's not bad on the warmer version. I like them both, but I fall more for the warmer as well. Maybe cause of the style of the photo it is better with warmer. It does not take me long to make her both versions of all photos, so I will provide her with both. After all, I dont charge anything, I am just so kind and step up for my friends. Never made a penny on my photographs :D
Thanx for viewing and commenting :) Appreciate it
Oct 3, 2016 08:07:48 #
Nalu wrote:
My opinion, its personal. No right or wrong, just what you like. Nice that you have various options to change it at your discretion.
Thank you Nalu,
Good to see that is not just me thinking this way.
Oct 3, 2016 08:11:00 #

catalint wrote:
That's what got me thinking also, and therefore thinking about making two sets, one with Auto and one with as shot.
But if you set your camera to Auto, isn't the resulting photo "as shot"?
I have always interpreted "as shot" as being the resulting photo with whatever settings were active on the camera at the moment the shutter release button was pressed, without any post-processing.
Oct 3, 2016 08:20:40 #
Morning Star wrote:
But if you set your camera to Auto, isn't the resulting photo "as shot"?
I have always interpreted "as shot" as being the resulting photo with whatever settings were active on the camera at the moment the shutter release button was pressed, without any post-processing.
I have always interpreted "as shot" as being the resulting photo with whatever settings were active on the camera at the moment the shutter release button was pressed, without any post-processing.
Not sure how to chew on this. I do have my WB on Auto, rarely change it. I do my changes in PP. But this example here, there is a big difference on what my camera interpreted on Auto WB, and what LR is interpreting.
My first thought was :" Will people criticize the photos of being way to warm and therefore wrong WB? " And like that started to question myself.
Thanx for your reply Morning Start
Oct 3, 2016 08:42:47 #

WB is a grail search... No evidence of what is 'correct' anywhere.
The only WB that one can consider as 'good' is the client's preference. Your preference if you capture something for yourself. Then it becomes an appreciation thingy from a third party.
You can always create a 'clinical' WB but, is it correct?
So, why the blurred answer?
Depending on the manufacturer WB is different.
From the same scene taken from different manufacturer camera you get a different WB.
When processing if your monitor is not calibrated you compensate for the capture AND for the monitor.
Then you have your eye sight. We think we have the right WB because it is our eyes. This assumption is false. (try having cataract surgery and you will see that our color perception is flawed ~ this being an extreme)
Let's assume everything is perfect, that you have what I call a 'clinical' WB...
Everything is thrown out the moment a third person look at is simply because (reversing the above)
The person eye sight is flawed
The display is flawed (if looking at a print that can be removed)
The environment where the image is looked at is not pure daylight (affects eye sight)
Let's assume that the latest is 'perfect'
The viewer taste may throw all your perfect good work to the dogs for whatever reason!!!
So, the WB? A sad joke. Do your best, select the best option available to you then start praying that whoever sees your work agree with your (WB) interpretation...
Oct 3, 2016 08:55:22 #
Rongnongno wrote:
WB is a grail search... No evidence of what is 'correct' anywhere.
So, the WB? A sad joke. Do your best, select the best option available to you then start praying that whoever sees your work agree with your (WB) interpretation...
So, the WB? A sad joke. Do your best, select the best option available to you then start praying that whoever sees your work agree with your (WB) interpretation...
Starting to believe in prayers now.
But thanx for your thoughts Rongnongno. It helps me understand what people think about this subject as I never raised questions about WB.
Oct 3, 2016 09:30:41 #
catalint wrote:
Not sure how to chew on this. I do have my WB on Auto, rarely change it. I do my changes in PP. But this example here, there is a big difference on what my camera interpreted on Auto WB, and what LR is interpreting.
My first thought was :" Will people criticize the photos of being way to warm and therefore wrong WB? " And like that started to question myself.
Thanx for your reply Morning Start
My first thought was :" Will people criticize the photos of being way to warm and therefore wrong WB? " And like that started to question myself.
Thanx for your reply Morning Start
I had my Morning Start about an hour ago, with a lovely hot cup of coffee! Ready for the day! :-)
So, now that I'm wide awake, the "As shot" setting you are looking at, is in ACR, right?
I turned my TV into a model once again (it's the most photographed "model" in this house, right across the room from where I usually sit). I took two photos: one at 3000 Kelvin, one at 6000 Kelvin, set on the camera's menu.
So when I opened the first one in ACR, and the bar right below the "As shot" window showed 3000 Kelvin! The second one showed 5850 Kelvin - very close to 6000.
Meaning that, if you have the camera on Auto WB (I almost always do too), the reading of "as shot" is, I believe, how the camera interpreted WB. But my first thought is still valid: "As shot" is how the camera interpreted the environment and selected the WB.
When the second photo was still open in ACR, I changed the temperature to 3000 and this time this photo had exactly the same colouring as the first one for which I had set the camera at 3000 degrees K.
It was an interesting exercise, and once again showed me, that by taking raw photos, there is a lot you can do in post-processing, as compared to .jpg images.
EDIT: From this exercise, I also deduct that, if for some reason I need to know at what Kelvin temperature a given photo was taken, all I have to do is open the original raw file in ACR and the "As shot" setting will give it.
Oct 3, 2016 09:32:23 #

catalint wrote:
Hi my fellow hogs, br Once again I turn to your w... (show quote)
You have a lot of questions and "what ifs", here.
First of all, the design intent of white balance tools is to render a subject as close to reality as is possible, given the state of photographic systems. White balance, exposure, and ICC profiles are used in a combined attempt at "perfect" color balance. A derivative intent is to allow controlled introduction of color casts for creative effects. A side effect of it is to confuse the living daylights out of newbies!
Back when we used lots of slide films, we had three types: Daylight (5500°K balance), Type A (3400°K "Photo lamp" balance), and Type B (3200°K quartz-halogen lighting and ECA 250 watt photofloods). We decided what film speed we needed, what light we would use, and picked our film type based on that. Then, we had filters to place over our lenses to fine-tune the combination for time of day, emulsion variations, etc.
With the advent of digital imaging, it became possible to process images with emphasis on both hue and color temperature. We can achieve MUCH better color balance than with film, either in camera with JPEG pre-processing menu settings, or in post-production, with software.
If you are going for dead neutral, life-like color reproduction (no enhancements to reality!), then you need a target of some sort, with which you achieve TTL exposure perfection, and set a CUSTOM WHITE BALANCE. You can use any of several types sold for the purpose.
The under-ten-bucks Delta-1 Gray Card is a good starting point. First, you meter it and set your exposure manually. Then, you use it to do a custom white balance. Your camera manual explains how... although camera manuals reference white cards. I don't like them, because unless the white is photographically neutral (most are NOT), you will have a color cast.
Another tool for this is the three-striped [b]One Shot Digital Calibration Target[b]. This tool has near-black, gray, and near-white stripes on it, all totally neutral. Use it the same way, centering the three spikes in the histogram of the image for exposure, and then using that frame or setting for custom white balance.
Then there is the ExpoDisc, which turns your camera into an incident meter and measures both light intensity and white balance. You take your camera to where the subject is, point it at the light source, and take a reading/set custom white balance.
In all three incidences, you must reference the white balance to a correct exposure for the light falling on the scene.
The processes described above work for both JPEGs AND raw images. If you are working solely in raw, you simply use the target for "click balance" in post-production, with the eyedropper tool provided for that in the software. JPEGs will be usable "as is", just like slides or transparencies.
There is usually a menu selection on cameras that allows you to dial in a Kelvin temperature. It works okay, but you have to use it in conjunction with HUE to get really neutral results. Here are a few VERY rough guidelines:
60-watt incandescents and their LED/CFL knock-offs: 2650K to 2800K
quartz-halogen stage lights: 3200K
cool white fluorescents: 4100K with a LOT of hue variation!
white fluorescents: 3500K with a LOT of hue variation!
daylight: 5500K (10:00 AM to 2:00 PM with no clouds, WITH direct sun)
HMI stadium/stage lights: 5000K to 5500K
Afternoon sun: 3200K to 4000K
Morning sun: 3500K to 4500K
Shade on a sunny day: 7500K
Skylight only: 9000K to 11,000K
Sodium and Mercury Vapor lights: NOTHING WORKS WELL. Record raw and convert to Black-and-White! Or over-ride ambient light with flash.
The problem with such guidelines is that they are very rough, and you still have to play with hue! That's why there is custom white balance for JPEGs and post-processing for raw images.
Another problem is that white balance is only one part of the color equation. You have monitor calibration and ICC profiling, post-processing software defaults, and various differences over how and whether third-party software interprets raw images with respect to their embedded, from-the-camera EXIF data. (Hint: If, when you open a raw image, it does not look almost identical to a JPEG saved simultaneously from the camera, then your software is applying ITS default values in place of the EXIF values. This can be good or bad, depending on how you work.)
A useful exercise is to make a few tests. Expose a ColorChecker chart and a gray card in daylight, using the camera's Daylight White Balance setting. Then do a custom white balance using the gray card, and expose the ColorChecker chart and gray card again. Save raw AND JPEG images at the camera. In the same manner, record the ColorChecker chart and the gray card at ALL the presets on your camera, regardless whether you think they are even remotely important. Put an index card in each scene with the type of light and the white balance setting written on it.
Repeat this same sort of test under as many different types of lighting as you can find. The results will show you what you need to know, and give you tools to understand how much you can and cannot correct in post-production, given each type of lighting.
Finally, understand that most modern types of lighting aren't very color accurate. 5500K noon daylight and 3200K incandescent lighting are different, but both are very consistent, in that they produce colors all through the spectrum. Incandescent sources just have a lot less energy on the blue end and more on the red end of the spectrum.
But sodium vapor, mercury vapor, fluorescent, and LED lighting DO NOT produce a full range of colors. They "spike" at certain frequencies, producing color casts in photographs, and leaving certain colors much darker than they would be rendered by daylight or incandescent light.
Some brands and grades of sodium vapor, mercury vapor, fluorescent, and LED are better than others, but none is perfect. The higher the CRI (Color Rendering Index, which tops out at 100 for noon daylight), the better. Under 90 is obviously deficient. 96 is about as good as it gets for photo-grade LEDs; "flicker-free" fluorescents made for photography tend to be under 93. Mercury vapor lights are awful for photography, as are some types of sodium vapor. The best sodium vapor lights are still not great. Fluorescent lamps used for general lighting are all over the place, and tend to flicker!
None of this is important if you don't calibrate and profile your monitor, and tell your software how to use that calibrated, profiled state...
Oct 3, 2016 09:39:39 #

catalint wrote:
Hi my fellow hogs, br Once again I turn to your w... (show quote)
Personally I am drawn to image #2, it looks more natural lighting.
If you want to reply, then register here. Registration is free and your account is created instantly, so you can post right away.