How to correct WB inside Photoshop CS
Oct 21, 2013 08:55:14 #

Chuck_893 wrote:
I'm pretty sure that's right, but perhaps only in full-dress Photoshop, maybe not in Elements 11. I've been trying every way I can to get an adjustment layer (or any other layer) that will give me the "gray card" effect, but no luck. The only layer that allows the effect is the layer with the original image on it, which I can't delete. I have the feeling that I am this close, :mrgreen: but it may be impossible in Elements 11. :cry:
oh sorry i don't know anything about elements i thought they worked pretty much the same.
Oct 21, 2013 09:01:22 #
normanhall wrote:
oh sorry i don't know anything about elements i thought they worked pretty much the same.
No, noI appreciate your input! Thank you! And so far as I know, Elements is pretty much "Photoshop Lite," in that it's just missing some of the bells and whistles that a real pro user uses. Therefore this technique (I think) ought to work, but I can't (so far) make it. :evil:
Oct 21, 2013 11:56:03 #

Chuck_893 wrote:
No, noI appreciate your input! Thank you! And so far as I know, Elements is pretty much "Photoshop Lite," in that it's just missing some of the bells and whistles that a real pro user uses. Therefore this technique (I think) ought to work, but I can't (so far) make it. :evil:
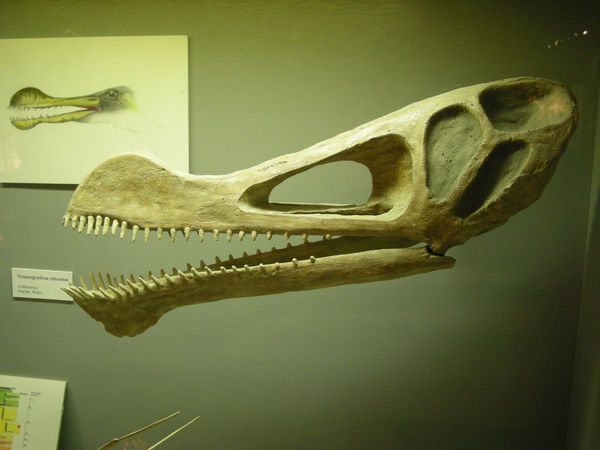
Using grey card method that I described:

your original image
Oct 21, 2013 12:08:53 #

I may not understand exactly what you are doing, but I don't see how it can work. If you spray a grey spot into the picture, it is 50% grey by definition. The picture's color balance will not colorize it, therefore any correction based on this is unrelated to the exposure. That seems to render the "correction" worthless. If I just didn't get it, help me out.
Oct 21, 2013 14:11:29 #
NEKON, THANKS SO MUCH! Now I have it! I completely missed the LAYER VIA COPY (Ctrl+J, or Command+J on a Mac, which I use). This shortcut works in Photoshop Elements 11! I can't say if it works in any earlier versions of PSE but anyone who has it should experiment because this shortcut is "da nutscat's meow&c &c!" :thumbup: :mrgreen: :thumbup:
It works perfectly! I won't bother to post mine because it is exactly like yours! I'm confident that this method will work any time we blow the white-balance. In the example I used, my little point-and-shoot, even though on auto white balance (all it offered) failed to correct for fluorescent lighting. Now it is perfectly balanced.
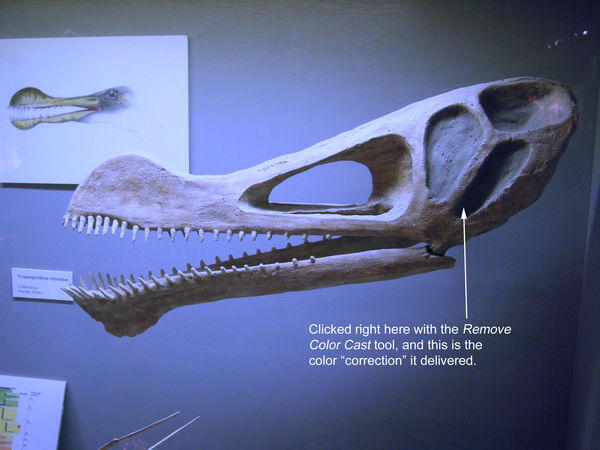
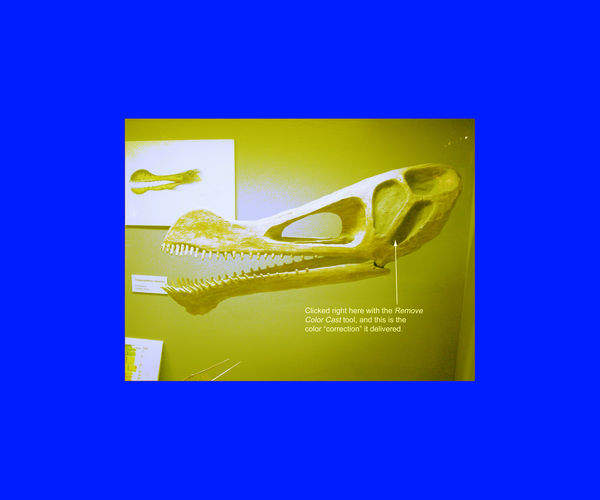
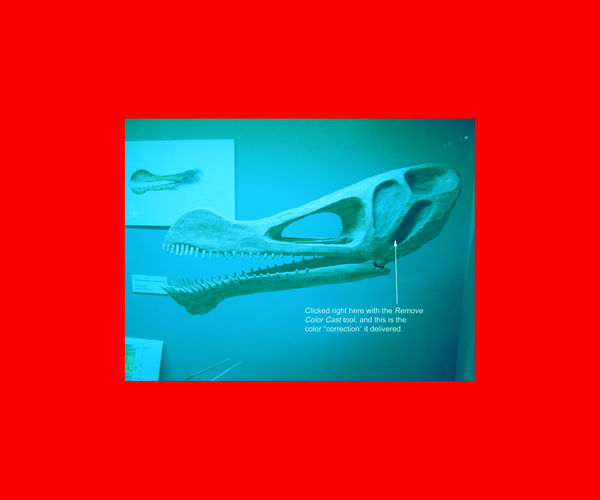
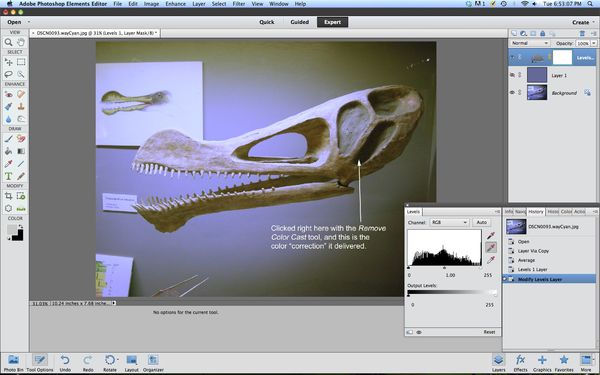
photoninja1, Tommy and I have now both concluded that you are correcta grey spot painted into the picture is already a neutral gray so it doesn't make any correction. But Nekon's shortcut does work, and the beauty of it is that, at least in Elements 11, instead of hunting around with the Remove Color Cast tool for something you judge to be "white" or "gray" or "black," you can average the color of the entire image on a copy layer, fix it in levels, and nail it! The trouble I have always run into with the Remove Color Cast tool is finding the true gray or whatever. Sometimes you can click here there and everywhere and get 10 different, often spectacularly bad color renditions. Just for fun, I went back to that yucky green original and using the Remove Color Cast tool (PSE-11), clicked in the blackest (I thought) part of the skull. Here's what I got :lol: :
nekon wrote:
White balance check: br 1. Ctrl+J (or Command+J on... (show quote)
It works perfectly! I won't bother to post mine because it is exactly like yours! I'm confident that this method will work any time we blow the white-balance. In the example I used, my little point-and-shoot, even though on auto white balance (all it offered) failed to correct for fluorescent lighting. Now it is perfectly balanced.
photoninja1 wrote:
I may not understand exactly what you are doing, but I don't see how it can work. If you spray a grey spot into the picture, it is 50% grey by definition. The picture's color balance will not colorize it, therefore any correction based on this is unrelated to the exposure. That seems to render the "correction" worthless. If I just didn't get it, help me out.
photoninja1, Tommy and I have now both concluded that you are correcta grey spot painted into the picture is already a neutral gray so it doesn't make any correction. But Nekon's shortcut does work, and the beauty of it is that, at least in Elements 11, instead of hunting around with the Remove Color Cast tool for something you judge to be "white" or "gray" or "black," you can average the color of the entire image on a copy layer, fix it in levels, and nail it! The trouble I have always run into with the Remove Color Cast tool is finding the true gray or whatever. Sometimes you can click here there and everywhere and get 10 different, often spectacularly bad color renditions. Just for fun, I went back to that yucky green original and using the Remove Color Cast tool (PSE-11), clicked in the blackest (I thought) part of the skull. Here's what I got :lol: :
Yucky, yuckier, yuckiest :D
Oct 21, 2013 16:46:44 #

kubota king wrote:
I have been searching on the internet how to get the correct WB using Photoshop ( since I use Photoshop ) there were videos for other programs too.
Shooting a grey card and telling your camera to use that to set WB is good idea. Failling that, open your image in camera raw and use the WG slider to make your adjustment. If you are shooting JPG, (UGH), you'll have to open your image in ACR from the Photoshop menu.
Oct 21, 2013 19:35:43 #
kubota king wrote:
I have been searching on the internet how to get t... (show quote)
I usually do my processing in Bridge ACR then open in CS6.go to curves and use the black picker ,then the white and most of the time you don't have to go to the grey.
Oct 22, 2013 01:36:38 #
nekon wrote:
Using grey card method that I described:
It works well with that photo Its mostly middle gray. Not a lot of harm done there. It won't work at all with most photos. If you what to see how badly that blur ave. works, shoot a small 18% gray card on a red background, open levels and with the mid eyedropper set the gray card as mid gray. then do your blurAve. technique. You mid gray card is now higher green levels. If you do it with a blue card it will then have a yellow cast to the card. Where did you get the idea that changing the average content color to gray would correct color cast?
Oct 22, 2013 02:30:02 #
Guy Johnstone wrote:
It works well with that photo Its mostly middle gr... (show quote)
Because that's the way it's done.:
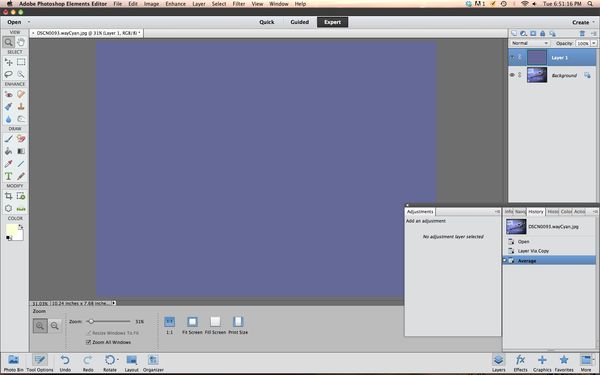
1) Duplicate Image-Ctrl+J
2) Filter>Blur>Average, this filter determines the average colour of the picture,
based on the colour value of each pixel in the image and fills theimage window with that colour.
By now, the photo will transform into one single colour, Do not panic!
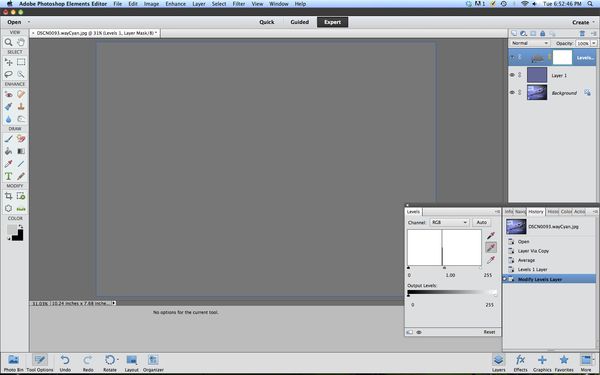
3) Now create a 'curve' adjustment layer by clicking on the adjustment icon on the layers palette.
4) Select the eyedropper in the middle to set the grey point, then click anywhere on your image,
This will transform the colour into 18% Grey-click "OK"
5) Now, turn off the middle layer and the original background photo will now have the correct white
balance\
6) Flatten and save
Oct 22, 2013 10:03:49 #
nekon wrote:
Because that's the way it's done.: br br 1) Dupli... (show quote)
NEKON, this method (which I am now calling The Nekon Method) really does work (I don't have to tell you, Nekon, but I want to tell other folks). I went looking in old files for the MOST AWFUL PICTURE I could find and found the one below. Among other utter screwups, I failed to notice that I had left the camera in Tungsten WB so the MOST AWFUL PICTURE looked as if it had been made with Kodachrome 40:
Folks, the whole point of this exercise is to save the ones you blew somehow, didn't know it at the time, didn't carefully lay an Eastman Kodak 18% Gray Target into the scene before shooting, &c &c. Everybody makes 'em. In the case below, the picture was made with the wrong white balance (I made several that way :shock: ) but because I never throw anything away I knew that I still had this embarrassment in my files. I had tried other ways to "fix" it, just to see if it could be done, but "The Nekon Method" comes by far the closest to "good." Guy, averaging the overall color content to gray, then adjusting it to neutral gray in levels really does work! It works much better when the original isn't quite as far out as the one below, but it really works. :thumbup: :thumbup: :thumbup:
The Most Awful original exposure, a bad picture to start, made worse by underexposure, and far worse by forgetting the WB was still in Tungsten. GAH!
First Edit using The NEKON method exactly as described, plus opening the shadow some. Not bad. Not great, but Not Bad.

With some more tinkering in levels, color curves &c, it's still Awful, but if the picture was important it is savable.
Oct 22, 2013 14:41:22 #
No it doesn't work. If you have a dominant color, your middle grades will shift radically. I've taken two copies of your dinosaur photo and added some color. Then I went ahead and used your averaging technique. I have applied the same technique on both photos. The middle grays should be the same in both photographs, clearly they are not. Try it yourself.
Blue bg
Red bg
Oct 23, 2013 07:06:53 #
Guy Johnstone wrote:
No it doesn't work. If you have a dominant color, your middle grades will shift radically. I've taken two copies of your dinosaur photo and added some color. Then I went ahead and used your averaging technique. I have applied the same technique on both photos. The middle grays should be the same in both photographs, clearly they are not. Try it yourself.
I think perhaps that I have been overstating the case that it works. I never meant to imply that The Nekon Method will work every time with every picture or that it can make a silk purse from a sows ear. It is a shortcut, which will (obviously) work best with out-of-balance pictures of average tones and colors. I also think, however, that perhaps you may be overstating the case that it doesnt work. If I implied that The Nekon Method will perfectly correct any out-of-balance picture, I apologize. My signature line says "I know you believe you understood what you thought I said, but what you heard was not what I meant." :-D
I absolutely agree that, If you have a dominant color, your middle grades will shift radically." But this method is not intended for the real catastrophe, as in your examples above, but rather for the average 80% of goofs, which I think it can fairly easily, and quickly, fix. :-)
In the original example, my tiny P&S cameras auto-WB failed to self-correct for fluorescent lighting so the picture shifted green. When I first made that picture I was able to correct it easily using the correct color cast tool in Elements 2.0 that I had at the time. The only difficulty was figuring out where to click. The correct color cast tool in Elements may not even exist in full-dress Photoshop, but in Elements you simply click on something in the image that should be white, or gray, or black, and it works. The challenge is finding something that is actually white, or gray, or black, to click. In the extreme cyan example that you used for your examples, I clicked in what youd assume was a dead black, but the tool yielded the dreadful cyan example instead. Normally I'd just keep clicking until I found a spot that gave the correct color balance, but
What The Nekon Method does with an average file is average everything in it, tones and colors, so that you can correct it to neutral gray in levels with one click. IF the picture is pretty much average, it will drop right into place like magic. It will probably be exactly where it should have been if the white balance had been correctly set in the first place. That's exactly what "The Method" did, essentially with a single middle-gray click, on the original green-shifted fluorescent-lit example. One click and done. :) You are quite correct, though, that it will not work at all with the extreme examples you provided with a very dominant color, but how often do any of us have something that far out that we don't beg to reshoot it?
As an experiment, however, I also took the worst example I could findthe underexposed rock shot in full sun with the white balance on tungstenand reworked it with The Method to see how well it worked with something "not average." The first try, just averaging the tones and colors, dragged it back to some semblance of normal, but it still needed more tinkering, and it will never be perfect, and I think I clearly said so. I never meant to imply that I thought that was a "good picture." What I meant to convey was: If you have made some goshawful mistake, especially if you shot it in Jpeg, you can drag it back at least partway from the brink with this shortcut.
I totally see your point, so I did not use the really egregious examples you supplied, but went back to the same awful cyan thing and dragged it back using first The Nekon Method and then some more tinkering. The purpose of this exercise is not to prove that The Method works every time on every picture, but rather that it can work well enough in an emergency to sort of save something that would otherwise be a disaster. I was a working pro for 30 years, long before digital, and ALL I ever cared about was getting a usable image for the client, but we all make misteaks :) . Any of us would have cheerfully murdered for Photoshop or anything like it sometimes. The examples below are not meant to show that "it works," but rather that it at least can get you to a place to start.
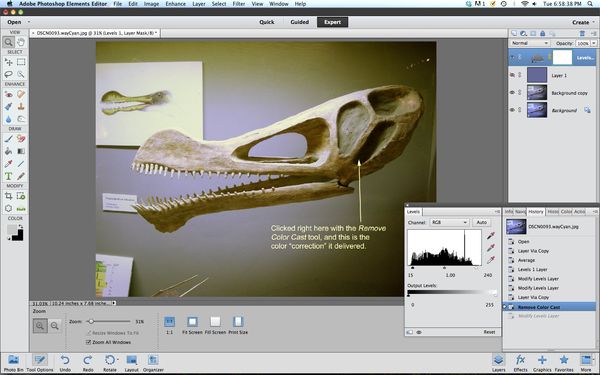
The cyan-shifted original before any corrections

With the first averaging mask applied; you can see from the color that it is averaging cyan, as expected.
The averaging mask has been "corrected" with a single click of the gray eyedropper in Levels. It now looks remarkably like a Kodak 18% gray card.
With the averaging layer turned off, the thing is predictably still cyan (or blue, or something), but less so; a place to start.
After some more "tinkering," THE THING IS STILL AWFUL, but not as awful, and might by some be accepted as a "save." And that's from what I think is a pretty bad starting image. It certainly won't work on everything, but I think it will work well enough on most "misteaks" to at least get you to a place to begin. :)
Oct 23, 2013 14:40:20 #
Well I'm an old studio photographer. We pretty much do simple things, where it's not difficult to control the outcome. Certainly my examples were extreme, and probably a bit overstated. The first photo I tried it with was one of the white stork with a strong blue background. Turn the white stork noticeably yellow. I also tried it with a peacock on a green lawn that was a disaster. His blues all shifted to Reds and grays. It's not a technique I would personally use.
What I do is: first set my black-and-white thresholds, then correct levels based on my high and low exposure setpoints. I look for a neutral point in the photograph with the great eyedropper and levels. If that doesn't work, and it does about 90% of the time, I will open "color balance" and try to massage things a bit and there.
I really don't take any of this personally. It is all for fun now.
Oct 23, 2013 19:39:50 #
Guy Johnstone wrote:
Well I'm an old studio photographer. We pretty muc... (show quote)
Hi, Guy You are so right; it is all for fun. Well, now it is I'm sure you've noticed that I too am an old pro from film days when digital and Photoshop were just pie-in-the-sky. When I left the business digital was just coming into the newsrooms. I could dimly perceive that it was eventually going to be revolutionary. Now the things we can do with the click of a "mouse" (once only small pests behind the baseboards) are simply mind-blowing! I didn't even get into digital until 2007, but I instantly, insanely loved it. I also love post-processing, but mainly to the extent that I can more easily get the picture that I saw, rather than necessarily what the camera captures. But as an Old Film Guy I work to Get It In The Camera In The First Place rather than relying on Photoshop or any other editing program to fix what I shouldn't of broke. Nevertheless, I was thrilled that Nekon shared this shortcut because we all blow it now and then, and I LOVE being able to save a picture that, had I shot it in film, would have been in the trash. "The Method" works best with stuff that's not that far out, and there I think it works very well indeed. I like a shortcut because I am fundamentally lazy. :lol: But I have much to learn about both digital and post-processing, which is why I am here on the Hog. :thumbup: :thumbup:
Oct 24, 2013 03:11:15 #
Digital changed things for a product photographer, suddenly we had to do post processing too. Before all we did was filter to .05 CC and the art Dept. did the rest. Now to get the work, most times ,I have to do the photos, PP. and the ad layout. Before we sent transparencies to the art Dept. now I send PDFs to the publishers. I'm not bitching, just observing. Sometimes I like it better this way, but it was easier then and digital was going to make it easier. Kind of ironic really.
If you want to reply, then register here. Registration is free and your account is created instantly, so you can post right away.