Can a "photo shopped" look be helped?
Oct 4, 2012 19:52:55 #

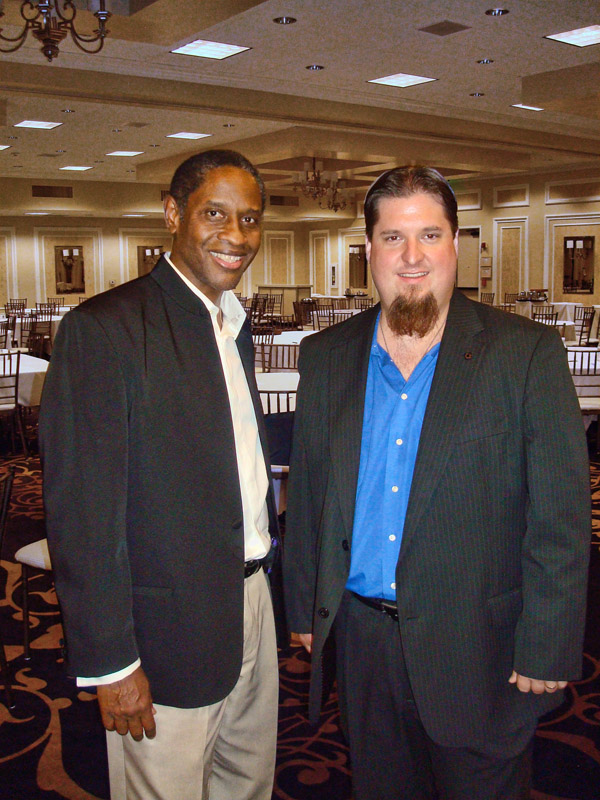
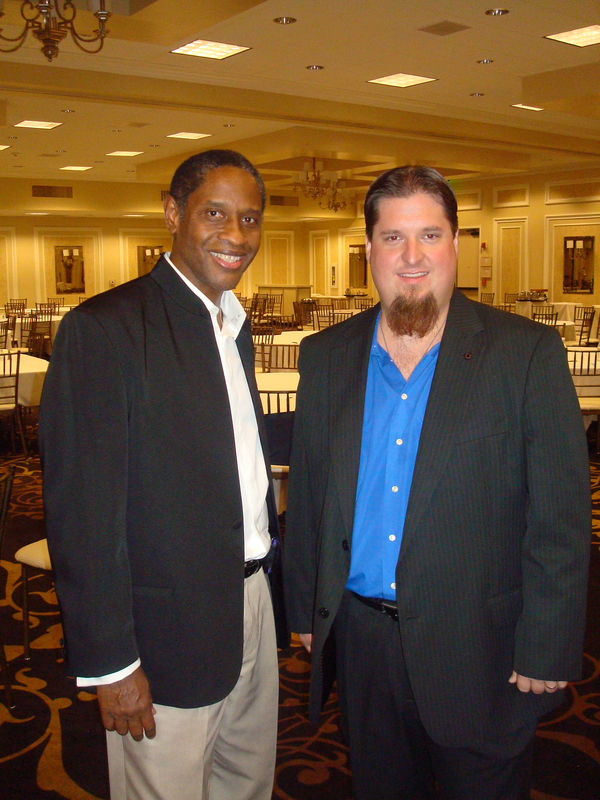
My husband was in Hollywood for the Star Ceremony for Walter Koenig and had an opportunity to have his picture taken with Tim Russ by a friend. To us it looks like they were both photo shopped into the background but this is the actual picture that was taken.
Any ideas why it should look this way and how we can minimize this look? We were only given the .jpeg version. Thanks for any help/suggestions you may have.
Sony DSC-W80
F2.8
1/40
ISO 400
Any ideas why it should look this way and how we can minimize this look? We were only given the .jpeg version. Thanks for any help/suggestions you may have.
Sony DSC-W80
F2.8
1/40
ISO 400
Tim Russ and Daniel at the Star Ceremony Dinner

Oct 4, 2012 20:05:52 #

This is the way a picture should look. I would say almost perfect depth of field and you want to 'minimize' the look of a good shot.. Someone knows how to use a camera. By the way you could use photo shop to correct the red eyes.
Oct 4, 2012 20:10:53 #
If you had matched the color balance of the flash to the ambient light it would look a bit better. You'd still be left with a background being lit with the ambient light and the subjects exposed with flash. Both of these have very different characteristics.
Oct 4, 2012 22:38:50 #
I'm not sure what the issue is here. This is not a portrait studio quality photograph. It's not archival. It's not for historical purposes. It's an opportunity to have someone you care about being photographed with someone he wouldn't normally be in contact with. Outside of posting it on UHH, maybe only a dozen people on the planet might ever see it.
Nobody is going to care what the background is. Nobody is going to think "Oh, they faked that..." Why would they fake it? Why would anyone care if it's a fake background?
One of these people is "famous", the other is not. These two gentlemen were obviously together, they obviously agreed to have their picture taken, and that's it.
It's a nice shot of two guys. Nothing else needs to be added to the picture.
Oct 5, 2012 00:14:11 #
Grammyratzi wrote:
My husband was in Hollywood for the Star Ceremony for Walter Koenig and had an opportunity to have his picture taken with Tim Russ by a friend. To us it looks like they were both photo shopped into the background but this is the actual picture that was taken.
Any ideas why it should look this way and how we can minimize this look? We were only given the .jpeg version. Thanks for any help/suggestions you may have.
Sony DSC-W80
F2.8
1/40
ISO 400
Any ideas why it should look this way and how we can minimize this look? We were only given the .jpeg version. Thanks for any help/suggestions you may have.
Sony DSC-W80
F2.8
1/40
ISO 400
Perhaps the thing that makes it look most that way is the halo around the left side of the right hand guy (sorry, I don't know which is the famous one). I think it is from the flash. You should be able to easily fix that with a burn brush.
If you wanted to go a bit further it would probably help to blur the background. You can select the guys, invert the selection, and then blur and perhaps even darken to your heart's content. That's what is often done with inconsistent background lighting. You'll want to feather so it doesn't have that photoshopped look.
It might also help to crop out some of the junk above their heads.
Oct 5, 2012 02:02:01 #

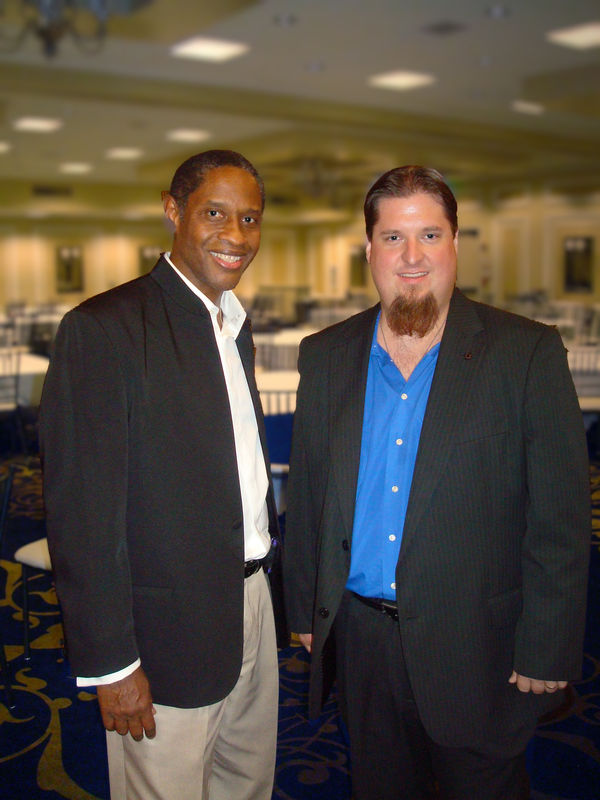
As you've made the download available, I'm assuming its okay to have a go. Apologys if that's not the case. Here I selected the two figures in the foreground and made them into a new layer. Then I got rid of the colour cast in the background, darkened, desaturated and blurred it a bit. Finally I when round the outlie of the foreground layer with the eraser tool set at 50% opacity. It does seem strange that you should have to use PS to get rid of the PS look, but it happens with mixed lighting. Of course you would need to spend more time on it to get it looking right, this is only meant as a demo.
Oct 5, 2012 03:01:18 #
GoofyNewfie wrote:
If you had matched the color balance of the flash to the ambient light it would look a bit better.
This!
The color temp of the flash is way too cool compared to the color temp of the ambient lighting in the background.
If you try to change the white balance of the entire image, it won't work.
The only way to fix this now is to use a mask (or select tool) to select just the people around the edges, and then change the white balance for just those regions of the image. But even then, it won't look too good.
Do some reading on color gels for flash to learn about the basics of why the image looks this way and how not to make this mistake yourself. Good luck.
Oct 5, 2012 03:33:24 #
In my opinion the Jacket is ok. I examined the pixels and they blend correctly(At least from my spot check.) The problem is the head. Mismatch of the color cast from ambient to flash. The old school way to correct this is with the smudge tool. Just smudge the hair out to cover the grey around the edges.
The easiest technique(There are a dozen) to add a color cast is to cut out a piece of the ceiling about the size of the ear or nose and put that on a seperate layer. Place the cutout over the center of the face. Add a gaussian blur at between 300 and 500 pixels This spreads out the color to cover a larger area. It will soften the skin a bit. To correct the softening you would have to use a Highpass filter with a blend mode. to re apply the texture to the skin. The high pass filter should be applied with a softlight blend mode.
I made the changes minus the highpass. A very slight colorcast from the yellow on the ceiling to the skin. This is just one way to do it. There are lots of ways. I usually use the levels and the channel mixer but I don't want to get into a course.
I only added the cast to the guy camera right and only to his face.
The reason the smudge tool works(Be sure you make it about 4 pixels.) It comes the closest(Undetectably close) to the natural transition between different photographic surfaces. You basically smudge the black hair over the grey halo slightly into the yellow background. I left the highlight in the hair on the right. (It looked ok)
I also removed the cyclops hotspot on the forehead.
This only took about a minute and did nothing to the original background color.
Oct 5, 2012 05:33:41 #
Wellhiem wrote:
As you've made the download available, I'm assumin... (show quote)
f1.8 to 3.5 would have done the job. instead of f22 + & it's still got RED EYE. Even pro's get it wrong sometimes. Get it right in camera that should be the aim. However be grateful for the photo, of the famous person whichever he is. For me (Excepting the red eye) it's a quality photo. Taken with some expensive kit no doubt but Red Eye? Had I taken the shot I most certainly would have removed the red eye before handing it over. You don't even have to buy PS etc. Two seconds in Picassa. It works.
Oct 5, 2012 06:00:49 #
HarryCleworth wrote:
quote=Wellhiem As you've made the download availa... (show quote)
Wow. I withdraw my previous comments having noticed the camera in use. I looked at the properties, photo taken on the 09-09-2012 at 2331. the properties say 6mm Lens F2.8 1/40 sec. It's obviously the wide angle lens that is giving the DOF I doubt if it could have been different with that camera & 6mm lens. Shorter the lens greater the DOF. it works the other was as well longer the lens the less DOF. It is a good quality shot & anyone wanting a similar deep DOF..........use a wide angle lens. It works.
Oct 5, 2012 09:35:26 #
Grammyratzi wrote:
My husband was in Hollywood for the Star Ceremony for Walter Koenig and had an opportunity to have his picture taken with Tim Russ by a friend. To us it looks like they were both photo shopped into the background but this is the actual picture that was taken.
Any ideas why it should look this way and how we can minimize this look? We were only given the .jpeg version. Thanks for any help/suggestions you may have.
Sony DSC-W80
F2.8
1/40
ISO 400
Any ideas why it should look this way and how we can minimize this look? We were only given the .jpeg version. Thanks for any help/suggestions you may have.
Sony DSC-W80
F2.8
1/40
ISO 400
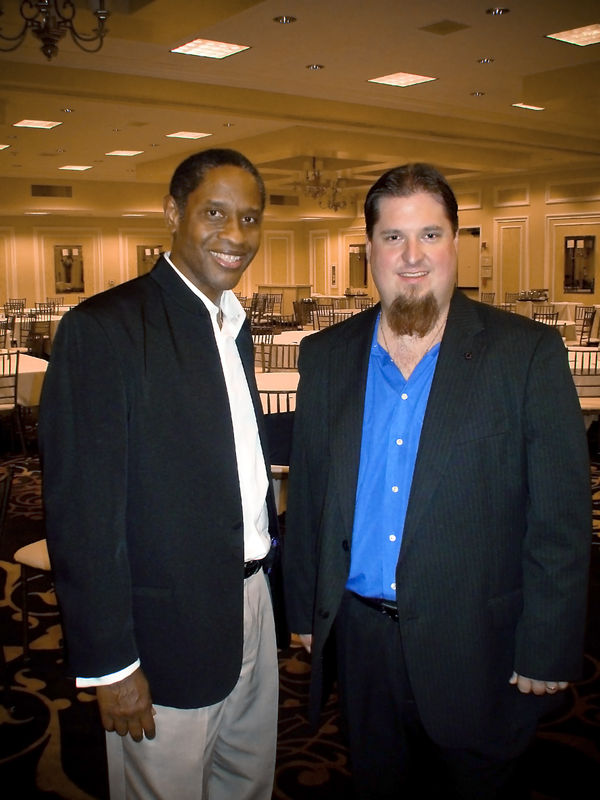
Do you like this any better? I did nothing to the jacket by the way. Just changed the colour of the background and applied bokeh to the background. It's all been done with a very quick and not very accurate selection but it shows the idea.

Oops! forgot the red eye fix.
Oct 5, 2012 09:52:14 #
infocus wrote:
Do you like this any better? I did nothing to the jacket by the way. Just changed the colour of the background and applied bokeh to the background. It's all been done with a very quick and not very accurate selection but it shows the idea.
Do you like this any better? I did nothing to the jacket by the way. Just changed the colour of the background and applied bokeh to the background. It's all been done with a very quick and not very accurate selection but it shows the idea.
I like this one best. You fixed the halo also. Nice work!
If you are OK with a non-standard size you still could crop about half (or slightly more) of the space over their heads.
Oct 5, 2012 13:22:25 #

Oct 5, 2012 13:40:09 #
Wow!! I want to do a quick thank you to all if you that addressed the question I posted being can the "photo shopped" look be helped. You all went above board with your suggestions and efforts. I'm on my phone at the moment so can't look closely at the full size of your efforts but I will as soon as I return home and will comment and thank each of you individually at that time. I just didn't want you to think I didn't appreciate your efforts!
To those who took the question in a direction assuming I was not happy to have this picture, or that I should just be grateful for what we had and not ask for ways to improve the picture I say thank you for taking the time to comment but please refer to the question being asked. We are VERY proud to have this picture as it was a once in a lifetime opportunity for my husband. I used this picture as an example to help me learn how to fix a problem I have had. This picture was the best example of a "photo shopped" look that I had. It was my belief that this forum was created for us to post pictures that we would like other members to offer methods and techniques showing how to correct issues that the poster is having. I did not realize it was for members to tell posters what they should or should not be happy to have. If that is an unwritten rule to posting on this board I apologize.
Thank you again to those who offer their talents and comments to help a newbie learn.
Oct 5, 2012 15:34:27 #
Grammyratzi wrote:
Wow!! I want to do a quick thank you to all if you... (show quote)
Sorry I didn't realize you were a "Newbie" the thing that a lot of Photographer newbies don't know "With respect & no offence meant" is the fact that a short focal length lens of, in your case 6mm (According to the properties) will, at just about all f stops available produce a greater Depth of Field. on the other hand a longer focal length lens will both compress & reduce the DOF. As I see it this forum it is here for all to give their opinions & those with more experience will do just that & as it happens may put in a suggestion. The picture in question is excellent as it is except the red eye, now that's IMO. however I do realize others have a different point of view. If you want the subjects to be in focus & the background out of focus then either edit it in whatever your editing choice of program is. Or use a more complex camera with a much larger sensor, with the ability to use the full range of F stops/shutter speeds/iso settings also interchangeable lenses.
Another aspect in your cameras case would be not to use the Slow syncro flash setting for that type of photo then the only lighting would be the flash, the background would not be visible. I realize you are limited to the equipment you have to hand. I use, Nikon D40 Nikon D300 & Nikon D700 plus an old sony point & shoot with a sensor the size of a flea. Everything comes out sharp as needles with a DOF of, from a few inches to infinity. The correct tool for the job is important but no good if it's on the shelf at home, as often happens to me, in which case you use whatever you have with you & accept its limitations. Use PS & a few mins (Or hours) to edit. You could buy a more versatile camera but forget the auto mode if there is one.
I repeat no offence meant. 45 years experience mostly B&W Film & digital about 17 years. It is a wonderful hobby & everyone will willingly assist a newbie but none of us know everything, except maybe Ken Rockwell.
Harry.
If you want to reply, then register here. Registration is free and your account is created instantly, so you can post right away.