I'm trying to match what my camera does automatically!
Dec 22, 2020 09:31:03 #

I shoot both RAW and JPG. On my "new" camera (a Canon EOS 1DX) I'm finding that I like the automatically processed jpegs better than what I can do with the raw image. I do like using the raw image because it holds more detail. My standard adjustments to the raw is highlights down a tad (or a lot, depending); the blacks down to create contrast; clarity up about 50 points; vibrance up about 15; sharpening about 25. That brings it into acceptable range, but nothing I do seems to bring it to the level of the auto jpg. So what do I do to make the raw more closely match the jpeg?
(I really dislike doing the PP work, so at this point I'm inclined to just use the camera's JPG and call it done!)
(Note the jpegs shown are straight OOC with the camera's processing.)
(I really dislike doing the PP work, so at this point I'm inclined to just use the camera's JPG and call it done!)
(Note the jpegs shown are straight OOC with the camera's processing.)
RAW file with my processing
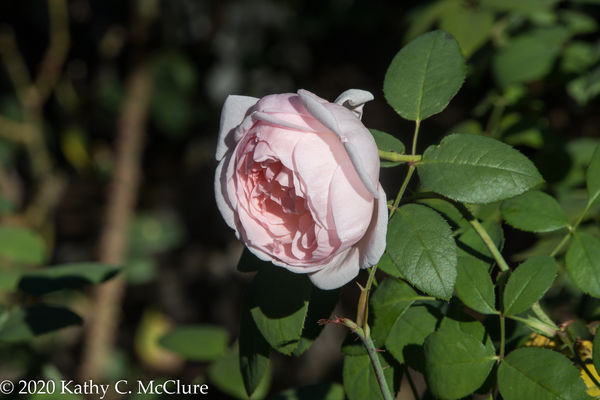
(Download)
JPG file with camera's processing
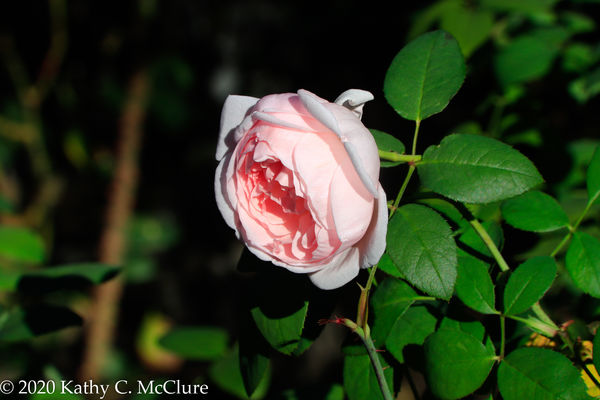
(Download)
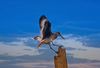
From RAW file. Also added a bit of saturation to bring out the oranges
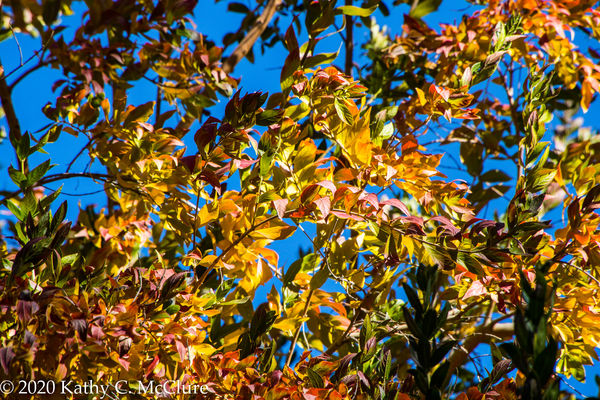
(Download)
JPG processed in camera
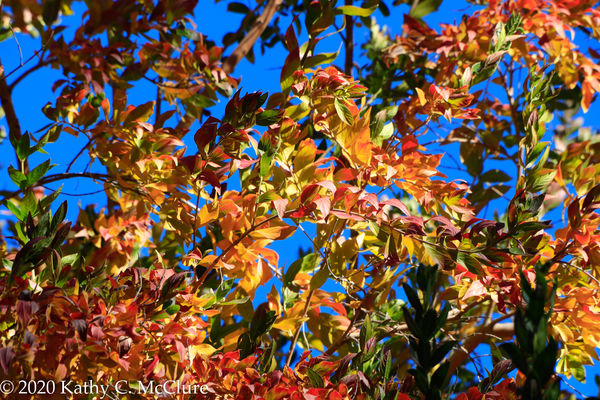
(Download)
Dec 22, 2020 09:55:51 #

I'm sure this will be a stupid question but, if you like the jpeg version better and "dislike the PP work", then why not just shoot jpegs? Or, at least, Jpeg + Raw?
Dec 22, 2020 10:04:12 #
Lynn 1509
Loc: Northern Illinois
AzPicLady wrote:
I shoot both RAW and JPG. On my "new" c... (show quote)
I see what you mean and I'm in the same boat. With images from my A7Riii, I can process the raws and equal or usually beat the jpegs. With my new iPhone 12 Pro, I've processed a couple Pro raw files and my efforts don't beat the camera jpegs. I do help things simple. I work in camera raw, going PS and then make small area adjustments with NIK products. If you like what the camera is giving you, Hey, you are the photographer, if you like go with it. It's more fun shooting that processing anyway.
Dec 22, 2020 10:11:31 #
cameraf4 wrote:
I'm sure this will be a stupid question but, if you like the jpeg version better and "dislike the PP work", then why not just shoot jpegs? Or, at least, Jpeg + Raw?
I thought I answered this, but maybe not. I DO shoot RAW and JPEG. I like using the RAW image because it contains more detail.
Dec 22, 2020 10:12:51 #
Lynn 1509 wrote:
I see what you mean and I'm in the same boat. With images from my A7Riii, I can process the raws and equal or usually beat the jpegs. With my new iPhone 12 Pro, I've processed a couple Pro raw files and my efforts don't beat the camera jpegs. I do help things simple. I work in camera raw, going PS and then make small area adjustments with NIK products. If you like what the camera is giving you, Hey, you are the photographer, if you like go with it. It's more fun shooting that processing anyway.
You got that right! I'd a whole lot be out shooting than sitting in front of a computer!!!!! My cell phone does a pretty good job also, just doesn't give me large images.
Dec 22, 2020 10:31:30 #
AzPicLady wrote:
I shoot both RAW and JPG. On my "new" c... (show quote)
Frustrating, isn't it? I haven't spent much time learning post-processing, but, with the little I have done, I haven't gotten very far. Seems like I spend a lot of time doing and undoing!
Dec 22, 2020 10:54:27 #
What are you using to process the raw file? If you use your Canon DPP software, you have the choice to use the same processing algorithm that the camera used to produce the jpeg...
Dec 22, 2020 11:05:47 #
I feel your pain, Kathy. Fortunately, I like PP work so I have learned to equal the jpegs and I can make the changes that please me. Nice image, by the way.
Dec 22, 2020 11:10:29 #

AzPicLady wrote:
....So what do I do to make the raw more closely match the jpeg?....
You appear to be trying to get most of your contrast boost via the Clarity slider. Try making more use of the Contrast slider. Before you add clarity try 20 or 30 on the Contrast slider (the optimum amount varies depending on the image). That should add depth and a 3D look to the image and take away some of the wishy washy look. When I want to add vividness I use both contrast and clarity, but when I want to push things I prefer to push Contrast rather than Clarity. I find that pushing Clarity produces a harshness that I don't care for. Pushing Contrast can result in the darks becoming a bit too solid but that's easily fixed by lifting Blacks and/or Shadows. And if the highlights become too bright it's not too difficult to rein them in with Whites and/or Highlights.
Dec 22, 2020 11:11:35 #

Ourspolair has a great suggestion. But check my same question in August, which he also solved 
https://www.uglyhedgehog.com/t-660442-2.html#11490710
I learned that in PS Elements, simply choosing Camera Profile and then the appropriate selection, based on what you've set for jpg's, works really well as a place to start your raw edits!
https://www.uglyhedgehog.com/t-660442-2.html#11490710
I learned that in PS Elements, simply choosing Camera Profile and then the appropriate selection, based on what you've set for jpg's, works really well as a place to start your raw edits!
Dec 22, 2020 11:33:15 #
srt101fan wrote:
Frustrating, isn't it? I haven't spent much time learning post-processing, but, with the little I have done, I haven't gotten very far. Seems like I spend a lot of time doing and undoing!
That sounds like me. I've been at it for a very long time, and I don't seem to be getting much better. I do know how to do certain things, and I'm tuning in to the Marc Muench webinars. I've learned a lot from them. It's just that I don't like doing it. I made my living looking at a computer screen. I really don't want to do it for my "fun" stuff.
Dec 22, 2020 11:34:04 #
Every raw converter is a little different. Lightroom doesn't have the same camera profiles as Canon has in DPP or out of the camera. I find Adobe Color to be most similar. You can check if you have a profile called camera standard in lightroom, which is their attempt to match Canon's standard profile. They are at least 2 years behind schedule in making these profiles. Also if you have auto lighting optimizer turned on in camera, you will have a different curve applied in the out of camera jpeg, but Lightroom ignores this setting so you have to adjust the curve in lightroom.
Lately I've been taking a long round trip from Lightroom to DPP4, to photoshop and back to lightroom. It makes for a different workflow where Lightroom is just the organizer and DPP does the raw conversion then finished off using the camera raw filter and adjustment layers in Photoshop, then saved back to the same folder and synced with Lightroom so it is visible in lightroom. Not as simple as the usual Lightroom to Photoshop and back routine, and frankly not a huge difference, which makes me question why I bother.
Lately I've been taking a long round trip from Lightroom to DPP4, to photoshop and back to lightroom. It makes for a different workflow where Lightroom is just the organizer and DPP does the raw conversion then finished off using the camera raw filter and adjustment layers in Photoshop, then saved back to the same folder and synced with Lightroom so it is visible in lightroom. Not as simple as the usual Lightroom to Photoshop and back routine, and frankly not a huge difference, which makes me question why I bother.
Dec 22, 2020 11:34:47 #
Ourspolair wrote:
What are you using to process the raw file? If you use your Canon DPP software, you have the choice to use the same processing algorithm that the camera used to produce the jpeg...
I started using PS but now use mostly LR. I actually don't have the DPP software on my desktop. Maybe I need to download it! It was on my old computer that I had when I purchased my older cameras. Thanks!
Dec 22, 2020 11:39:28 #
R.G. wrote:
You appear to be trying to get most of your contra... (show quote)
Thanks so much, RG. I sort of got addicted to the clarity slider when I began using LR. It brings up the midtones and the details very nicely. But I started to notice that I was getting unwanted white lines around some of the objects where dark met light. That was a pain, and to get rid of them, I had to take the clarity back down a LOT until it no longer did what I wanted. So that's annoying. In the Muench webinars, they recommend using the lights and darks sliders instead of the contrast. But sometimes, on the RAW images, that's simply not enough. One thing I noticed this morning is that the JPEGS appear to have the tones more to the right (toward yellow). Maybe that's a fix I need to explore.
Dec 22, 2020 11:41:12 #
Linda From Maine wrote:
Ourspolair has a great suggestion. But check my same question in August, which he also solved
https://www.uglyhedgehog.com/t-660442-2.html#11490710
I learned that in PS Elements, simply choosing Camera Profile and then the appropriate selection, based on what you've set for jpg's, works really well as a place to start your raw edits!
https://www.uglyhedgehog.com/t-660442-2.html#11490710
I learned that in PS Elements, simply choosing Camera Profile and then the appropriate selection, based on what you've set for jpg's, works really well as a place to start your raw edits!
I'll look into that. I forget about using the camera profile! I could even do that on import! Not sure how to do the second part to that, but then you're in Elements and I'm in LR. Hummmmm. More digging! THANKS!
If you want to reply, then register here. Registration is free and your account is created instantly, so you can post right away.