Luminosity Maps Part 2 & 3
Aug 30, 2020 14:48:48 #
Steve DeMott
Loc: St. Louis, Missouri (Oakville area)
Part 2 The Dark Side
Part 1 https://www.uglyhedgehog.com/t-662581-1.html
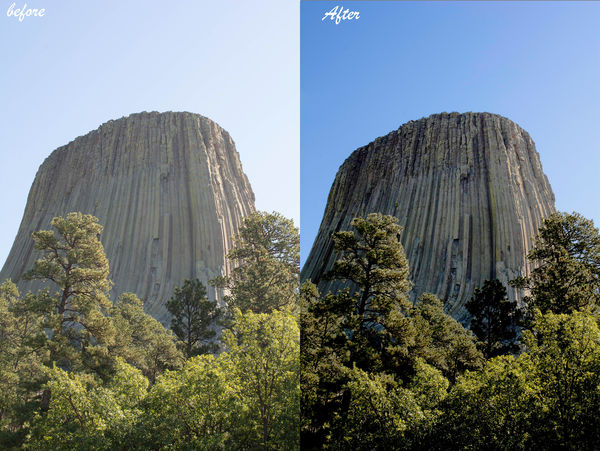
Our next range will be the dark and shadow areas. Notice that in the last tutorial that the gradient map is not needed. We’re going to use the same steps we used for the highlights. Make sure the color palette is black & White. Press the “D” key if not.
Gradient Map
We can do this in two ways. Create a new gradient map above the highlight layer, Go to Layer>New Adjustment Layer>Gradient Map, or click & drag the gradient map above the highlight layer. I suggest, click on the gradient map, press & hold the alt key and drag the gradient map above the highlight layer. This will make a copy of the gradient map. Disable the highlight map so that it doesn’t interfere. We’ll turn it back on later.
Our goal here is to highlight the dark and darken the highlights. Remember the color stops; drag the white stop to the left of the black stop. The image will reverse. Adjust the stops to your liking. Press OK.
Create Mask
Create a curves adjustment layer, same as before, go to Image>Apply image, keep the defaults. Press OK. We now have an adjustment map for the dark areas of the image. Open the curves Property and adjust to your liking.
Disable the gradient Map, enable the highlight layer, Open the shadows curve property and adjust to your liking.
Part 3 The Midtones
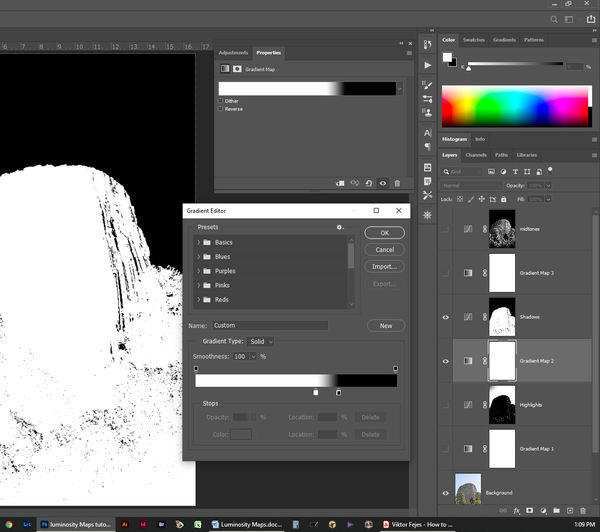
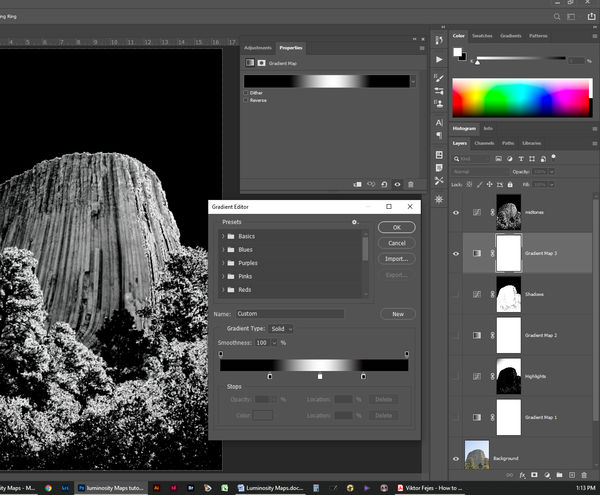
The midtones will use the same steps as before with a small addition. Make sure the color palettes are set to black & white. “D” key. Turn off the highlights & shadow layers. Copy a gradient map above the shadows layer. We need to have the highlights show up as black, the shadows show up as black and the midtones show up as white. To do this we have to add another color stop.
Gradient editor
Open the gradient editor. We have two color stops, Black & white. Move the black stop to the left of the white stop to about 25%. Move the white stop to about 50%. To add a stop, place your cursor to the right of the white stop just below the gradient bar and click. A new color stop will appear. Change the color of the stop double clicking on the stop and use the color picker to create black. Move the stop to your liking, making sure that they are black (highlights), white (midtones), and black (shadows).
Create Mask
Follow the same steps above in creating a mask.
Enable the Midtone mask, Shadow mask & highlight mask.
Couple of notes
Gradient maps will only turn into masks when applied to another adjustment layer using Apply Image.
You can slightly apply Gaussian blur for extra finesse.
You can create a mask using ANY adjustment layer that has a mask.
You can create a mask to adjust colors.
You can create as many masks you want.
In each mask you can use the brush tool to add or delete areas of the mask.
Open the gradient layer and re-adjust the color stops. Just remember to re-apply the Apply Image.
Part 1 https://www.uglyhedgehog.com/t-662581-1.html
Our next range will be the dark and shadow areas. Notice that in the last tutorial that the gradient map is not needed. We’re going to use the same steps we used for the highlights. Make sure the color palette is black & White. Press the “D” key if not.
Gradient Map
We can do this in two ways. Create a new gradient map above the highlight layer, Go to Layer>New Adjustment Layer>Gradient Map, or click & drag the gradient map above the highlight layer. I suggest, click on the gradient map, press & hold the alt key and drag the gradient map above the highlight layer. This will make a copy of the gradient map. Disable the highlight map so that it doesn’t interfere. We’ll turn it back on later.
Our goal here is to highlight the dark and darken the highlights. Remember the color stops; drag the white stop to the left of the black stop. The image will reverse. Adjust the stops to your liking. Press OK.
Create Mask
Create a curves adjustment layer, same as before, go to Image>Apply image, keep the defaults. Press OK. We now have an adjustment map for the dark areas of the image. Open the curves Property and adjust to your liking.
Disable the gradient Map, enable the highlight layer, Open the shadows curve property and adjust to your liking.
Part 3 The Midtones
The midtones will use the same steps as before with a small addition. Make sure the color palettes are set to black & white. “D” key. Turn off the highlights & shadow layers. Copy a gradient map above the shadows layer. We need to have the highlights show up as black, the shadows show up as black and the midtones show up as white. To do this we have to add another color stop.
Gradient editor
Open the gradient editor. We have two color stops, Black & white. Move the black stop to the left of the white stop to about 25%. Move the white stop to about 50%. To add a stop, place your cursor to the right of the white stop just below the gradient bar and click. A new color stop will appear. Change the color of the stop double clicking on the stop and use the color picker to create black. Move the stop to your liking, making sure that they are black (highlights), white (midtones), and black (shadows).
Create Mask
Follow the same steps above in creating a mask.
Enable the Midtone mask, Shadow mask & highlight mask.
Couple of notes
Gradient maps will only turn into masks when applied to another adjustment layer using Apply Image.
You can slightly apply Gaussian blur for extra finesse.
You can create a mask using ANY adjustment layer that has a mask.
You can create a mask to adjust colors.
You can create as many masks you want.
In each mask you can use the brush tool to add or delete areas of the mask.
Open the gradient layer and re-adjust the color stops. Just remember to re-apply the Apply Image.
Aug 30, 2020 14:57:10 #

Aug 30, 2020 16:10:13 #
Steve DeMott
Loc: St. Louis, Missouri (Oakville area)
Fotoartist wrote:
Impressive.
Thank you
I saw this post first, which is why I didn't comment in part 1. Your idea of Before & aft was great.
I've enjoyed a lot of your post & hope this can help.
Aug 30, 2020 19:46:59 #

Again, Steve, thanks for the time and effort that went into this post and the other posts!
Aug 31, 2020 07:39:16 #

I added links to both of your tutorials in the list originally created by Searcher, which I've tried to keep updated:
https://www.uglyhedgehog.com/t-645056-1.html
One thing different about PS Elements is the terminology and action of adjustment layers and masks. If you're curious, that is covered here:
https://helpx.adobe.com/photoshop-elements/using/adjustment-fill-layers.html
I don't have curves; only "levels" is available. And I'm just now remembering I can choose by color - I don't think I've ever used that way!
Thanks again for your efforts, Steve.
Aug 31, 2020 09:07:38 #
Steve DeMott
Loc: St. Louis, Missouri (Oakville area)
Linda From Maine wrote:
......Thanks again for your efforts, Steve.
Thanks Linda.
I did a little research on PSE and unfortunately PSE does not have an equivalent command for Apply Image. I don't know enough about PSE to find a work around.
Thanks
Steve
Aug 31, 2020 09:25:01 #
Steve DeMott wrote:
We PSE users probably don't miss what we've never had Thanks Linda.
I did a little research on PSE and unfortunately PSE does not have an equivalent command for Apply Image. I don't know enough about PSE to find a work around.
Thanks
Steve
I did a little research on PSE and unfortunately PSE does not have an equivalent command for Apply Image. I don't know enough about PSE to find a work around.
Thanks
Steve
 I admire those willing to tackle the life-long learning curve of Photoshop!
If you want to reply, then register here. Registration is free and your account is created instantly, so you can post right away.