Luminosity Maps
Aug 30, 2020 12:08:14 #
Steve DeMott
Loc: St. Louis, Missouri (Oakville area)
Luminosity Maps for Highlights
Here’s an easy way to change the brightness of different areas using the Gradient Map Adjustment Layer to create Luminosity maps in Photoshop 2020.
A couple of notes. I use Photoshop CC 2020. For those who use PS Elements, I hope you can translate these steps. I never use the original image. Make a copy of the original, Layers>Duplicate Layer & name it background & rename the original to “original” & lock the original. I’ll also assume that you are familiar with creating masks and some of the basic functions in PS.
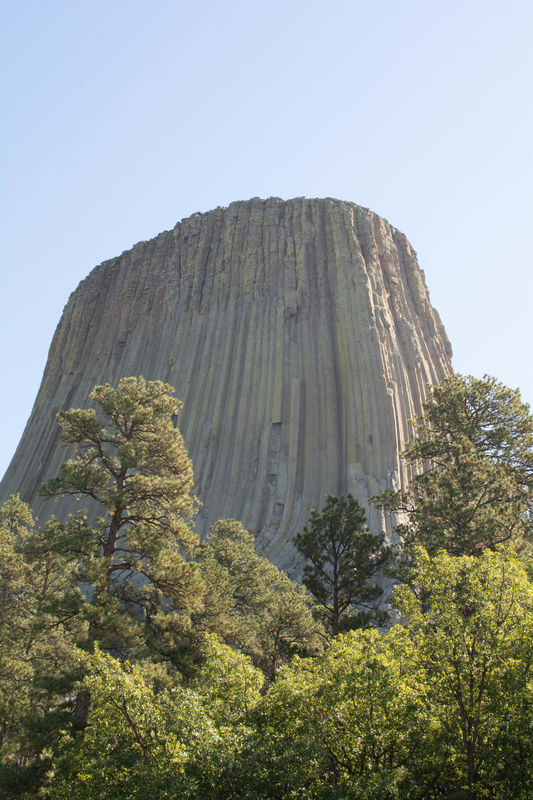
Open an image.
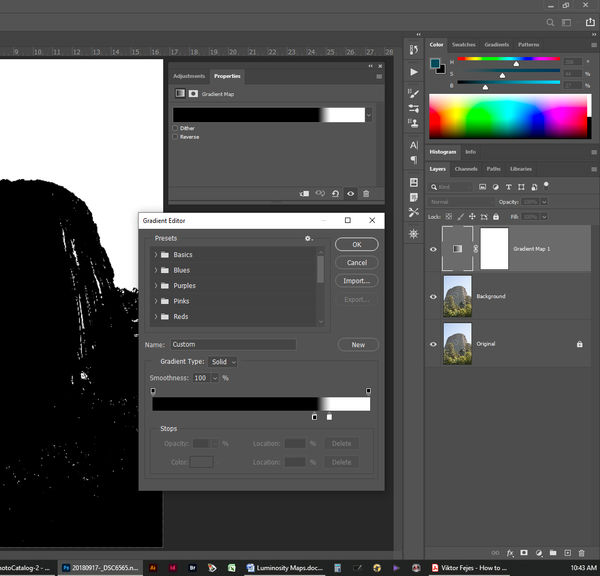
We need to create a gradient Map Adjustment Layer above the background layer. Make sure your foreground & background colors are set to default (Keyboard shortcut “D”). To create the adjustment layer go to Windows>Layers, on the bottom of the layers panel you’ll see 7 icons. Press the 4th icon from the right, Create new fill or adjustment layer, and select the Gradient Map. Another way, go to Layer>New Adjustment Layer>Gradient Map, click OK. In the Properties Panel, click on the gradient strip to open the Gradient Editor. Remember, we’re creating a mask and the image will be black & white.
Gradient Editor settings:
Presets: Select the Black & White, Gradient Type: Solid, Smoothness 100%
Gradient Strip: The Gradient strip should go from black to white. The small house shaped markers are called Color Stops. We’ll Be adjusting the bottom stops. The bottom left color stop should be black, if not double click on stop and select black using the color picker, click OK. Do the same to the bottom right color stop, but this will be set to white.
Adjustments for the brightest areas or Highlights.
Click and hold the black color stop and drag to the right to around 75%. You’ll see the percentages in the Location box under Stops. As you can see this turns everything black except the highlights. Using the same procedure drag the white color stop to about 85%. This will clean up and brighten the white areas. You can fine tune both color stops to your liking. Keep in mind that this is a mask, Black hides & white reveals and these percentages are just starting points. When satisfied click OK.
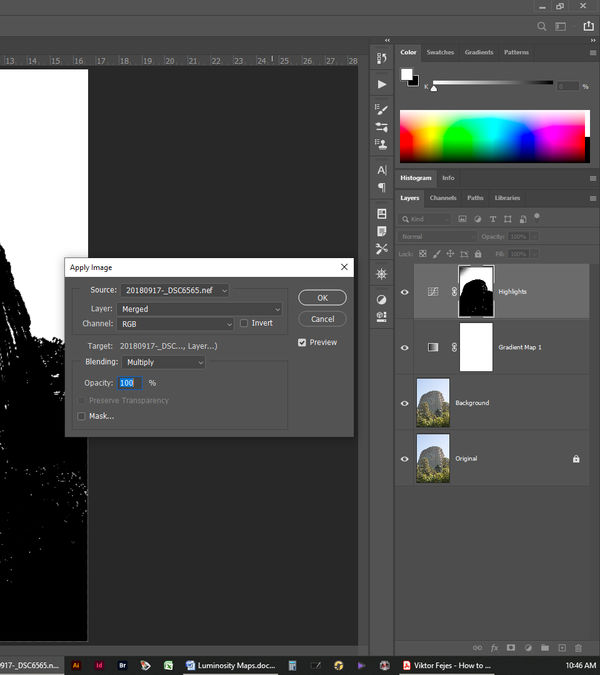
Now we need to create the mask.
We’ll use the Curves Adjustment layer for the mask. Go to Layer>New Adjustment Layer>Curves. Name this layer highlights, click OK. Make sure that the curves layer mask is active by clicking on the mask. This should be a white rectangle surrounded by four brackets. Go to Image>Apply image. Use the default settings: Layer: Merged, Channel: RGB, Blending: Multiply, and Opacity: 100%. Select OK.
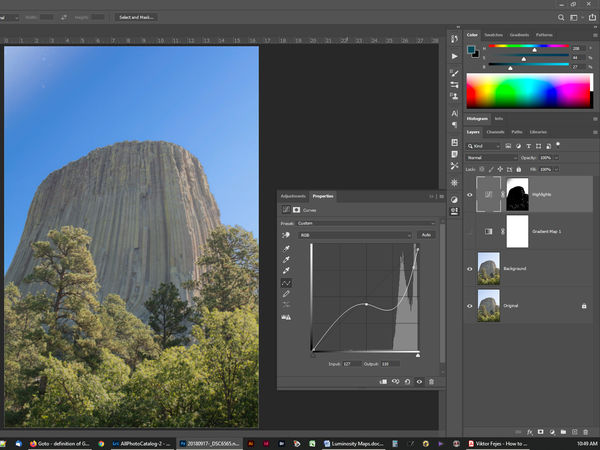
We now have an adjustment curve for our highlights. Here’s how it works. Turn off the Gradient map by clicking on the eye. Now we see the full color image. Open the properties for the curves and make adjustments until the highlights is to your liking. You can also use the Brush tool to paint the mask for areas that need or don’t need masking. Double click on mask for more adjustments if needed.
This is a lot easier do then to explain. Later today I’ll post how to do shadows & mid tones. It’s the same process just a few minor tweaks.
Here’s an easy way to change the brightness of different areas using the Gradient Map Adjustment Layer to create Luminosity maps in Photoshop 2020.
A couple of notes. I use Photoshop CC 2020. For those who use PS Elements, I hope you can translate these steps. I never use the original image. Make a copy of the original, Layers>Duplicate Layer & name it background & rename the original to “original” & lock the original. I’ll also assume that you are familiar with creating masks and some of the basic functions in PS.
Open an image.
We need to create a gradient Map Adjustment Layer above the background layer. Make sure your foreground & background colors are set to default (Keyboard shortcut “D”). To create the adjustment layer go to Windows>Layers, on the bottom of the layers panel you’ll see 7 icons. Press the 4th icon from the right, Create new fill or adjustment layer, and select the Gradient Map. Another way, go to Layer>New Adjustment Layer>Gradient Map, click OK. In the Properties Panel, click on the gradient strip to open the Gradient Editor. Remember, we’re creating a mask and the image will be black & white.
Gradient Editor settings:
Presets: Select the Black & White, Gradient Type: Solid, Smoothness 100%
Gradient Strip: The Gradient strip should go from black to white. The small house shaped markers are called Color Stops. We’ll Be adjusting the bottom stops. The bottom left color stop should be black, if not double click on stop and select black using the color picker, click OK. Do the same to the bottom right color stop, but this will be set to white.
Adjustments for the brightest areas or Highlights.
Click and hold the black color stop and drag to the right to around 75%. You’ll see the percentages in the Location box under Stops. As you can see this turns everything black except the highlights. Using the same procedure drag the white color stop to about 85%. This will clean up and brighten the white areas. You can fine tune both color stops to your liking. Keep in mind that this is a mask, Black hides & white reveals and these percentages are just starting points. When satisfied click OK.
Now we need to create the mask.
We’ll use the Curves Adjustment layer for the mask. Go to Layer>New Adjustment Layer>Curves. Name this layer highlights, click OK. Make sure that the curves layer mask is active by clicking on the mask. This should be a white rectangle surrounded by four brackets. Go to Image>Apply image. Use the default settings: Layer: Merged, Channel: RGB, Blending: Multiply, and Opacity: 100%. Select OK.
We now have an adjustment curve for our highlights. Here’s how it works. Turn off the Gradient map by clicking on the eye. Now we see the full color image. Open the properties for the curves and make adjustments until the highlights is to your liking. You can also use the Brush tool to paint the mask for areas that need or don’t need masking. Double click on mask for more adjustments if needed.
This is a lot easier do then to explain. Later today I’ll post how to do shadows & mid tones. It’s the same process just a few minor tweaks.
original image
(Download)
after gradient map
(Download)
(Download)
using curves adjustment. These are extreme adjustments
(Download)
Aug 30, 2020 12:14:38 #

Aug 30, 2020 12:15:48 #

Aug 30, 2020 12:24:43 #

Steve, thanks for taking the time to provide this information. This is what makes UHH such a great site.
Aug 30, 2020 12:34:17 #

Grateful appreciation for your time and efforts, Steve. I have PS Elements, so will let you know if I run into a roadblock.
Aug 30, 2020 12:36:52 #

Steve, I'll definitely try this. Thanks for the work you put into your post.
Aug 30, 2020 16:01:44 #
Steve DeMott
Loc: St. Louis, Missouri (Oakville area)
RichardTaylor wrote:
Thanks very much.
Thank you and I hope you'll like pt. 2
Aug 30, 2020 16:03:01 #
Steve DeMott
Loc: St. Louis, Missouri (Oakville area)
UTMike wrote:
Steve, thanks for taking the time to provide this information. This is what makes UHH such a great site.
I really enjoy doing things like this.
Thanks for the great comment.
Aug 30, 2020 16:03:46 #
Steve DeMott
Loc: St. Louis, Missouri (Oakville area)
Linda From Maine wrote:
Grateful appreciation for your time and efforts, Steve. I have PS Elements, so will let you know if I run into a roadblock.
One of these days I'm going to load PSE and see how it works.
Thanks Linda
Aug 30, 2020 16:05:18 #
Steve DeMott
Loc: St. Louis, Missouri (Oakville area)
DWU2 wrote:
Steve, I'll definitely try this. Thanks for the work you put into your post.
Don't forget pt 2. There are so many ways to use this idea it's scary.
thanks DWU2
Aug 31, 2020 17:27:07 #
If you want to reply, then register here. Registration is free and your account is created instantly, so you can post right away.