Addendum to Exposure and How It Works
Jan 21, 2019 15:12:28 #

Exposure and How It Works - A Beginner's Guide
https://www.uglyhedgehog.com/t-574357-1.html
More Exposure and How It Works - A Beginner's Guide
https://www.uglyhedgehog.com/t-574448-1.html
Finishing Up Exposure and How It Works - A Beginner's Guide - This one so you can bookmark all of them.
https://www.uglyhedgehog.com/t-574638-1.html#9795237
Now that we've covered the basics of balancing the shutter speed, aperture, and ISO to produce an image, let's take it a step further. We are going to look at the glass we fill from the point of a digital camera. It's my opinion that camera manufacturers want the user to produce the most satisfactory pictures from each of their products. Keep that in mind, as there are "safety" features built into those remarkable pieces of equipment. Your camera may indicate overexposure when in reality it's not.
The glasses we've been using have been fine up to this point. But, let's focus on the glass we'll call the image glass. If we look at this image glass we can see a very faint line running around the inside surface of the glass. It's located a bit down from the top. Hmmm, what's up with that.
That is the jpg line. That is the line by which the camera decides whether a photograph is overexposed or not. If the glass is filled a bit above that line we receive a warning, blinkies, that the glass is overfilled. But, wait. There's still a good bit of room above that line. Exactly. That good bit of room is the difference between the RAW capture and the jpg capture.
I'm not going to go into a detailed description of a jpg image. There are a good deal of sites that will explain the format and it's characteristics. For many, the jpg image is more than sufficient for their photographic needs. However, for those wishing to have more control and editing abilities, the RAW file provides that. That is the equivalent of our full glass, above the scribed mark somewhat below to rim.
This is where the terms Expose To The Right and Expose Beyond The Right are used. The right being the upper limit of what the JPG file "thinks" exposure-wise is the limit. The RAW file can handle a bit more exposure and be quite usable. The bit of additional exposure can vary from camera to camera, not just model to model. So, if one wishes to take advantage of the extra capabilities of the RAW aspect of image capture, it is best for one to diligently test their equipment.
Almost every light meter reads the light and provides a camera setting that will place that metered area in the middle of the range between black and white, what's referred to as middle gray. This makes sense in that one would not find using a meter biased towards either end a useful tool.
So, digitally exposing for the brightest part of the scene and then increasing the exposure sufficiently to record that portion of the scene at the level of lighter gray to white that one wishes will produce a very useable start for processing the image.
Just a note here that this is the opposite of the practice for metering and adjusting for exposure when using black and white film. For film, the adjustment is to place the less luminous areas of the scene in the appropriate gray to black rendering. Then, the brighter areas of the scene are handled through processing. Digital is just the opposite. Set the exposure for the brightest part of the scene and adjust the darker areas in processing.
The following description addresses adjustments in Adobe Camera Raw. This is what I use and have little experience with any other products.
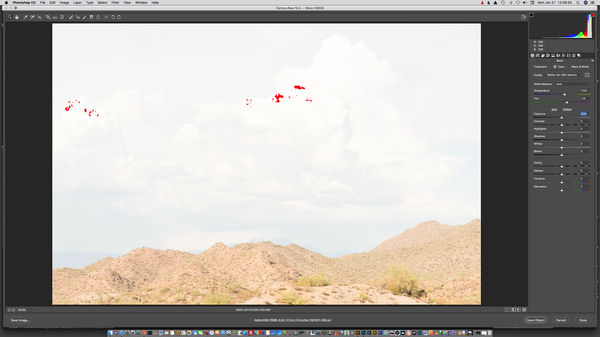
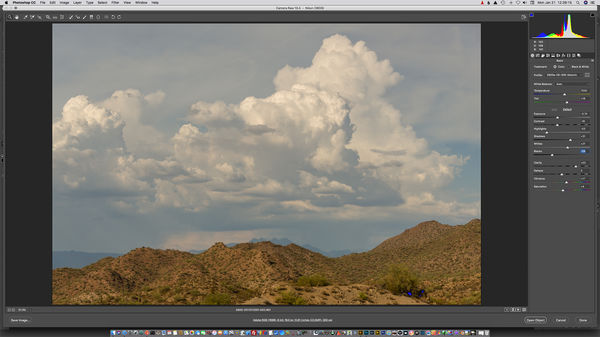
One approach to obtaining and starting the processing of an image is done at the very start of the capture. Spot meter the brightest part of the scene, adjust the exposure to render that part of the scene the brightness one desires using the camera's capabilities. When the image is opened in Adobe Camera RAW, the histogram will be "crammed" to the right. Adjust the Exposure slider to the left to more evenly distribute the histogram. Then, further adjustments of the Highlights and Shadows sliders, then the Whites and Blacks sliders will produce a relatively good start to bring the image into Photoshop to complete the processing.
In some cases, using the Auto selection in ACR at the start will provide a good starting point for the initial portion of the processing. I prefer to set each slider rather then let the program set them for me.
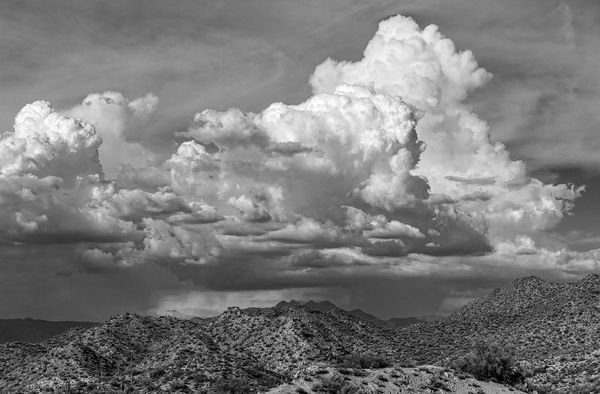
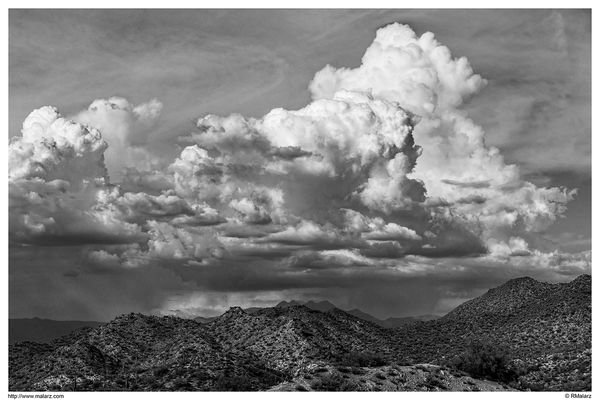
Yes, this is the procedure I use on each of my photographs. The examples show the initial opening of the image in ACR, the ACR adjustments for that image, then the initial image in Photoshop, and the finished photograph.
Additional benefits of pushing the exposure to the right is that this assists in diminishing noise in a photograph. Though, I view noise as digital grain and don't find it all that annoying, some do. This technique does diminish noise. For the purpose of this discussion that's all that needs to be said.
This procedure is not for everyone. It takes time to test and evaluate your camera(s). It takes time to process your images. But, it also allows for better exposures, less blown highlights in clouds, etc. and more control of the final photograph. I hope this article inspires some to learn their camera's capabilities, experiment a bit, and eventually produce photographs that provide satisfaction of time well spent.
--Bob
https://www.uglyhedgehog.com/t-574357-1.html
More Exposure and How It Works - A Beginner's Guide
https://www.uglyhedgehog.com/t-574448-1.html
Finishing Up Exposure and How It Works - A Beginner's Guide - This one so you can bookmark all of them.
https://www.uglyhedgehog.com/t-574638-1.html#9795237
Now that we've covered the basics of balancing the shutter speed, aperture, and ISO to produce an image, let's take it a step further. We are going to look at the glass we fill from the point of a digital camera. It's my opinion that camera manufacturers want the user to produce the most satisfactory pictures from each of their products. Keep that in mind, as there are "safety" features built into those remarkable pieces of equipment. Your camera may indicate overexposure when in reality it's not.
The glasses we've been using have been fine up to this point. But, let's focus on the glass we'll call the image glass. If we look at this image glass we can see a very faint line running around the inside surface of the glass. It's located a bit down from the top. Hmmm, what's up with that.
That is the jpg line. That is the line by which the camera decides whether a photograph is overexposed or not. If the glass is filled a bit above that line we receive a warning, blinkies, that the glass is overfilled. But, wait. There's still a good bit of room above that line. Exactly. That good bit of room is the difference between the RAW capture and the jpg capture.
I'm not going to go into a detailed description of a jpg image. There are a good deal of sites that will explain the format and it's characteristics. For many, the jpg image is more than sufficient for their photographic needs. However, for those wishing to have more control and editing abilities, the RAW file provides that. That is the equivalent of our full glass, above the scribed mark somewhat below to rim.
This is where the terms Expose To The Right and Expose Beyond The Right are used. The right being the upper limit of what the JPG file "thinks" exposure-wise is the limit. The RAW file can handle a bit more exposure and be quite usable. The bit of additional exposure can vary from camera to camera, not just model to model. So, if one wishes to take advantage of the extra capabilities of the RAW aspect of image capture, it is best for one to diligently test their equipment.
Almost every light meter reads the light and provides a camera setting that will place that metered area in the middle of the range between black and white, what's referred to as middle gray. This makes sense in that one would not find using a meter biased towards either end a useful tool.
So, digitally exposing for the brightest part of the scene and then increasing the exposure sufficiently to record that portion of the scene at the level of lighter gray to white that one wishes will produce a very useable start for processing the image.
Just a note here that this is the opposite of the practice for metering and adjusting for exposure when using black and white film. For film, the adjustment is to place the less luminous areas of the scene in the appropriate gray to black rendering. Then, the brighter areas of the scene are handled through processing. Digital is just the opposite. Set the exposure for the brightest part of the scene and adjust the darker areas in processing.
The following description addresses adjustments in Adobe Camera Raw. This is what I use and have little experience with any other products.
One approach to obtaining and starting the processing of an image is done at the very start of the capture. Spot meter the brightest part of the scene, adjust the exposure to render that part of the scene the brightness one desires using the camera's capabilities. When the image is opened in Adobe Camera RAW, the histogram will be "crammed" to the right. Adjust the Exposure slider to the left to more evenly distribute the histogram. Then, further adjustments of the Highlights and Shadows sliders, then the Whites and Blacks sliders will produce a relatively good start to bring the image into Photoshop to complete the processing.
In some cases, using the Auto selection in ACR at the start will provide a good starting point for the initial portion of the processing. I prefer to set each slider rather then let the program set them for me.
Yes, this is the procedure I use on each of my photographs. The examples show the initial opening of the image in ACR, the ACR adjustments for that image, then the initial image in Photoshop, and the finished photograph.
Additional benefits of pushing the exposure to the right is that this assists in diminishing noise in a photograph. Though, I view noise as digital grain and don't find it all that annoying, some do. This technique does diminish noise. For the purpose of this discussion that's all that needs to be said.
This procedure is not for everyone. It takes time to test and evaluate your camera(s). It takes time to process your images. But, it also allows for better exposures, less blown highlights in clouds, etc. and more control of the final photograph. I hope this article inspires some to learn their camera's capabilities, experiment a bit, and eventually produce photographs that provide satisfaction of time well spent.
--Bob
Jan 21, 2019 21:06:25 #

Jan 21, 2019 21:28:51 #
Thanks, Andy. Always appreciated.
--Bob
--Bob
AndyH wrote:
Great explanation, Bob.
Andy
Andy
If you want to reply, then register here. Registration is free and your account is created instantly, so you can post right away.