Follow up to frustrated, frustrated, frustrated.
Jul 30, 2012 23:25:20 #

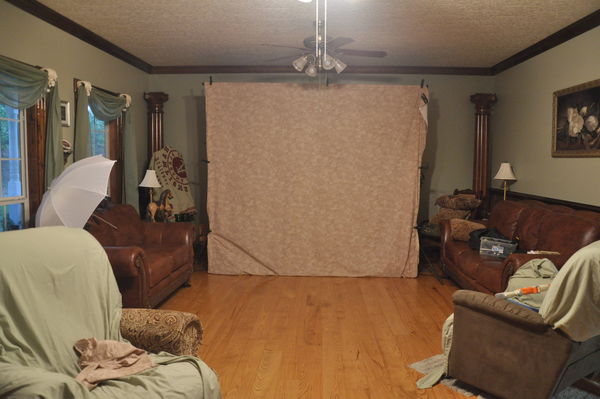
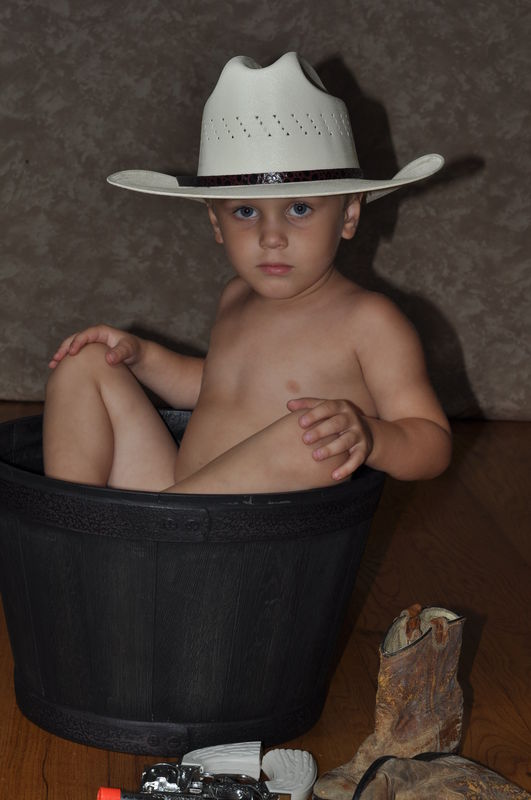
For those of you who looked at my last thread here concerning studio lighting, this is the 'follow up'. I used my grandson who is 3 and tried it again. Used my 50mm the entire time which may have been the first nono. Was using my speedlite as my lighting, it being triggered by my camera's flash. My understanding is it is suppose to send out the signal but not flash. I think it is flashing. Used a white umbrella turning it to where the light bounces back to the subject and then for it to filter thru to the subject. I was at child level as evidence by some unlevel shots. Someone please tell me how to correct that in Elements. The shadows are frustrating me telling me this is a picture and not a 'portrait'. I have included my 'work space' which I mentioned in my last thread, and a photo of this endeavor. Many said the last photos were to 'busy'. So what now?
living room
post processed
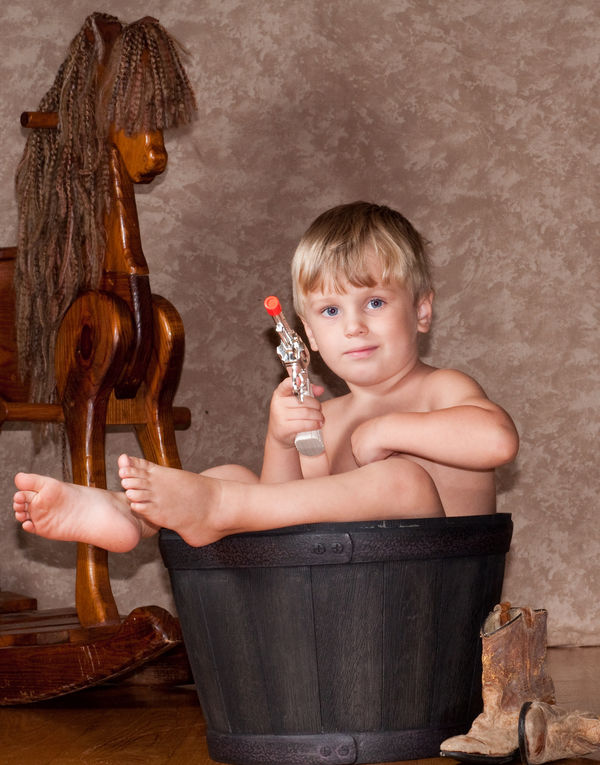
straight from camera
Jul 30, 2012 23:30:55 #
I think you can reduce the shadow by moving the subject farther away from the background. Maybe CaptainC will chime in. I know he has the correct answers.
Jul 30, 2012 23:40:48 #
thanks rtr. As you can see from that first photo, my working room is rather limited. Sometimes I feel like throwing up my hands.:(
Jul 30, 2012 23:55:30 #

If you put a slave flash behind the black bucket in the back, diffuse it, point it straight up, you can get rid of the shadows behind the boy. You can use an incandescent lamp as well. Just remember to WB.
Lighting is difficult. Our eyes compensate for so many things that we ignore anything distracting in our field of vision. The camera however cant do that, and when we look at the pic, it is quite obvious. Fill light is always the key, and can change the same image drastically by moving lights around. You just have to experiment and maybe watch some tutorials on You tube. Practice on a plant on a chair, or a doll, or... I have been using SLR's for over 30 years, and I sill practice and learn new techniques, it never ends.
Lighting is difficult. Our eyes compensate for so many things that we ignore anything distracting in our field of vision. The camera however cant do that, and when we look at the pic, it is quite obvious. Fill light is always the key, and can change the same image drastically by moving lights around. You just have to experiment and maybe watch some tutorials on You tube. Practice on a plant on a chair, or a doll, or... I have been using SLR's for over 30 years, and I sill practice and learn new techniques, it never ends.
Jul 31, 2012 00:09:30 #
Jul 31, 2012 00:57:51 #
deanna_hg wrote:
Thanks Ray for the input.
Just wanted to say that I use LED panels as small as 50 LED's to panels with 300 LED's, really good control. they are bright, adjustable, and hard on a model's eyes if in front but effective for fill, and inexpensive. I have setup with all incandescent and all florescent, halogen etc. In some pics, you just have to improvise to get what you want.
Jul 31, 2012 01:01:19 #
Hello Deanna hg, Coatachrome here.
Lighting subjects for photography is an art, not a science. I would first start by looking at a very basic three light system. If you do a google search for "three light portrait photography" you should find many resources on how, where and why to place your lighting. Your speedlight is a good "fill" light but it does not make a good single source for the results you may be looking for.
You can improve your light source easily at the hardware department store. Purchase three compact florescent lightbulb and make sure they are daylight bulbs not soft white. 100 watt bulbs should work well for your workspace. You can pick up three inexpensive aluminum reflectors to put the bulbs in and difuse the light with a simple piece of white paper taped across the reflector. In my very first workroom I used the backs of chairs as places to mount my lighting source.
I see two problems in your workspace. First your backdrop the floor and the furniture. They will all cast a yellow hue to your finished photo. You're going to need to do a bit or adjusting to your cameras white balance settings to compensate for all that "stuff" that will alter your lighting color. However that is the beauty of digital photography, you can expirement, adjust, and evaluate instanly.
The other problem is spacing. You're going to need to get a bit more space between your subject and your backdrop to reduce the shadows that the flash will create. Sometimes adjusting the angle of the flash will help, sometimes increasing the wattage of the blub you use to flood your backdrop will help. Here again, you will need to experiment.
Do not get frustrated. In my photography classes I would devote two classes on basic lighting setup alone. As I said, it is an art, not a science. And much of the detail work takes place in the post-processing of the image, an area that many of "instant gratification generation", "point and shoot oriented" students just do not want to hear about.
But you can get great results without post processing using a basic three light setup and your strobe/flash unit.
Jul 31, 2012 01:05:28 #
coatachrome wrote:
Hello Deanna hg, Coatachrome here. br br Lighting... (show quote)
YES, what coatachrome said!! I am such a poor explainer, thank the maker for teachers.
Jul 31, 2012 02:22:59 #
Deanna. When I used my D-90 as a slave to fire the flash the camera flash would fire giving it that head on look. Get you something like a pocket wizzard, this hooks to the camera hot shoe and the flash. You also need to do what coatchrome said. Don't give up you are getting their. Even the pros don't get it right all the time.
Jul 31, 2012 06:48:03 #

Let me say first your photo is downright cute, and you are on the right track. I can appreciate your frustration with limited space to work in. Your subject being too close to the background is indeed the culprit when it comes to shadows. Short of buying lights, you could make yourself a cheap reflector with cardboard and tinfoil, and place it close to the shadow side, it will help knock down some of that shadowing. Or you could buy some whit foamcore to help do the same. Reflectors can do wonders,,try that. Good luck :)
Jul 31, 2012 08:54:58 #
km2000
Loc: NashVegas
Perhaps you would consider shooting against a plain background, and photoshop it out in post?
Jul 31, 2012 09:00:57 #
Lucian
Loc: From Wales, living in Ohio
Okay this is what you should do...
I don't know what type of umbrella you have but you can try this to see if it will work as a "shoot Through" umbrella which will give you softer lighting than a bounce umbrella. Also make sure it does not have a silver bounce lining that will be far too intense and cause too many specular highlights.
Let's get started. First off your room looks fine for what you wish to do, your 50mm lens will also work fine, so no worries there. Next move your subject further away from the background, in your images you showed he was far too close to the background. Have him at least 5 feet away. Next you need to fix the way you are lighting him.
To keep it simple think this, if you are shooting him again the way he looks in the images you sent, be sure that your light source is at a 45 degree angle off to one side of his head and at the same time 45 degrees above his head. Forget the low hat poses with this lighting position but you could bounce light into his face under the hat brim by placing a white card on the floor in front of him.
Now..., the light source. Try shooting through the umbrella instead of bouncing the light into it and having it them bounce back onto the subject. That means the way the umbrella is pointing in your example shot of your set up, turn the umbrella around 180 degrees so the shaft is pointing towards your flash and not pointing towards the subject. In your example image the shaft was pointing towards your subject. Of course your flash should be pointing directly towards your subject this time but shooting through the umbrella rather than bouncing off it and back into the subject, hence the term "Shoot Through".
By doing this you will get a softer shadow. Another thing to always remember, the closer the diffused light source to your subject, the softer the light/shadows will appear. So don't have the umbrella too far away from him when doing the shoot through system or you will see more of a harsher light falling on him with harsher shadows evident. Of course adjust your aperture to compensate for the closer light source to keep the exposure correct.
Now when you are using your on camera flash (built in) to trigger your speed light, be sure to set it so that it acts only as a trigger light and not as part of the flash for lighting your subject. That way it gives such a weak light source that it will not be affecting your overall exposure, but rather just giving off enough light to fire off your remotely positioned speedlight.
And finally set a white (large) card off to the shadow side of your subject to bounce a little light back into his face and body. I say a little light, so read and heed. You want to have shadow to give shape to the face and body but you don't want to see harsh dark or deep shadow areas. Therefore, the card should be moved back and forth (closer and further away) from your subject until you see the amount of fill that suits your wants. Better a little less than too much in my mind.
Do this and you will find a huge difference in your finished portrait shot. One more word to the wise, when you were bouncing your light into the umbrella and back onto your subject, you probably had the umbrella centered so that the light was right in the middle and falling back onto the subject. This is wrong, you never use the umbrella centered on the subject, just like a light box is never centered on a subject. Most newbees don't know this.
You always use the edge of the light coming off your light modifier to fall on your subject and NEVER the main light source. So when you used your umbrella for the images you showed us, you should have had the umbrella almost pointed completely away from your subject. Just use it in the shoot through mode and you should be fine though and in the shoot through mode you can point the dome right at your subject.
One final point, lower your backdrop and with a curved base going onto the ground, let it go underneath your set up so that it is on the floor like a carpet would be, just to see what that effect looks like rather than having the harsh line of floor and backdrop. As for tilted images, just crop and straighten in post but get it right in the camera and that will make less work for you in post.
Let us know how it turned out this time.
Jul 31, 2012 12:11:55 #

I don't know what equipment you use but if it's Canon I'd recommend this video. I've watched it over and over. It not only teaches how to set up the Speedlites but all the basics for indoor and outdoor lighting using 1, 2, or multiple Speedlites.
http://bluecranedigital.com/RecommendedProducts.aspx?RelatedID=1077
They have it for Nikon too:
http://bluecranedigital.com/RecommendedProducts.aspx?RelatedID=1217
http://bluecranedigital.com/RecommendedProducts.aspx?RelatedID=1077
They have it for Nikon too:
http://bluecranedigital.com/RecommendedProducts.aspx?RelatedID=1217
Jul 31, 2012 12:17:57 #
Lucian
Loc: From Wales, living in Ohio
Don't let yourself get confused with too many lights. One single light with reflectors can give you excellent results as long as you know what you are doing and why.
Jul 31, 2012 15:41:38 #
If you want to reply, then register here. Registration is free and your account is created instantly, so you can post right away.