Some thoughts on light.
Feb 15, 2018 15:21:43 #

This arose from questions posted in the original thread.
And it is not just people.
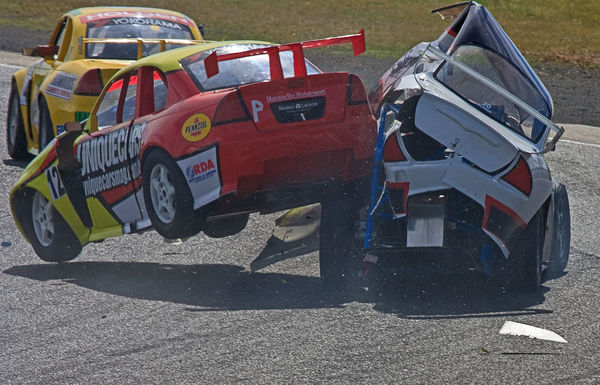
(#32) Harsh near midday sun, lots of glare from the track and rear glass of the airborne vehicle. No control over the subject and I was roughly shooting towards the sun (11 o'clock high" to me). Sometimes in sport you just had to take what you can get. Lots of PPing of the original raw file. The drivers walked away.
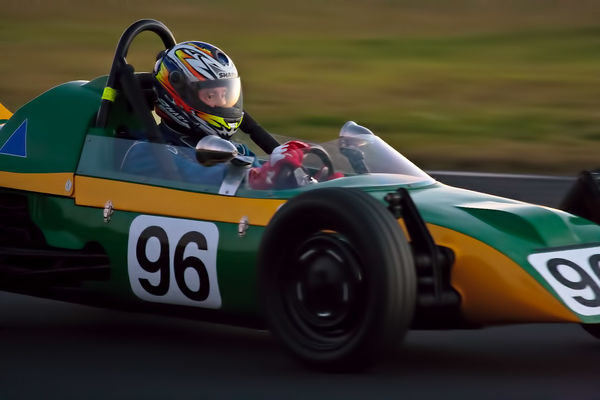
(#33) #2 This was shot very late in the afternoon and car is roughly at the same location as the cars above. Shot 15 minutes after sunset so I was working with just an afterglow in the sky - a very diffused light source. No harsh shadows.
Thanks for looking
Feel free to comment and ask questions.
Richard
And it is not just people.
(#32) Harsh near midday sun, lots of glare from the track and rear glass of the airborne vehicle. No control over the subject and I was roughly shooting towards the sun (11 o'clock high" to me). Sometimes in sport you just had to take what you can get. Lots of PPing of the original raw file. The drivers walked away.
(#33) #2 This was shot very late in the afternoon and car is roughly at the same location as the cars above. Shot 15 minutes after sunset so I was working with just an afterglow in the sky - a very diffused light source. No harsh shadows.
Thanks for looking
Feel free to comment and ask questions.
Richard
Feb 16, 2018 02:08:42 #
Light 5 Continued.
High contrast #2
When faced with a high contrast scene there are some things we can do whilst shooting.
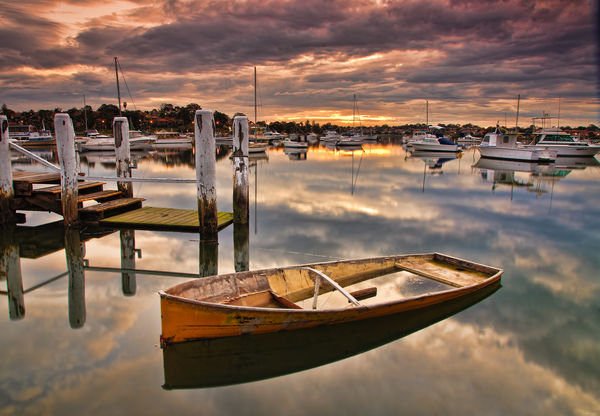
(#34) Reduce the contrast of the light seen by the lens by using a graduated neutral density filter on the lens. Here a 3 stop ND grad fiter was used to darken the clouds for this shot taken around sunset.
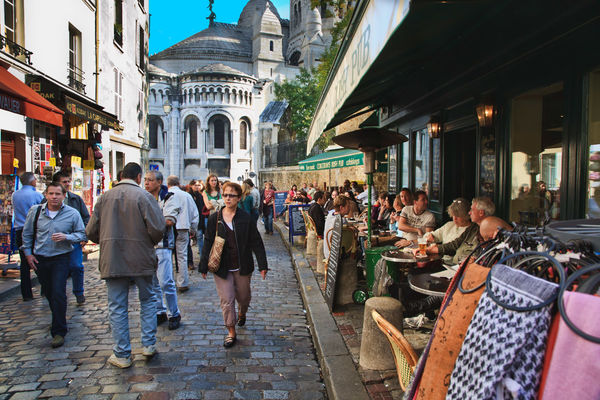
(#35) We can shoot RAW and/or bracket our exposures and combine the exposure when post processing, by either using HDR techniques or layers (masked) for different parts of the subject. This from a single capture shot during a vacation. Notice we have everything here from full sunlight on white building to deep shadows in the cafe.
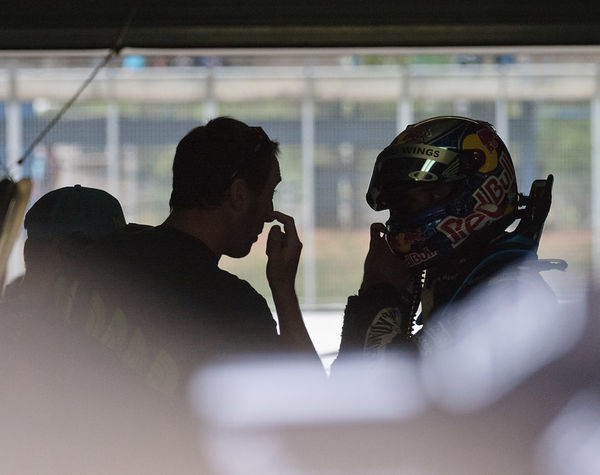
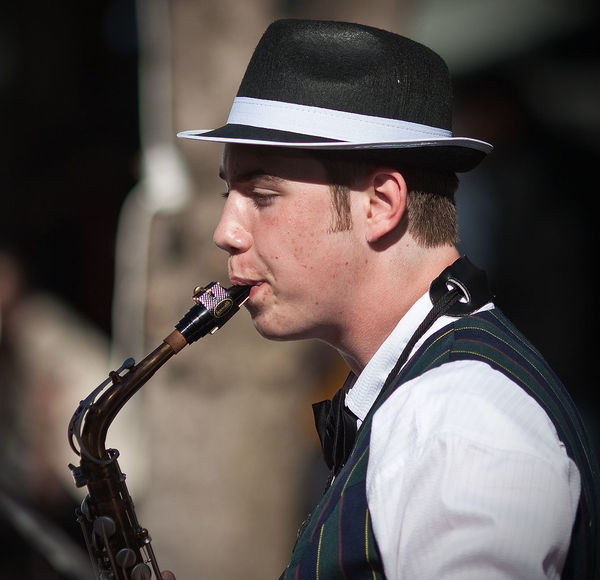
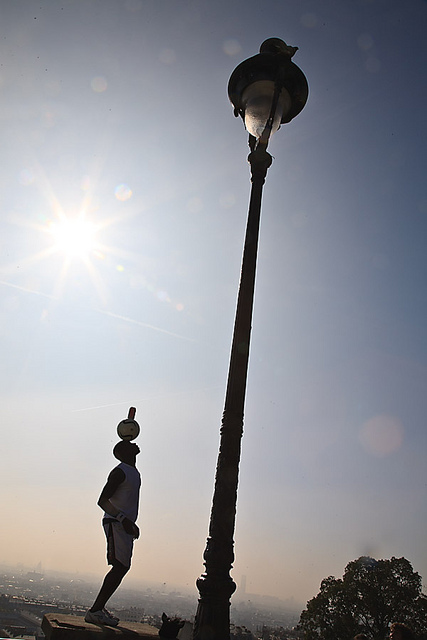
(#36) Sometimes we can make high contrast work for us, as in a silhouette. I had very little control over my shooting position and no control over the subjects. In hindsight I should have reduced the ISO considerably.
(#37) Or we can use it to isolate a subject as per this under exposed background.
Thanks for looking.
More to come and feel free to comment and ask questions.
Richard
High contrast #2
When faced with a high contrast scene there are some things we can do whilst shooting.
(#34) Reduce the contrast of the light seen by the lens by using a graduated neutral density filter on the lens. Here a 3 stop ND grad fiter was used to darken the clouds for this shot taken around sunset.
(#35) We can shoot RAW and/or bracket our exposures and combine the exposure when post processing, by either using HDR techniques or layers (masked) for different parts of the subject. This from a single capture shot during a vacation. Notice we have everything here from full sunlight on white building to deep shadows in the cafe.
(#36) Sometimes we can make high contrast work for us, as in a silhouette. I had very little control over my shooting position and no control over the subjects. In hindsight I should have reduced the ISO considerably.
(#37) Or we can use it to isolate a subject as per this under exposed background.
Thanks for looking.
More to come and feel free to comment and ask questions.
Richard
(#34) Exposure 6 seconds @ f/11.0 F-24 mm ISO 100
(Download)
(#35) 1/100) @ f/10.0 F=24 mm ISO 40000
(Download)
(#36) 1/4000 @ f/4.0 F=131 mm ISO 3200
(Download)
(#37) 1/400 @ ƒ/4.0 F=180 mm ISO 400
(Download)
Feb 16, 2018 06:09:25 #

Feb 16, 2018 09:29:07 #
Dan R wrote:
I really like the boat pic and the green racer is very sharp.
Thanks very much.
Feb 16, 2018 19:31:41 #
A bit more from the original thread regarding high contrast lighting and people photographs.
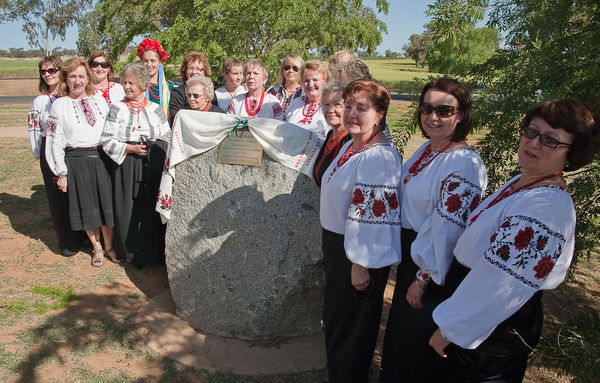
(#38 & #39 ) Full sunshine - high contrast. No control over the subjects (except to say "smile") and limited control over my shooting position.
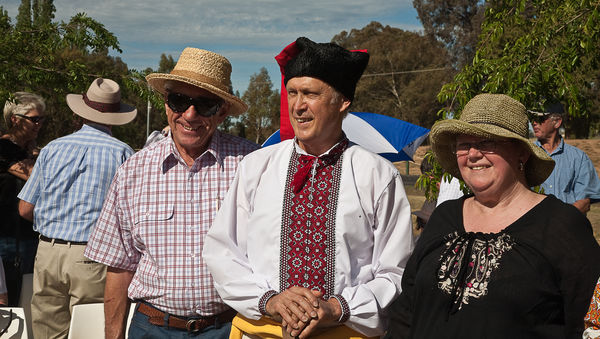
(#40) Good - Same day (Bright sunshine) . Open shade - in the doorway of a motel room.I had small control over the subject placement (she is my wife) and some control over my shooting position.
More to come.
Feel free to ask questions.
Richard
(#38 & #39 ) Full sunshine - high contrast. No control over the subjects (except to say "smile") and limited control over my shooting position.
(#40) Good - Same day (Bright sunshine) . Open shade - in the doorway of a motel room.I had small control over the subject placement (she is my wife) and some control over my shooting position.
More to come.
Feel free to ask questions.
Richard
(#38) Bad. Full sunshine.
(Download)
(#39) Bad. Full sunshine.
(Download)
(#40) Good. Open shade.
(Download)
Feb 17, 2018 15:23:44 #
Some more from the original thread.
Most of my portrait shots are on vacation or "events" and shot in uncontrolled environments where I have no control over the lighting, subject and limited control over shooting position. I do have control over my exposure, how the frame is filled and most importantly when to take the photograph.
As always it depends on the subject and how you want to show that subject.
Some subject are beautiful and some are not. That's what I want to show and a lot of that can be done by contrast.
Some examples.
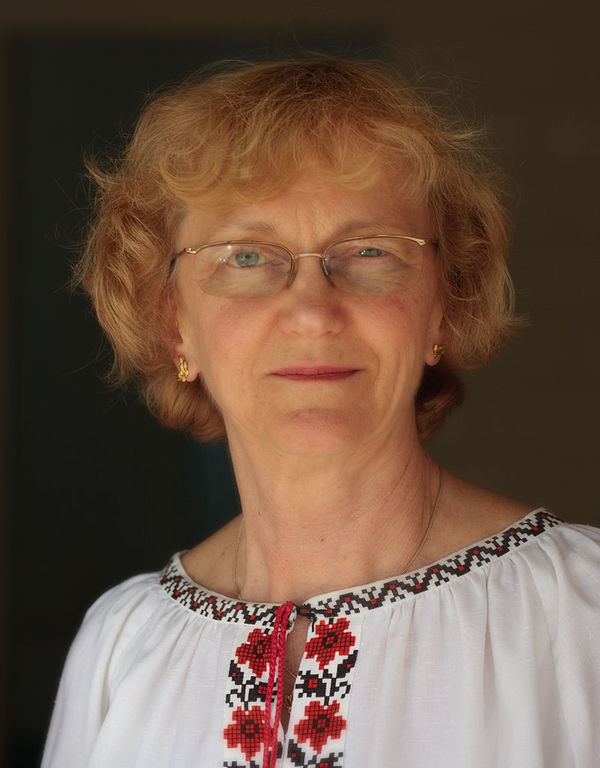
(#41) A Dancer at a Latin American music festival.
Lighting conditions were diffused sunlight - It was before the festival was washed out.
The pic has been PP'd to soften the background a little more and concentrate the light on the face.
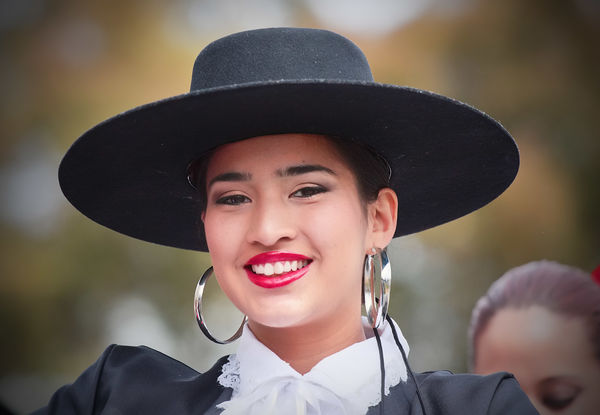
(#42) At a medieval festival.
Bright sunshine - cloudless sky and high sun. A lot PPing processing to get even this.
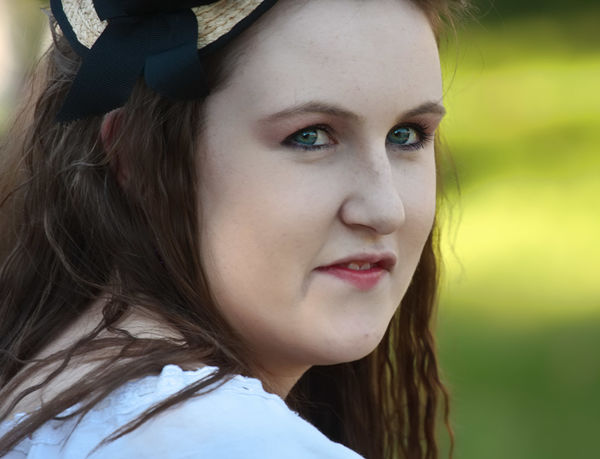
(#43) Same event as (#42) This time the lady was in shade - so no contrast problems.
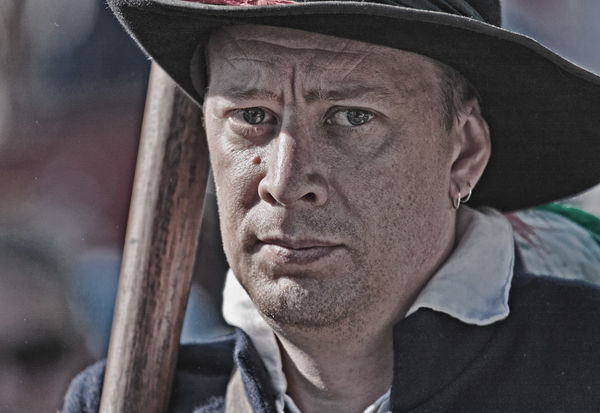
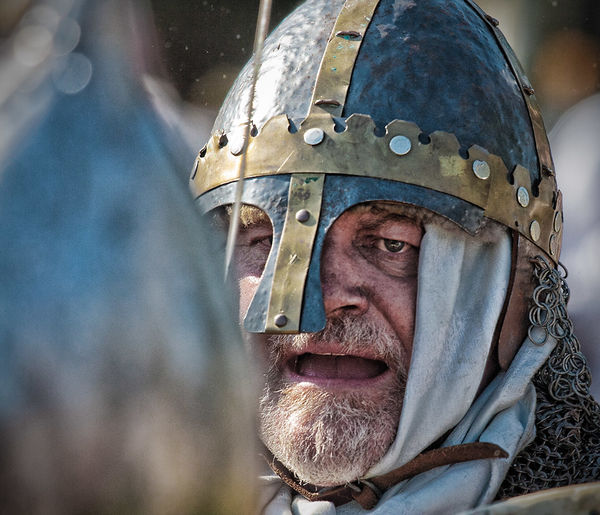
(#44) Same event, a bit latter in the afternoon. Bright sunshine. Notice the difference on both sides of the helmet.
Lost of post processing on this to get a 1/2 decent exposure and that "gritty" look.
(This is the answer to a question)
Shooting mostly candids, and never ever a planed portrait session, means no lighting check lists (at the moment).
However I do keep in mind, without dwelling on it, and this applies to a lot of subjects.
#1 Soft light makes things very easy both when shooting and PPing..
#2 If the lighting is harsh be prepared for a lot of post processing and/or moody pictures.
#3 Back lighting can make for some wonderful shots (this will be another thread)
#4 When shooting -
#3a fill the frame with the subject (notice I was using long lenses).
#3b Any distracting elements - If so remove them by changing your POV or DOF.
#3c Can you see the subjects eyes? That may help a lot.
#3dc Pick your moment.
#3e Always be ready to shoot an know your camera/lens intimately as those "moments" may be very fleeting.
More to come
Thanks for looking and feel free to ask questions
Richard
Most of my portrait shots are on vacation or "events" and shot in uncontrolled environments where I have no control over the lighting, subject and limited control over shooting position. I do have control over my exposure, how the frame is filled and most importantly when to take the photograph.
As always it depends on the subject and how you want to show that subject.
Some subject are beautiful and some are not. That's what I want to show and a lot of that can be done by contrast.
Some examples.
(#41) A Dancer at a Latin American music festival.
Lighting conditions were diffused sunlight - It was before the festival was washed out.
The pic has been PP'd to soften the background a little more and concentrate the light on the face.
(#42) At a medieval festival.
Bright sunshine - cloudless sky and high sun. A lot PPing processing to get even this.
(#43) Same event as (#42) This time the lady was in shade - so no contrast problems.
(#44) Same event, a bit latter in the afternoon. Bright sunshine. Notice the difference on both sides of the helmet.
Lost of post processing on this to get a 1/2 decent exposure and that "gritty" look.
(This is the answer to a question)
Shooting mostly candids, and never ever a planed portrait session, means no lighting check lists (at the moment).
However I do keep in mind, without dwelling on it, and this applies to a lot of subjects.
#1 Soft light makes things very easy both when shooting and PPing..
#2 If the lighting is harsh be prepared for a lot of post processing and/or moody pictures.
#3 Back lighting can make for some wonderful shots (this will be another thread)
#4 When shooting -
#3a fill the frame with the subject (notice I was using long lenses).
#3b Any distracting elements - If so remove them by changing your POV or DOF.
#3c Can you see the subjects eyes? That may help a lot.
#3dc Pick your moment.
#3e Always be ready to shoot an know your camera/lens intimately as those "moments" may be very fleeting.
More to come
Thanks for looking and feel free to ask questions
Richard
(41) 1/2000) @ f/4.0 F= 180 mm ISO 400
(Download)
(#42) 1/1000) @ f/5.6 F=390 mm ISO 400
(Download)
(#43) 1/250) @ f/5.6 F=400 mm ISO 400
(Download)
(#44) 1/1600 @ f/5.6 F=330 mm ISO 640
(Download)
Feb 18, 2018 12:26:53 #
Light #6 - Too much light.
Some times you can have too much light to record the immage the way you want to in the available light. The solution may be to use the lowest possible ISO or if that is not low enough to use a neutral density (ND) filter to reduce the light the camera sees or in the case of at least one point and shoot camera switch on the inbuilt neutral density filter.
Some examples where you may want to use a ND filter. :
(#45) Here a wide aperture was needed to isolate the subjects. Full sunlight on a bright sunny day. Here F2 was the desired aperture. If the maximum shutter speed of the camera used was lower than than the 1/6400 used here then a stop ND filter would have been needed the value depending on the camera's maximum shutter speed.
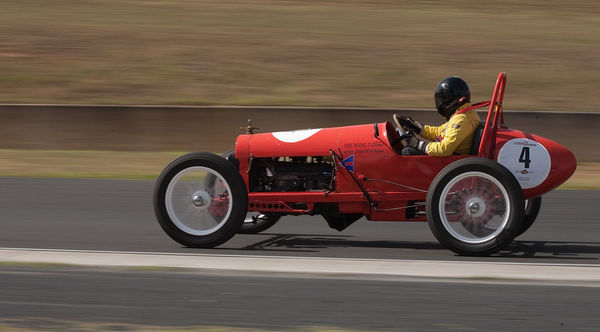
(#46)Again in bright sunshine at minimum ISO. An even lower shutter speed (at this aperture) would have been nice. Without a ND filter 1/160 was the slowest shutter speed I could shoot at for this panning shot.
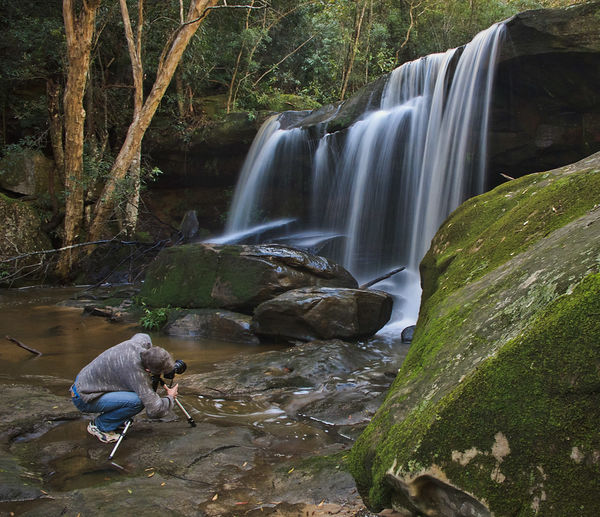
(#47) In shade. From experience an exposure of around 1/2 second was needed to give a "nice" and not over the top blur to the falls. The inbuilt 3 stop ND filter on this P&S camera was turned on to give me the desired exposure. A tripod was used.
Thanks for looking and feel free to ask any questions.
Richard
Some times you can have too much light to record the immage the way you want to in the available light. The solution may be to use the lowest possible ISO or if that is not low enough to use a neutral density (ND) filter to reduce the light the camera sees or in the case of at least one point and shoot camera switch on the inbuilt neutral density filter.
Some examples where you may want to use a ND filter. :
(#45) Here a wide aperture was needed to isolate the subjects. Full sunlight on a bright sunny day. Here F2 was the desired aperture. If the maximum shutter speed of the camera used was lower than than the 1/6400 used here then a stop ND filter would have been needed the value depending on the camera's maximum shutter speed.
(#46)Again in bright sunshine at minimum ISO. An even lower shutter speed (at this aperture) would have been nice. Without a ND filter 1/160 was the slowest shutter speed I could shoot at for this panning shot.
(#47) In shade. From experience an exposure of around 1/2 second was needed to give a "nice" and not over the top blur to the falls. The inbuilt 3 stop ND filter on this P&S camera was turned on to give me the desired exposure. A tripod was used.
Thanks for looking and feel free to ask any questions.
Richard
(#45) - 1/6400 @ f/2.0 F=135 mm ISO 100
(Download)
(#46) - 1/100 @ ƒ/16.0 F=80.0 mm ISO 100
(Download)
(#47) - 1/2 second @ ƒ/5.6 F=6.1 mm ISO 200
(Download)
Feb 19, 2018 00:59:40 #
Back light.
Back light is basically when most of the lighting is behind the subject. Exposure can be tricky, unless you want a silhouette, however the results can be spectacular.
Tip for Great Backlighting
Using lens hoods and the removal of any unnecessary filters will help reduce flare.
Some examples:
(#48) Shooting almost straight into the sun, exposure set, by basically exposing for the sky, to give a silhouette. I did have a skylight "protection" filter on the
camera (I shouldn't have) and I was using a lens hood. Notice the flare.
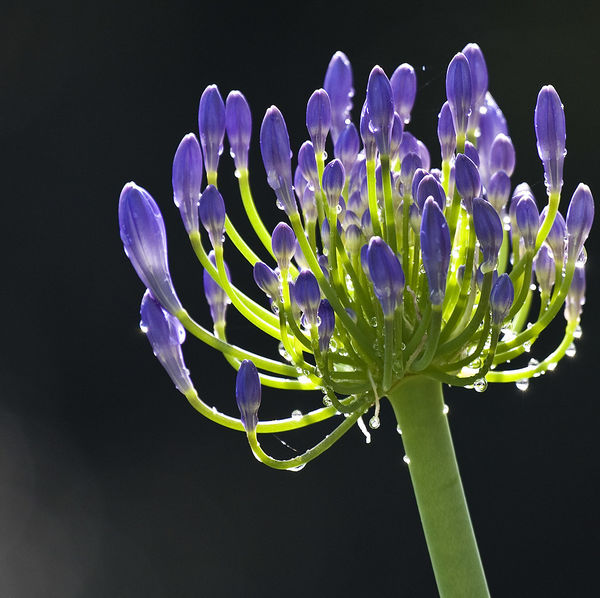
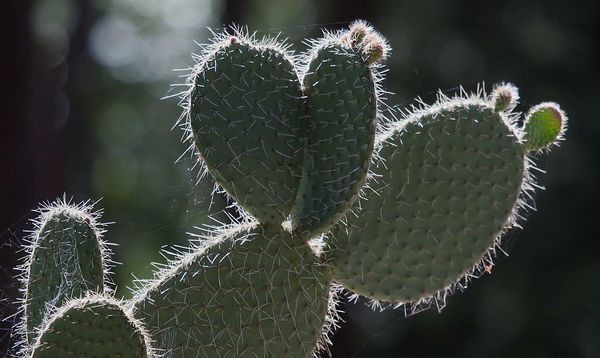
(#49) Bright sunny day with the sun high and behind the cactcus. Having a dark background helps with the shape and edge lighting.
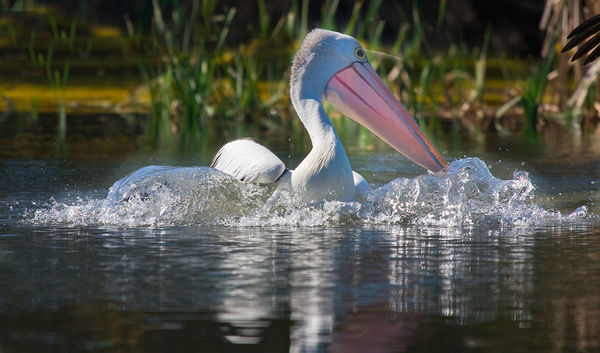
(#50) Shooting almost straight in the direction of the sun around midday on a clear sunny day. Again a dark background helps.
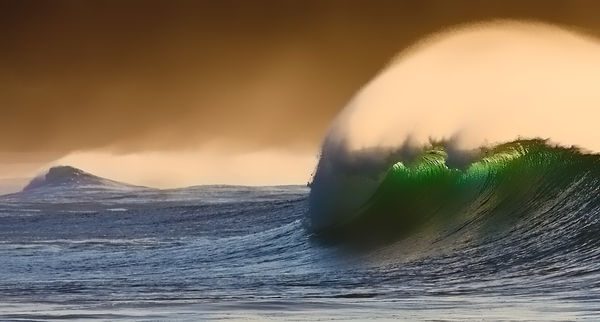
(#51) Just after sunrise, with the sun more or less off to my right front but behind the waves.
Thank for looking and feel free to ask any questions.
More to come.
Richard
Back light is basically when most of the lighting is behind the subject. Exposure can be tricky, unless you want a silhouette, however the results can be spectacular.
Tip for Great Backlighting
Using lens hoods and the removal of any unnecessary filters will help reduce flare.
Some examples:
(#48) Shooting almost straight into the sun, exposure set, by basically exposing for the sky, to give a silhouette. I did have a skylight "protection" filter on the
camera (I shouldn't have) and I was using a lens hood. Notice the flare.
(#49) Bright sunny day with the sun high and behind the cactcus. Having a dark background helps with the shape and edge lighting.
(#50) Shooting almost straight in the direction of the sun around midday on a clear sunny day. Again a dark background helps.
(#51) Just after sunrise, with the sun more or less off to my right front but behind the waves.
Thank for looking and feel free to ask any questions.
More to come.
Richard
(#48) Vacation - 1/160 @ f/22.0 F=28 mm ISO 100
(#49) 1/500 @ f/5.6 F=320 mm ISO 400
(Download)
(#50) 1/1000) @ f/6.3 F=400 mm ISO 200
(Download)
(#51) 1/2000 @ f/5.6 F=260 mm ISO 400
(Download)
Feb 19, 2018 10:15:09 #

RichardTaylor wrote:
b Back light. /b br br Back light is basically ... (show quote)
I'm a surfing and wave follower and your last shot is amazing! LOVE it! Thanks for sharing.
Feb 19, 2018 15:25:14 #
BrentHarder wrote:
I'm a surfing and wave follower and your last shot is amazing! LOVE it! Thanks for sharing.
Thanks very much.
Feb 19, 2018 18:24:51 #
Light #8 - Weather
Weather - Fog & misty rain
The weather will have a major impact on the appearance of your photographs.
The clue is to always be prepared for it and seize the moment as it may not last very long.
Some examples.
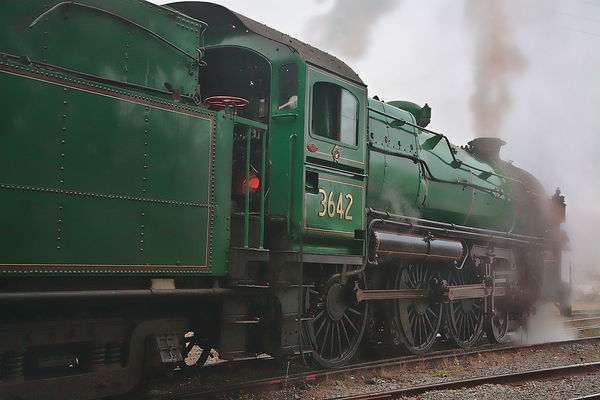
(#52)This early morning fog was totally unexpected and made for some marvellous lighting for shooting steam engines especially as the steam and smoke mixed with the fog to make a great atmosphere.No harsh shadows at all and notice how the background disappears.
(#53) For comparison - A couple of hours latter, near the location above, when the sun had burnt off the fog. Bright sunny day with just a few puffy clouds about. Notice the solid shadows.
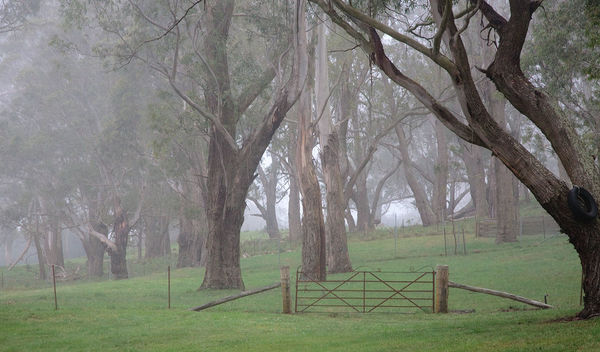
(#54) Light misty rain 2:15pm on a late spring day. Notice the beautiful soft lighting.
(#55) Even indoors, with most of the light coming from outside, an overcast/rainy day, can provide beautiful light. Here the light from a drizzly day was coming in through a very large open door to the front of the subject.
More to come, and feel free to ask questions.
Richard
Weather - Fog & misty rain
The weather will have a major impact on the appearance of your photographs.
The clue is to always be prepared for it and seize the moment as it may not last very long.
Some examples.
(#52)This early morning fog was totally unexpected and made for some marvellous lighting for shooting steam engines especially as the steam and smoke mixed with the fog to make a great atmosphere.No harsh shadows at all and notice how the background disappears.
(#53) For comparison - A couple of hours latter, near the location above, when the sun had burnt off the fog. Bright sunny day with just a few puffy clouds about. Notice the solid shadows.
(#54) Light misty rain 2:15pm on a late spring day. Notice the beautiful soft lighting.
(#55) Even indoors, with most of the light coming from outside, an overcast/rainy day, can provide beautiful light. Here the light from a drizzly day was coming in through a very large open door to the front of the subject.
More to come, and feel free to ask questions.
Richard
(#52) 1/500) @ f/6.3 F=47 mm ISO 800
(Download)
(#53) 1/500 @ f/5.6 F=24 mm ISO 100
(Download)
(#55) 1/160) @ f/14.0 F=105 mm ISO 800
(Download)
(#56) 1/100 @ f/6.3 F=45 mm ISO 1600
(Download)
Feb 20, 2018 16:05:13 #
Weather - Storms
You can shoot from any direction and not have any real worries like harsh shadows and glare. The main thing is to have wet weather protection for you and your camera.
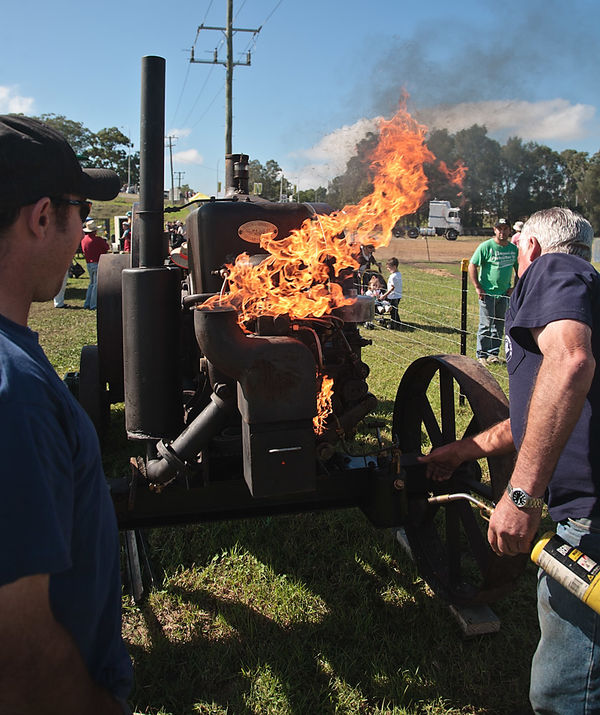
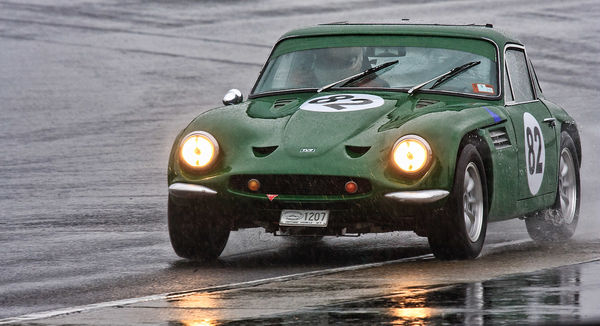
(#56) It also makes for some great opportunities to capture something different. Shot in pouring rain
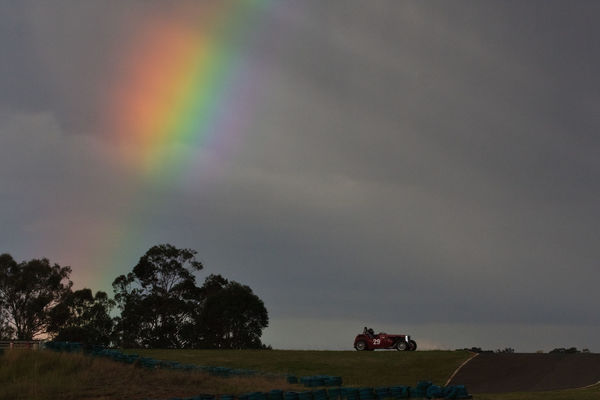
(#57) For landscapes, even at a motor racing track, storm lighting can be magical. Always be prepared as the lighting conditions may be fleeting.
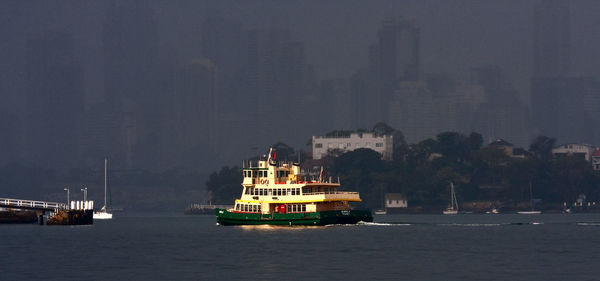
(#58) There were storms about one morning. Occasionally you do get lucky and a break in the clouds will put sunlight in the right spot. Very little post processing. This is an approaching storm and a few minutes latter it was pouring.
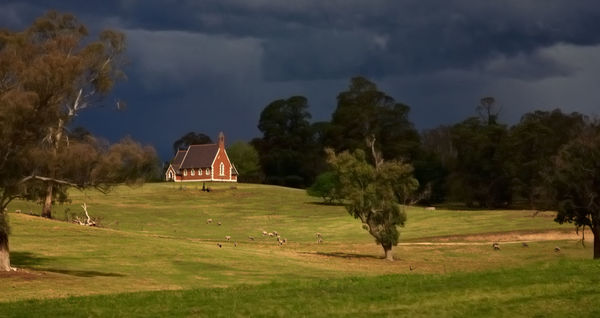
(#59) Why it always pays to have your camera ready to go. 3pm on a spring afternoon. There were showers about. Picture taken through the window of a tour bus on the way to visit this church. Lots of post processing to remove the window reflections.
Thanks for looking and feel free to ask questions.
More to come.
Richard
You can shoot from any direction and not have any real worries like harsh shadows and glare. The main thing is to have wet weather protection for you and your camera.
(#56) It also makes for some great opportunities to capture something different. Shot in pouring rain
(#57) For landscapes, even at a motor racing track, storm lighting can be magical. Always be prepared as the lighting conditions may be fleeting.
(#58) There were storms about one morning. Occasionally you do get lucky and a break in the clouds will put sunlight in the right spot. Very little post processing. This is an approaching storm and a few minutes latter it was pouring.
(#59) Why it always pays to have your camera ready to go. 3pm on a spring afternoon. There were showers about. Picture taken through the window of a tour bus on the way to visit this church. Lots of post processing to remove the window reflections.
Thanks for looking and feel free to ask questions.
More to come.
Richard
(#56) 1/320 @ f/9.0 F=320 mm ISO 500
(Download)
(#57) 1/320 @ f/11.0 F=100 mm ISO 250
(Download)
(#58) 1/1250 @ f/8.0 F=135 mm ISO 400
(Download)
(#59) 1/250) @ f/8.0 F=85 mm ISO 400
(Download)
Feb 21, 2018 15:49:39 #
This came up as a result of a question in the original thread.
"When do you apply exposure compensation and how much."
Probably easier to say "when not and experience will tell you how much (beside using a live histogram). A histogram will help a lot"
(1) Shooting manual
You will still need to take the nature of the scene into account.
(2) camera dependant, in a scene mode where you have very little control over the camera settings.
(3) When you are looking at an "average scene" ie; not a lot of contrast and not a lot of real bright subjects (snow etc) or real dark subjects (a black car for example).
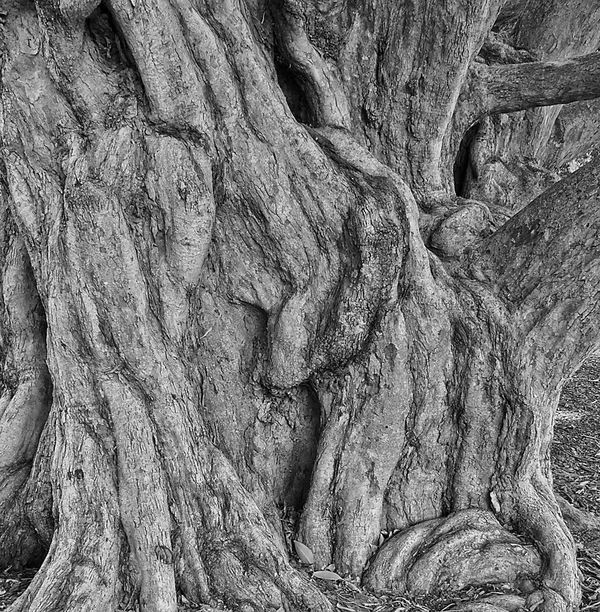
(#60) An average subject. This is a B&W conversion of a basically colourless subject shot in overcast lighting conditions so no harsh shadows. No exposure compensation.
Even though it was shot in auto the exposure is ok.
----------
"how do you choose the 'right Exposure Bias'?"
If you are shooting with a the aid of a live histogram you can just dial it in as needed whilst watching the histogram.
If you don't have a live a live histogram you need to ask a couple of things.
(1) Do I want negative or positive exposure compensation?
(2) Are there any highlights that may blow out?
If you are shooting a predominately dark subject the camera will think the picture is too dark and will try to lighten it by increasing the exposure - so a black car may come out grey or dark grey.
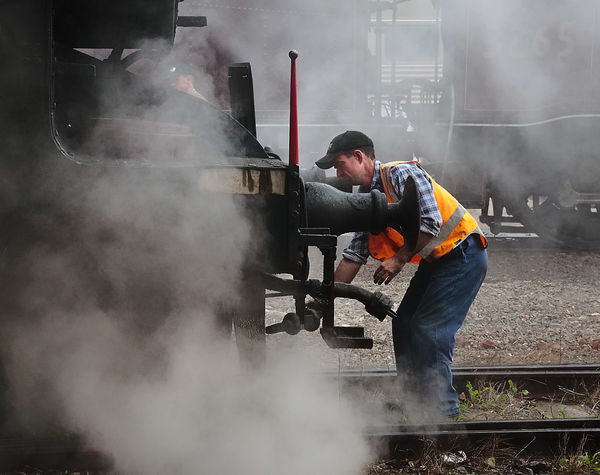
So you will need to reduce the exposure to compensate. How much depends on the subject. This was probably one of the more extreme cases (along with the train picture above). Normally for the subjects I shoot it is around -2/3
(#61) Here the subject was mostly darkish green and black engine. Light was diffused as it was morning fog.
--------
Conversely if the subject is mostly very light, like snow or a beach in daylight, the camera will think the scene is over exposed and it will reduce the exposure making the scene look dark.
You will need to dial in positive exposure compensation. How much depends on the scene. I havn't shot in snow but I would be looking at possibly two stops.
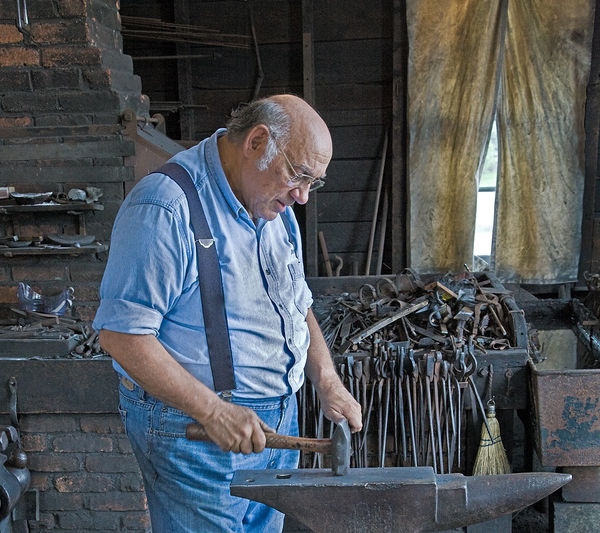
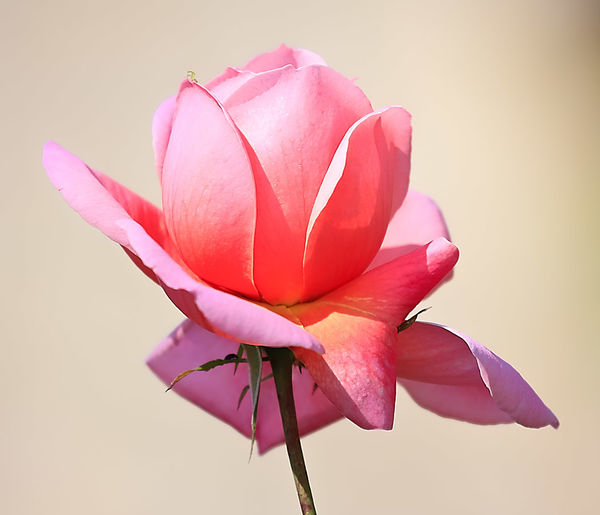
(#62) The light wall in the background made the camera think the scene was brighter than it was so I dialed in some positive exposure compensation.
-------
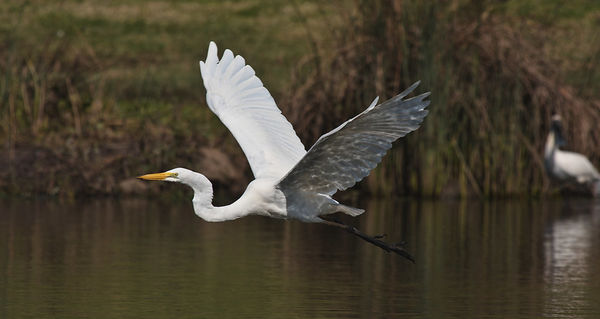
(#63) Sometimes with high contrast scenes you may need to make a decision on what detail you want to preserve. Stopping the whites blowing out was the main concern here as it didn't really matter if the background was a little dark
Notice the exposure compensation (-4/3ev).
----------
Keep in mind there are other techniques you can use when shooting.
(1) In difficult lighting conditions you may be able top bracket your exposures.
(2) Using a different metering metering method (ie spot, instead of evaluative/are/matrix) may reduce the need to dial in any exposure compensation at all.
More to come and feel free to ask any questions.
Richard
"When do you apply exposure compensation and how much."
Probably easier to say "when not and experience will tell you how much (beside using a live histogram). A histogram will help a lot"
(1) Shooting manual
You will still need to take the nature of the scene into account.
(2) camera dependant, in a scene mode where you have very little control over the camera settings.
(3) When you are looking at an "average scene" ie; not a lot of contrast and not a lot of real bright subjects (snow etc) or real dark subjects (a black car for example).
(#60) An average subject. This is a B&W conversion of a basically colourless subject shot in overcast lighting conditions so no harsh shadows. No exposure compensation.
Even though it was shot in auto the exposure is ok.
----------
"how do you choose the 'right Exposure Bias'?"
If you are shooting with a the aid of a live histogram you can just dial it in as needed whilst watching the histogram.
If you don't have a live a live histogram you need to ask a couple of things.
(1) Do I want negative or positive exposure compensation?
(2) Are there any highlights that may blow out?
If you are shooting a predominately dark subject the camera will think the picture is too dark and will try to lighten it by increasing the exposure - so a black car may come out grey or dark grey.
So you will need to reduce the exposure to compensate. How much depends on the subject. This was probably one of the more extreme cases (along with the train picture above). Normally for the subjects I shoot it is around -2/3
(#61) Here the subject was mostly darkish green and black engine. Light was diffused as it was morning fog.
--------
Conversely if the subject is mostly very light, like snow or a beach in daylight, the camera will think the scene is over exposed and it will reduce the exposure making the scene look dark.
You will need to dial in positive exposure compensation. How much depends on the scene. I havn't shot in snow but I would be looking at possibly two stops.
(#62) The light wall in the background made the camera think the scene was brighter than it was so I dialed in some positive exposure compensation.
-------
(#63) Sometimes with high contrast scenes you may need to make a decision on what detail you want to preserve. Stopping the whites blowing out was the main concern here as it didn't really matter if the background was a little dark
Notice the exposure compensation (-4/3ev).
----------
Keep in mind there are other techniques you can use when shooting.
(1) In difficult lighting conditions you may be able top bracket your exposures.
(2) Using a different metering metering method (ie spot, instead of evaluative/are/matrix) may reduce the need to dial in any exposure compensation at all.
More to come and feel free to ask any questions.
Richard
(#60) 1/60 @ f/4.0 F=6.1 mm ISO 200 Exposure Bias 0 EV
(Download)
(#61) 1/320 @ f/10.0 F=75 mm ISO 800 Exposure Bias -5/3 EV
(Download)
(#62) 1/320 @ f/5.6 F=400 mm ISO 200 Exposure Bias +2/3 EV
(Download)
(#63) 1/1600) @ f/8.0 F=400 mm ISO 250 Exposure Bias -4/3 EV
(Download)
Feb 22, 2018 13:39:27 #
What time of day to shoot?. (1)
Depending on the weather this can make a huge difference to the appearance of your subjects, especially landscapes. Around the start and end of the day (including before sunrise and shortly after sunset) can be great.
You may find The Photographer's Ephemeris of assistance.It will tell you the time for sun/moon rise or set, and the direction for any location. That and with weather reports and tide charts will help in planning shoots.
I sometimes do early morning shoots with a Flickr group and they use the above tools to plan shoots. There may be similar groups in your area.
For sunrises they will be on site ready to shoot about an hour before sunrise.
That means a tripod, remote release and torch will be needed, and possibly a ND grad filter.
They will normally finish shooting about 1/2 hour after sunrise unless the weather conditions are exceptional, and that means "atmosphere".
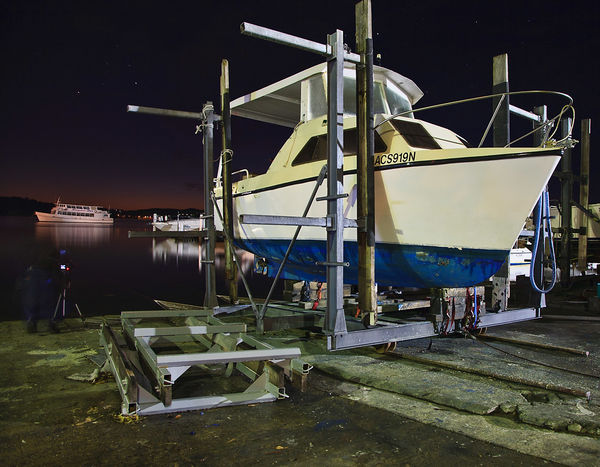
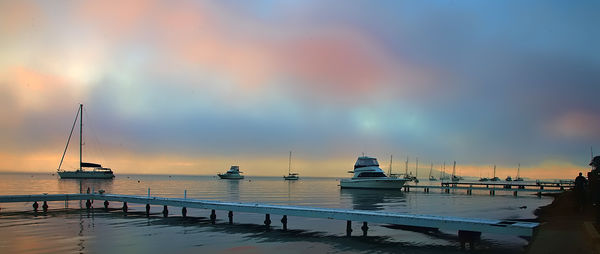
Here is an example of an early morning shoot at a town on a coastal lake. We are looking east and there are some town street lights behind us. It was shot in mid winter, in a temperate climate in the southern hemisphere. (Toronto, NSW, Australia)
Sunrise was around 7am (the exif clock data is about 10 minutes fast for pics up until sunrise.)
This illustrates how much changing light and atmosphere can change a photograph. All these pics were taken on a full frame camera.
(#64) One hour and 10 minutes before sunrise. Mostly lighting from the marina behind me. Available light only..
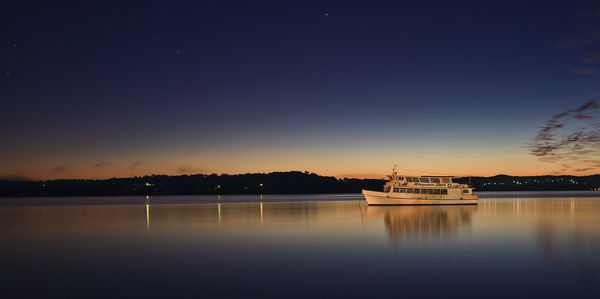
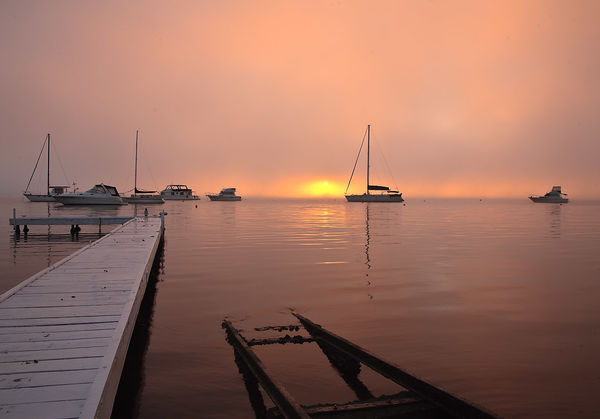
(#65) About 15 minutes latter. The light on the boat is from the town lights and the first hint of dawn can be seen on the horizon.
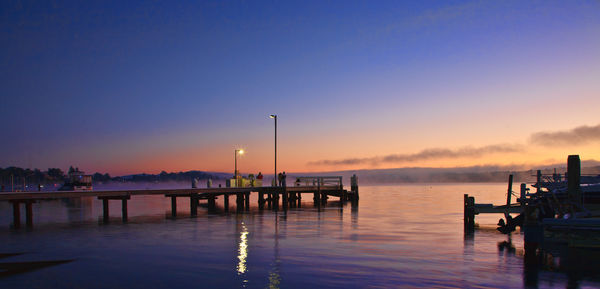
(#66) About 35 minutes latter. A lot more light in the sky but signs of a fog rolling in.
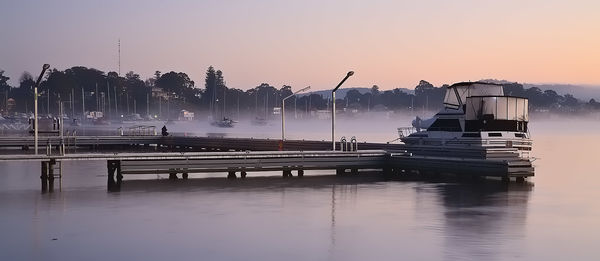
(#67) Just a couple of minutes latter but looking north, notice how the colours have changed, with the fast approaching sunrise off to my right. The fog was moving in rapidly.
Thanks for looking, and feel free to ask questions or comment.
Richard
Depending on the weather this can make a huge difference to the appearance of your subjects, especially landscapes. Around the start and end of the day (including before sunrise and shortly after sunset) can be great.
You may find The Photographer's Ephemeris of assistance.It will tell you the time for sun/moon rise or set, and the direction for any location. That and with weather reports and tide charts will help in planning shoots.
I sometimes do early morning shoots with a Flickr group and they use the above tools to plan shoots. There may be similar groups in your area.
For sunrises they will be on site ready to shoot about an hour before sunrise.
That means a tripod, remote release and torch will be needed, and possibly a ND grad filter.
They will normally finish shooting about 1/2 hour after sunrise unless the weather conditions are exceptional, and that means "atmosphere".
Here is an example of an early morning shoot at a town on a coastal lake. We are looking east and there are some town street lights behind us. It was shot in mid winter, in a temperate climate in the southern hemisphere. (Toronto, NSW, Australia)
Sunrise was around 7am (the exif clock data is about 10 minutes fast for pics up until sunrise.)
This illustrates how much changing light and atmosphere can change a photograph. All these pics were taken on a full frame camera.
(#64) One hour and 10 minutes before sunrise. Mostly lighting from the marina behind me. Available light only..
(#65) About 15 minutes latter. The light on the boat is from the town lights and the first hint of dawn can be seen on the horizon.
(#66) About 35 minutes latter. A lot more light in the sky but signs of a fog rolling in.
(#67) Just a couple of minutes latter but looking north, notice how the colours have changed, with the fast approaching sunrise off to my right. The fog was moving in rapidly.
Thanks for looking, and feel free to ask questions or comment.
Richard
(#64) 25 seconds @ f/5.6 & ISO 200. F=24mm
(Download)
(#65) 25 seconds @ f/5.6 & ISO 200. F=35mm
(Download)
(#66) 0.6 seconds @ f/8.0 & ISO 100. F =24mm
(Download)
(#67) 2 seconds @ f/8.0 & ISO 100. F=70mm
(Download)
Feb 23, 2018 12:35:50 #
Continuing on with an early morning shoot at a town on a coastal lake. Sunrise was around 7am (the exif clock data is about 10 minutes fast). This illustrates how much changing light and atmosphere can change a photograph.
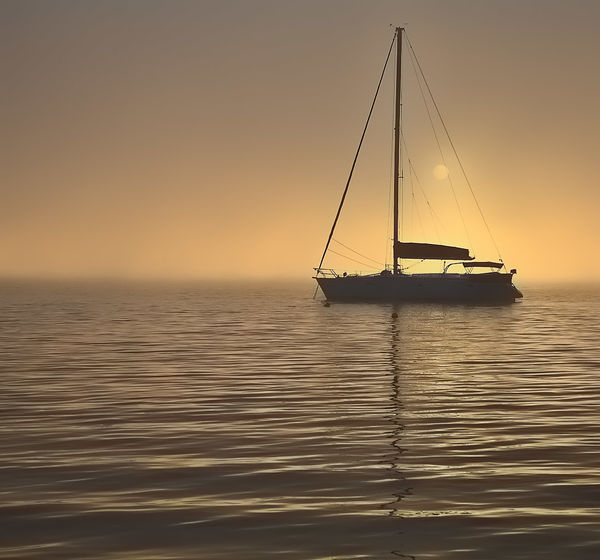
(#68) Just on sunrise looking north east. The sun is just starting to appear on the horizon off to my right but the fog is still rolling in.
(#69) About 10 minutes latter. The fog was still rolling in.
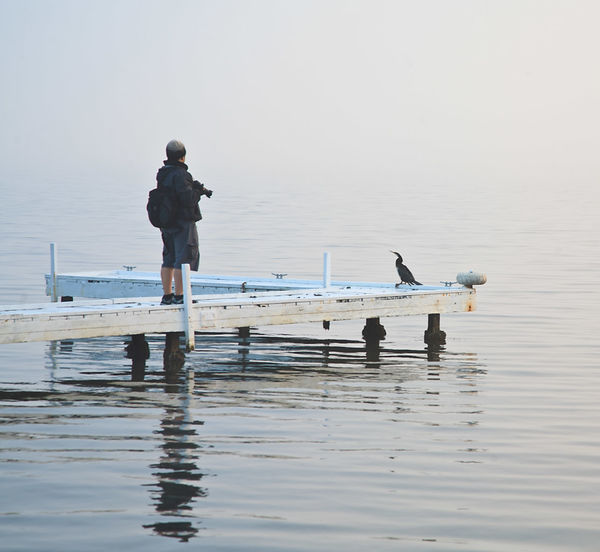
(#70) About another 10 minutes latter. I was now shooting hand held.
(#71) Just a couple of minutes latter. The fog had completely closed in.
This was next to last keeper from the morning and it was time for breakfast with the group I was shooting with.
More to come. Thanks for looking and feel free to ask questions.
Richard
(#68) Just on sunrise looking north east. The sun is just starting to appear on the horizon off to my right but the fog is still rolling in.
(#69) About 10 minutes latter. The fog was still rolling in.
(#70) About another 10 minutes latter. I was now shooting hand held.
(#71) Just a couple of minutes latter. The fog had completely closed in.
This was next to last keeper from the morning and it was time for breakfast with the group I was shooting with.
More to come. Thanks for looking and feel free to ask questions.
Richard
(#68) 1/13 @ f13 & ISO 50. F=24mm
(Download)
(#69) 1/15 @ f/13 & ISO 50. F=28mm
(Download)
(#70) 1/400 @ f/7.1 & ISO 200 F =70mm
(Download)
(#71) 1/50 @ f/7.1 & ISO 200. F=105mm
(Download)
If you want to reply, then register here. Registration is free and your account is created instantly, so you can post right away.