Some thoughts on light.
Feb 9, 2018 20:59:34 #

Light #1
This is in response to a question on the forum, and will mostly cover available light, be it outdoors or indoors.
It is derived from an old tutorial over at the now defunct Digital Photography School Forums.
I will be looking at:
(1) How much light do we have to shoot with?
This, and camera, will determine the kind of picture we can take. A tripod will give you more exposure options.
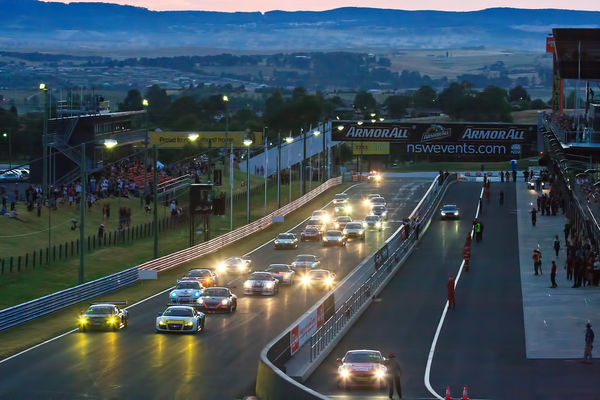
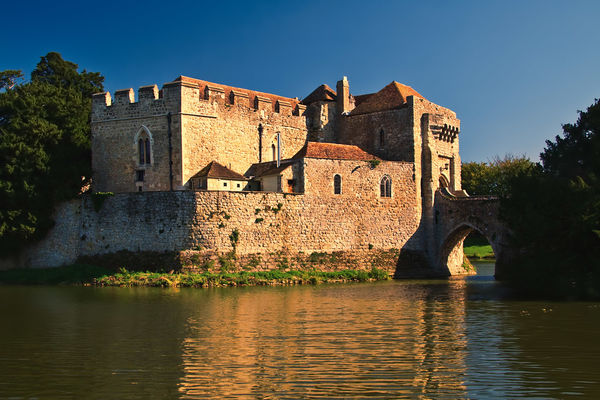
(#1) This was before dawn in summer. Even though I didn't have a tripod (I was using a mono pod) there was still enough light to capture a decent image
(2) How harsh is the light?
What contrasts, in light levels, do we have in the scene?
It may determine how we will capture the scene or how we can reduce the contrast if it is excessive.
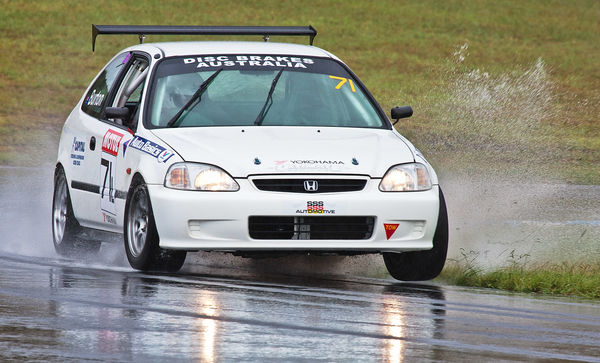
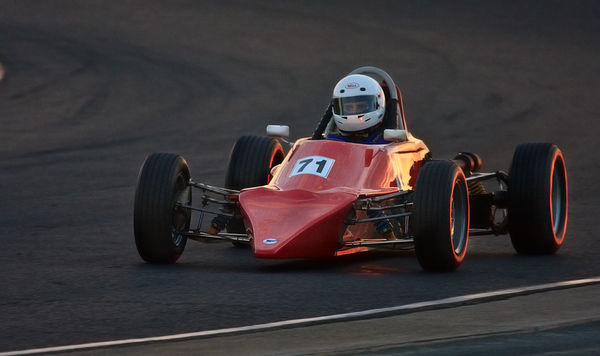
Here it was raining which makes it very easy to capture a subject from any direction as you don't have to worry much about shadows, reflections from windshields etc. However notice the lack of contrast.
See image #2
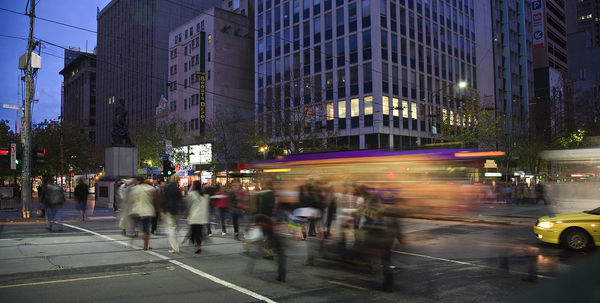
(3) What direction is the light coming from?
It may determine our shooting position and emphasise textures and details and/or it
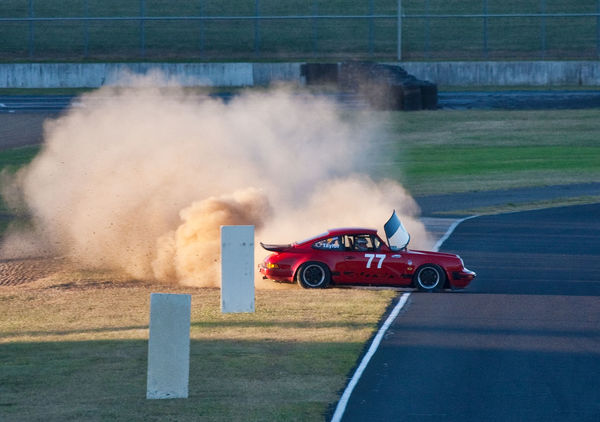
can add lots of atmosphere. The example (#3) is very late in the afternoon and almost shooting into the sun.
Notice how the burning rubber (its not dust) adds a lot of "atmosphere"
(4) What colour is the light?
Is it the warmth of a sunset or a cool shade. Mostly controlled by the time of day or if your subject is in direct light.
Example #4, taken from near the same spot as pic #2. Late afternoon with the sun off to my left.
Notice the contrast in the colours between the directly lit area and the shade.
----------------
More to come, and I do shoot more than motor sport.
Thanks for looking, and feel free to ask questions or comment.
Richard
This is in response to a question on the forum, and will mostly cover available light, be it outdoors or indoors.
It is derived from an old tutorial over at the now defunct Digital Photography School Forums.
I will be looking at:
(1) How much light do we have to shoot with?
This, and camera, will determine the kind of picture we can take. A tripod will give you more exposure options.
(#1) This was before dawn in summer. Even though I didn't have a tripod (I was using a mono pod) there was still enough light to capture a decent image
(2) How harsh is the light?
What contrasts, in light levels, do we have in the scene?
It may determine how we will capture the scene or how we can reduce the contrast if it is excessive.
Here it was raining which makes it very easy to capture a subject from any direction as you don't have to worry much about shadows, reflections from windshields etc. However notice the lack of contrast.
See image #2
(3) What direction is the light coming from?
It may determine our shooting position and emphasise textures and details and/or it
can add lots of atmosphere. The example (#3) is very late in the afternoon and almost shooting into the sun.
Notice how the burning rubber (its not dust) adds a lot of "atmosphere"
(4) What colour is the light?
Is it the warmth of a sunset or a cool shade. Mostly controlled by the time of day or if your subject is in direct light.
Example #4, taken from near the same spot as pic #2. Late afternoon with the sun off to my left.
Notice the contrast in the colours between the directly lit area and the shade.
----------------
More to come, and I do shoot more than motor sport.
Thanks for looking, and feel free to ask questions or comment.
Richard
(#1) Before dawn in summer - 1/320 @ f7.1 and ISO 3200 F=100, manual exposure
(Download)
#2 In the rain and low contrast - 1/320 @ f/11.0 and ISO 320 F=400 mm, Manual expsure model
(Download)
#3 Into the sun - Exif data not available.

(Download)
#4 Late afternoon - 1/400 @ f/6.3 F=4000mm and ISOocal Length 400 mm, ISO 500, Exposure Bias -2/3 EV, Shutter priority
(Download)
Feb 9, 2018 22:31:38 #
patrick43
Loc: Los Lunas,NM
Thanks for this, Richard. I look forward to learning more about uses of light. patrick
Feb 9, 2018 23:14:13 #
Richard, this may Beto many questions for any but the most advance to comprehend.
I know this is not what it’s about but #2 is at what I would consider an awfully high f-stop for those conditions!?
Let’s see how this developed, I’m glad to join in.
SS
I know this is not what it’s about but #2 is at what I would consider an awfully high f-stop for those conditions!?
Let’s see how this developed, I’m glad to join in.
SS
Feb 9, 2018 23:35:52 #
SharpShooter wrote:
Richard, this may Beto many questions for any but the most advance to comprehend.
I know this is not what it’s about but #2 is at what I would consider an awfully high f-stop for those conditions!?
Let’s see how this developed, I’m glad to join in.
SS
I know this is not what it’s about but #2 is at what I would consider an awfully high f-stop for those conditions!?
Let’s see how this developed, I’m glad to join in.
SS
Thanks and welcome.
For the motor racing I normally like to keep the shutter speed around 1/320 or so (to show blurred wheels, at the very least), if the car is relatively close and around f8-f11 if there is reasonable light levels and even though it was raining the light levels were ok.
Feb 10, 2018 00:13:08 #
Part 2
The colour of light.
The colour of light, even natural light, may change the appearance of the subject a lot. Think of a cool moonlit evening or the heat of a summer sunset or the cool of a mountain stream.
Some examples.
(1) The warmth of an afternoon sun. However it really wasn't that late in the afternoon. This was a vacation (tour) snapshot where there was little control of the time to shoot. The photograph has been warmed up when post processing the RAW file. You may be able to achieve a similar results when shooting by changing the white balance, how the camera interprets colour in your camera settings. See example #5
Example #6 - This is very late in the afternoon with most of the light the warm after glow of the setting sun which was more or less of to my right (and foreward).
Example #7 - Cool light - Mostly clear sky, just a few puffy clouds around, and deep in a forest with just filtered skylight coming though.
Example #8 - Cool - Taken 45 minutes before sunrise. Most of the light is skylight. The warm yellow light is from flood lights on a nearby beach.
While the colour of light can be used artistically there may be times where the subject colour should not be influence by the light. Some examples would be product and people photography. There are at least two methods of doing this; set the white balance when shooting and/or correct it when post processing (shooting RAW helps a lot).
-------------------------------------------------
Other topics I will be covering at least.
Indoors
Low light outdoors
High contrast light.
Too much light.
Light direction.
Weather
Weather
Time of day.
------------------------------
Thanks for looking, and feel free to ask questions or comment.
Richard
#5 Warmth - 1/160 @ f/10.0 F=26mm, ISO 400.
(Download)
#6 Late afternoon - Exposure 1/320 @ f/6.3 F=400mm, Exposure Bias -2/3 EV
(Download)
#7 Cool - Exposure 1 second @ f/13.0 F=200mm, ISO 400
(Download)
#8 Cool - Camera Canon PowerShot G11, 15 seconds @ f/3.5 F=6.1 mm, ISO 400
(Download)
Feb 10, 2018 10:24:42 #
How much? Enough #1 .
It all depends on what you are trying to achieve and the camera gear available.
If you can use the shutter speed, aperture and ISO you want then you don't have any basic exposure problems.
Some of the problems you may have are:
Extreme contrast, lighting from the wrong direction and boring/messy background/sky.
(more to come in future postings on some of these)
Some of these may be able to be controlled when shooting.
If you cannot change the subject position then change your own position, point of view or field of view, or shooting time to show the subject off to best advantage.
Even when shooting motor sport, where we have no control over the light, the subjects, shooting time, and limited control over our shooting positions we "tend to follow the light" on shooting days. You do get a fair amount of time to prepare for shooting and a chance to do it again as they lap the circuit.
Some examples:
This series of photographs was shot mid afternoon, I had no control over the shooting time, on a clear (blue skies) spring day in a botanical garden that was open to wild life. All were taken with a Canon 40D + a Canon 100-400 4.5-F5.6 IS L lens and a mono pod
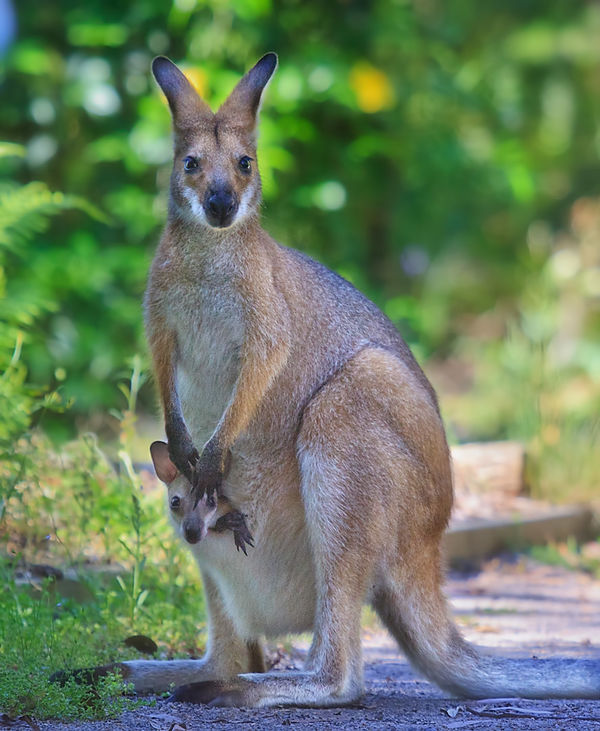
(#9) An almost worse case scenario. No control over the subject, lighting and background, and and very limited control over my shooting position, and no idea how long the kangaroo would stay for. This lady just hopped onto the path and stopped to look at me. After one or two quick snapshots I slowly at on the ground, to get eye level and started shooting as she was posing. It wasn't long before she hopped off again. This is part of a series.
Took lots of post processing from the original RAW file to get something usable.
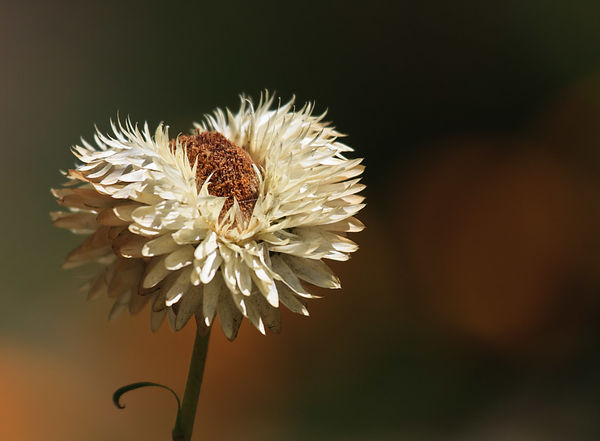
(#10) Again, no control over my subject, however I had control over my shooting position. The the relatively high contrast of the sunlight and the shaded background has helped isolate the flower, along with a wide aperture to throw the background out of focus.The field of view has been restricted by using a long lens.
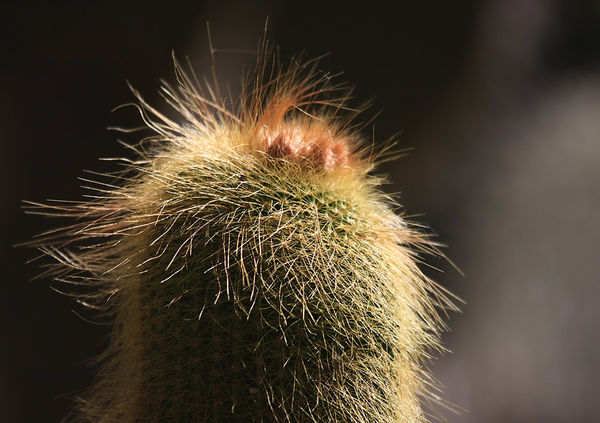
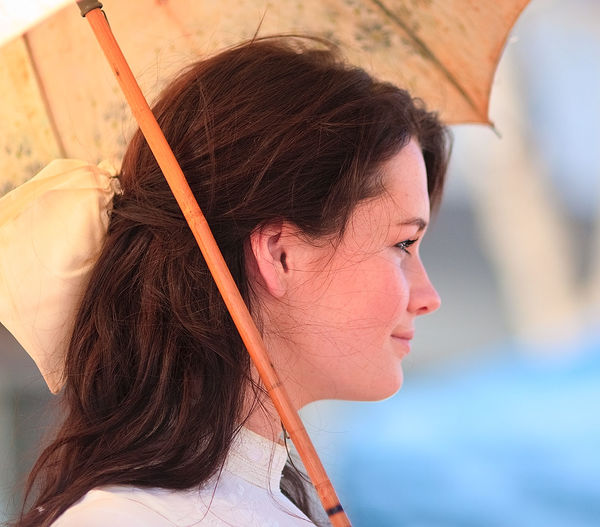
(#11) Here the light is high and mostly right to the subject. I wanted to show what it was like "to have a bad hair day". Similar techniques to pic #2 to isolate the subject, which could not be moved.
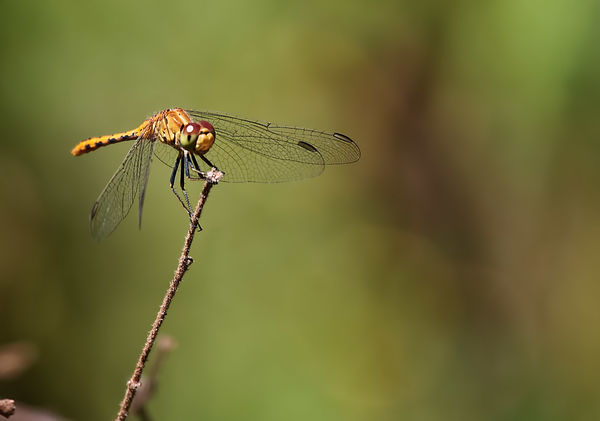
(#12) Here it is a very easy exposure, with the sun high and to the left of me, and a little behind me, allowing me to just concentrate on capturing the dragon fly.
More to come.
It all depends on what you are trying to achieve and the camera gear available.
If you can use the shutter speed, aperture and ISO you want then you don't have any basic exposure problems.
Some of the problems you may have are:
Extreme contrast, lighting from the wrong direction and boring/messy background/sky.
(more to come in future postings on some of these)
Some of these may be able to be controlled when shooting.
If you cannot change the subject position then change your own position, point of view or field of view, or shooting time to show the subject off to best advantage.
Even when shooting motor sport, where we have no control over the light, the subjects, shooting time, and limited control over our shooting positions we "tend to follow the light" on shooting days. You do get a fair amount of time to prepare for shooting and a chance to do it again as they lap the circuit.
Some examples:
This series of photographs was shot mid afternoon, I had no control over the shooting time, on a clear (blue skies) spring day in a botanical garden that was open to wild life. All were taken with a Canon 40D + a Canon 100-400 4.5-F5.6 IS L lens and a mono pod
(#9) An almost worse case scenario. No control over the subject, lighting and background, and and very limited control over my shooting position, and no idea how long the kangaroo would stay for. This lady just hopped onto the path and stopped to look at me. After one or two quick snapshots I slowly at on the ground, to get eye level and started shooting as she was posing. It wasn't long before she hopped off again. This is part of a series.
Took lots of post processing from the original RAW file to get something usable.
(#10) Again, no control over my subject, however I had control over my shooting position. The the relatively high contrast of the sunlight and the shaded background has helped isolate the flower, along with a wide aperture to throw the background out of focus.The field of view has been restricted by using a long lens.
(#11) Here the light is high and mostly right to the subject. I wanted to show what it was like "to have a bad hair day". Similar techniques to pic #2 to isolate the subject, which could not be moved.
(#12) Here it is a very easy exposure, with the sun high and to the left of me, and a little behind me, allowing me to just concentrate on capturing the dragon fly.
More to come.
#9 - 1/250 @ f/5.6 F=300 mm, ISO 1000, Aperture proprity.sure Bias +2/3 EV Exposure Program Aperture-priority AE
(Download)
#10 - 1/2500 @ f/5.6 F=365 mm, ISO 400, Exposure Bias -2/3 EV, Aperture priority
(Download)
#11 - 1/1250) @ f/5.6 F=400 mm, ISO 400 Exposure Bias -2/3 EV, Aperture-priority
(Download)
#12 - 1/800 @ f/8.0 F= 400 mm, ISO 400, Exposure Bias -2/3 EV, Aperture priority
(Download)
Feb 10, 2018 13:57:29 #
Feb 10, 2018 13:59:21 #
Feb 11, 2018 02:01:25 #
Light 3.
Indoors #1
A major problem may be that light levels will be low. If long shutter speeds can be used (static subjects) then it won't be quite so much of a problem. A tripod, with a remote release (or using the self timer), or an image stabilised camera/lens may be all you need.
(#13) Hand held with an image stabilised lens. Shot whilst on vacation with available light.
However if you are hand holding a long lens and/or trying to freeze action then the low light will be a problem. It will mean using high ISO and fast lenses (preferably ones that focus quickly an accurately in low light. Point and shoot cameras and slow kit lenses will be almost useless. Image stabilisation will not freeze action
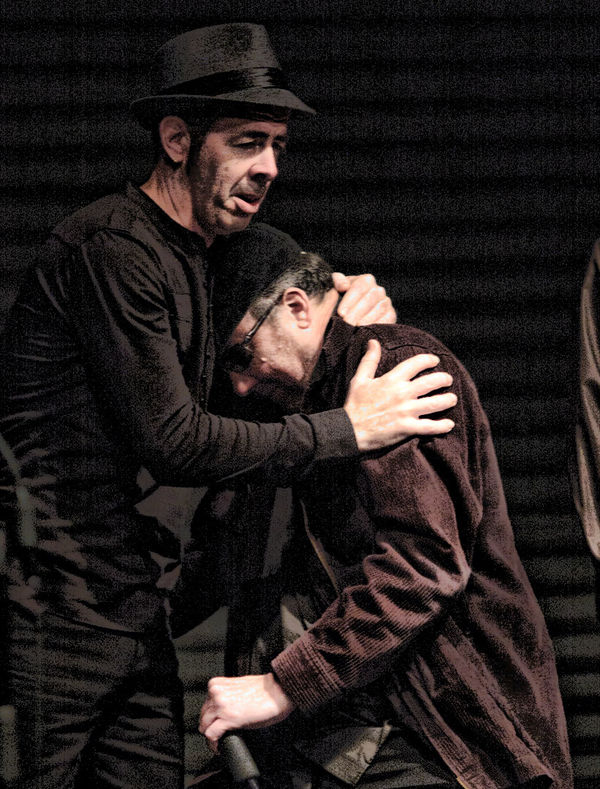
(#14) Hand held, at a concert, with a non image stabilised longish lens. Stage lighting.
The other problem may be the lighting itself. For a lot of locations it will be utilitarian with very little, if any, aesthetic quality. Depending how much control over your shooting position you may just have to live with it.
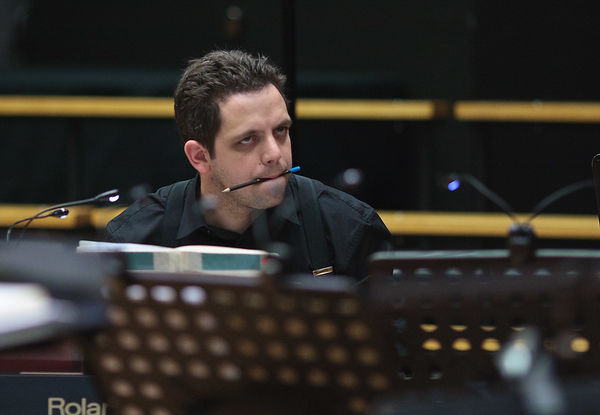
(#15) Shot during a rehearsal for a classical music concert. They lighting was set up for a lecture theatre.
At other times, especially shooting interiors dring the day with external windows, the lighting will be very contrasty. HDR, bracketing and combining different exposures when post pricesing would be the way to go. Some event lighting can be a nigtmare to shoot in.
(#16) Hand held. A combination of different processing of a single exposure - not entirely successful. Shot whilst on a walking tour. If I were to revisit this location I would take a tripod.
However sometimes you will find great lighting, as per some of the pics below, especially some stage lighting. All you need to to is be observant and ready to catch it as sometimes it can be very fleeting.
Nowdays I am shooting with cameras that have much better high ISO performance than the cameras used for the above images. It makes life a lot easier.
More to come
Richard
Indoors #1
A major problem may be that light levels will be low. If long shutter speeds can be used (static subjects) then it won't be quite so much of a problem. A tripod, with a remote release (or using the self timer), or an image stabilised camera/lens may be all you need.
(#13) Hand held with an image stabilised lens. Shot whilst on vacation with available light.
However if you are hand holding a long lens and/or trying to freeze action then the low light will be a problem. It will mean using high ISO and fast lenses (preferably ones that focus quickly an accurately in low light. Point and shoot cameras and slow kit lenses will be almost useless. Image stabilisation will not freeze action
(#14) Hand held, at a concert, with a non image stabilised longish lens. Stage lighting.
The other problem may be the lighting itself. For a lot of locations it will be utilitarian with very little, if any, aesthetic quality. Depending how much control over your shooting position you may just have to live with it.
(#15) Shot during a rehearsal for a classical music concert. They lighting was set up for a lecture theatre.
At other times, especially shooting interiors dring the day with external windows, the lighting will be very contrasty. HDR, bracketing and combining different exposures when post pricesing would be the way to go. Some event lighting can be a nigtmare to shoot in.
(#16) Hand held. A combination of different processing of a single exposure - not entirely successful. Shot whilst on a walking tour. If I were to revisit this location I would take a tripod.
However sometimes you will find great lighting, as per some of the pics below, especially some stage lighting. All you need to to is be observant and ready to catch it as sometimes it can be very fleeting.
Nowdays I am shooting with cameras that have much better high ISO performance than the cameras used for the above images. It makes life a lot easier.
More to come
Richard
#13 On vacation - 1/15@ f/7.1 F=17 mm ISO 1600, Hand held
(Download)
(#14) Spooky men - 1/200 @ f/2.0 F=135 mm, ISO 3200
(Download)
(#15) rehearsal - 1/200) @ f/2.0 F=135 mm, ISO 1600
(Download)
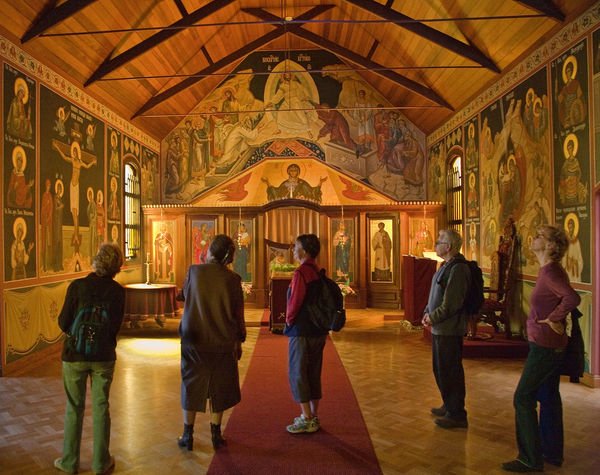
(#16) Church - 1/15 @ f/5.6 F=24 mm, ISO 600, Exposure Bias -1 EV
(Download)
Feb 11, 2018 19:25:46 #
Low light outdoors #1
(this is from an old night photography tute of mine)
Night Photography:1 Cityscapes.
This tute will be covering long exposure cityscapes.
(1) When to shoot.
For me the best time to shoot is in the "blue hour", that time just after sunset but before the sky turns black.
I like the fact the sky is not boring black but beautiful deep blue, may have some interest and makes a nice contrast with building lights.
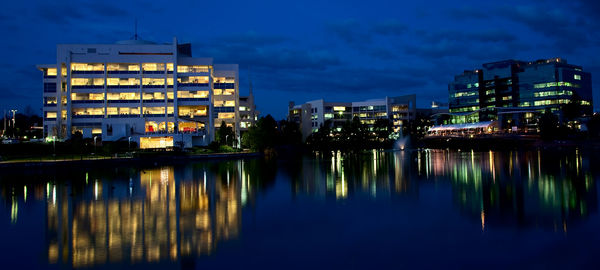
(#17) During the blue hour (at 5:50PM looking east on a winters day)
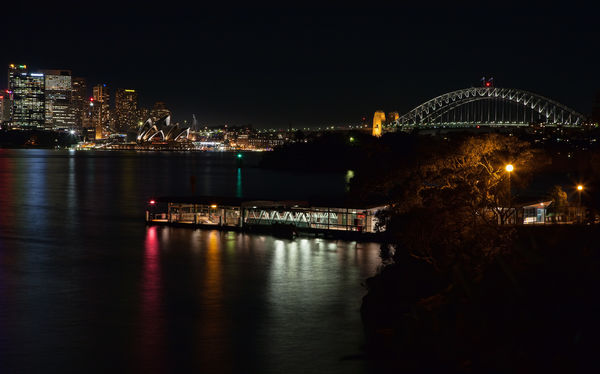
In this example (#18) much latter than the "blue hour" notice how the sky is booring black
2) Pre requisites
- be familiar with your camera and its operation. You may be making adjustments in the dark.
- Be able to read and understand the histogram. The pic on the back of your camera is not a good guide for a correctly exposed image.
- some cameras have a live histogram in the viewfinder
(3) Equipment.
Any camera that allows manual long exposure and focussing will be fine.
A stable support, tripod, for the camera is an absolute necessity.
A remote for your camera is a lot easier than using the self timer. Touching the camera may cause vibrations which may blur the image.
Take a torch, or a head lamp - this will help a lot when working in the dark.
Make sure you have plenty of battery power for your camera.
(4) Setting up your camera.
(4a) Check your camera lens/manual to see if image stabilisation should be turned off when the camera is tripod mounted.
(4b) Manual focus.
(4c) Manual exposure.
(4d) Lowest possible ISO - this is to keep noise to a minimum.
(4e) Remove any filters from the lens and use a lens hood. This will help reduce flare.
(4f) Camera on tripod and remote plugged in.
(4g) I shoot raw to give me more control when PPing the image.
(4h) I use just the centre focus point only active.
(4j) I meter the whole scene however the light meter can be fooled very easily in these conditions so use it just as a guide.
I usually start with an exposure around 10 second @ F8 & ISO 100 (that will get you in or near the ball park)
(5) shooting.
Focussing may be a problem. Live view may make it easier and try to focus on something that provides some contrast. Not all my cameras have live view so what I do is just partially depress the shutter and rack the lens back & forth while watching the focus indicators in the viewfinder. A powerful torch may help illuminate the subject.
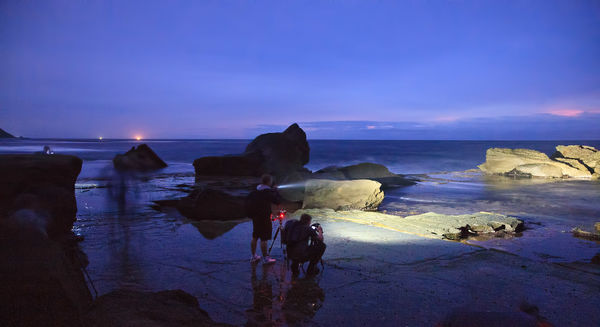
See example #19 where the photographers are using a torch to assist with focus and/or light painting.
I will then take a photograph and then check the histogram.
I will adjust my exposure if needed, and then re shoot.
Bracket your exposures, by at least one stop, it will give you more choices when PPing.
If the light is changing, or the moon rising etc, I will continue shooting, bracketing exposures until the light has gone.
If the light is not changing I will only take a few photographs with a range of exposures (+- up to 3 F stops) to allow possible use of HDR or merging images when PPing.
Security: always be aware of your surroundings and take care when shooting and let people know where you are going.
More to come.
Richard
(this is from an old night photography tute of mine)
Night Photography:1 Cityscapes.
This tute will be covering long exposure cityscapes.
(1) When to shoot.
For me the best time to shoot is in the "blue hour", that time just after sunset but before the sky turns black.
I like the fact the sky is not boring black but beautiful deep blue, may have some interest and makes a nice contrast with building lights.
(#17) During the blue hour (at 5:50PM looking east on a winters day)
In this example (#18) much latter than the "blue hour" notice how the sky is booring black
2) Pre requisites
- be familiar with your camera and its operation. You may be making adjustments in the dark.
- Be able to read and understand the histogram. The pic on the back of your camera is not a good guide for a correctly exposed image.
- some cameras have a live histogram in the viewfinder
(3) Equipment.
Any camera that allows manual long exposure and focussing will be fine.
A stable support, tripod, for the camera is an absolute necessity.
A remote for your camera is a lot easier than using the self timer. Touching the camera may cause vibrations which may blur the image.
Take a torch, or a head lamp - this will help a lot when working in the dark.
Make sure you have plenty of battery power for your camera.
(4) Setting up your camera.
(4a) Check your camera lens/manual to see if image stabilisation should be turned off when the camera is tripod mounted.
(4b) Manual focus.
(4c) Manual exposure.
(4d) Lowest possible ISO - this is to keep noise to a minimum.
(4e) Remove any filters from the lens and use a lens hood. This will help reduce flare.
(4f) Camera on tripod and remote plugged in.
(4g) I shoot raw to give me more control when PPing the image.
(4h) I use just the centre focus point only active.
(4j) I meter the whole scene however the light meter can be fooled very easily in these conditions so use it just as a guide.
I usually start with an exposure around 10 second @ F8 & ISO 100 (that will get you in or near the ball park)
(5) shooting.
Focussing may be a problem. Live view may make it easier and try to focus on something that provides some contrast. Not all my cameras have live view so what I do is just partially depress the shutter and rack the lens back & forth while watching the focus indicators in the viewfinder. A powerful torch may help illuminate the subject.
See example #19 where the photographers are using a torch to assist with focus and/or light painting.
I will then take a photograph and then check the histogram.
I will adjust my exposure if needed, and then re shoot.
Bracket your exposures, by at least one stop, it will give you more choices when PPing.
If the light is changing, or the moon rising etc, I will continue shooting, bracketing exposures until the light has gone.
If the light is not changing I will only take a few photographs with a range of exposures (+- up to 3 F stops) to allow possible use of HDR or merging images when PPing.
Security: always be aware of your surroundings and take care when shooting and let people know where you are going.
More to come.
Richard
(#17) - 8 seco9nds @ f/11.0 F=28 mm, ISO 100 tripod.
(Download)
(#18) - 8 seconds @ ƒ/11.0 F=88.0mm ISO 200 Tripod 200
(Download)
#19 - Using a torch to help with focussing and/or light painting.
(Download)
Feb 12, 2018 15:37:04 #
Low light Photography - In the street
(this is from an old tutorial of mine)
This tute will cover available light, hand held, night street photography
(1) Pre requisites
- be familiar with your camera and its operation. You may be making adjustments in the dark.
- Be able to read and understand the histogram. The pic on the back of your camera is not a good guide for a correctly exposed image.
- Be able to use your camera in manual mode (if need be).
(2) Shooting:
If I am using an image stabilised lens it will be on.
I tend to shoot at fairly wide angles.
Normally I will set the camera aperture wide open with a fairly high ISO (800+) and take what ever shutter speed I can get (preferably => 1/15 second).
If I find that I have plenty of light the I will increase the shutter speed and then think about shooting at a smaller aperture and/or decreasing the ISO (especially if I am at a very high ISO (3200?))
Now days will usually be shooting in aperture priority (possibly with a bit of exposure compensation dialed in) or manual mode, manual focus if the camera has trouble focussing, and in RAW.
With newer cameras you may be able to shoot at lot higher ISO values giving you more exposure options.
Some examples
(#20) The blue hour can be a great time to shoot.
Here I cheated and placed the camera on top of a traffic light controller box, for stability.
(#21) Hand held whilst on vacation.
(#22) Another hand held whilst on vacation
(#23) And yet another vacation shot.
Thanks for looking.
Feel free to comment and ask questions.
Richard
(#20) - Exposure 0.5 seconds @ f/4.0 F=24 mm ISO 100
(Download)
(#21) - 1/10 @ F6.3, ISO 1600
(Download)
(#22) - 1/15) @ f/4 F= 40 mm ISO 1600

(Download)
(#23) 1/15 @ ƒ/5.0 F=24.0 mm ISO 1600

(Download)
Feb 13, 2018 16:36:09 #
Light - low light outdoors
Just a few more notes:
In some cases low light can be so diffused that it will not provide any modelling at all.
(#24) Hand held with an image stabilised lens. Shot whilst on vacation.
If long exposures are suitable for your subject then you won't have any real problems, except possibly for contrast.
However if you are hand holding a long lens and/or trying to freeze action then the low light will be a problem. It will mean using high ISO and fast lenses (preferably ones that focus quickly an accurately in low light. Point and shoot cameras and slow kit lenses will be almost useless.
Some examples from a choir shoot at a sports field.
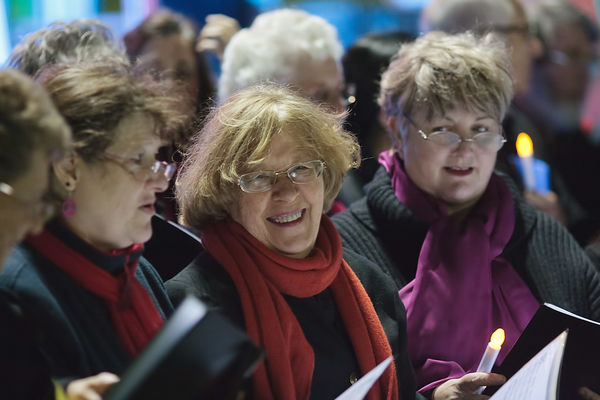
(#25) Hand held. During set up and rehearsal the flood lights were on. I thought the light levels were ok.
(#26) Then they turned the flood lights off and only used spotlights to the rear of the choir. Very low light levels, and extreme contrast - In hindsight a graduated neutral may have helped (more to come on that).
This photograph has had a lot of post processing.
(#27) Capturing portraits was even more difficult with strong back lighting and low light levels on the faces.
Thanks for looking, and more to come.
Feel free to comment or ask questions.
Richard
Just a few more notes:
In some cases low light can be so diffused that it will not provide any modelling at all.
(#24) Hand held with an image stabilised lens. Shot whilst on vacation.
If long exposures are suitable for your subject then you won't have any real problems, except possibly for contrast.
However if you are hand holding a long lens and/or trying to freeze action then the low light will be a problem. It will mean using high ISO and fast lenses (preferably ones that focus quickly an accurately in low light. Point and shoot cameras and slow kit lenses will be almost useless.
Some examples from a choir shoot at a sports field.
(#25) Hand held. During set up and rehearsal the flood lights were on. I thought the light levels were ok.
(#26) Then they turned the flood lights off and only used spotlights to the rear of the choir. Very low light levels, and extreme contrast - In hindsight a graduated neutral may have helped (more to come on that).
This photograph has had a lot of post processing.
(#27) Capturing portraits was even more difficult with strong back lighting and low light levels on the faces.
Thanks for looking, and more to come.
Feel free to comment or ask questions.
Richard
(#24) Pizza - 1/10 @ f/4.0 F=24 mm ISO 1600

(Download)
(#25) 1/50 @ f/2.8 F=35 mm ISO 3200 (maximum)
(Download)
(#26) - 1/15 (limit of my hand holding ability) @ f/2.0 (wide open) F=35 mm ISO 3200 (maximum)
(Download)
(#27) Exposure 1/125 (I can't get consistent results hand hold at this shutter speed at 135mm) @ f/2.0 (wide open) F=135 mm ISO 3200 (Maximum)
(Download)
Feb 14, 2018 16:32:53 #
Light 5.
High contrast #1
Bright sunlight can be a killer for people shots.
These were "candids" at a street food & wine festival on a cloudless day.
(#28) In full sunlight,at 1.11pm. Notice the harsh shadows and no eye detail. This photograph has had a lot of post processing.
Getting subject completely out out of the direct sun can help a lot.
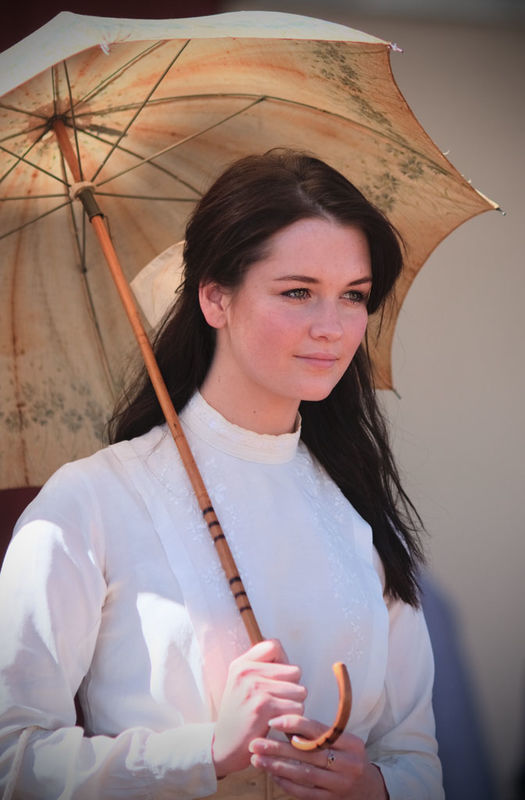
(#29) Same location and at 1.15pm. However the model is in total shade.
If direct sunlight is lighting part of the subject you will still have problems. I think dappled sunlight under a tree could be a major problem.
(#30) Same location and at 1.07pm. Notice the over exposed dress and hand. This photograph also has a lot of post processing.
(#31 Or you may be able to change your point of view so most of the contrast problems are solved. Taken 15 seconds before pic #30 (1.07pm)
More to come.
Richard
High contrast #1
Bright sunlight can be a killer for people shots.
These were "candids" at a street food & wine festival on a cloudless day.
(#28) In full sunlight,at 1.11pm. Notice the harsh shadows and no eye detail. This photograph has had a lot of post processing.
Getting subject completely out out of the direct sun can help a lot.
(#29) Same location and at 1.15pm. However the model is in total shade.
If direct sunlight is lighting part of the subject you will still have problems. I think dappled sunlight under a tree could be a major problem.
(#30) Same location and at 1.07pm. Notice the over exposed dress and hand. This photograph also has a lot of post processing.
(#31 Or you may be able to change your point of view so most of the contrast problems are solved. Taken 15 seconds before pic #30 (1.07pm)
More to come.
Richard
(#28) 1/4000 @ f/2.0 F=135mm, ISO 100
(Download)
(#29) 1/400 @ f/2.0 F=135 mm, ISO 100
(Download)
(#30) 1/2000 @ f/2.0 F=135 mm, ISO 100
(Download)
(#31) 1/1600 @ f/2.0 F=135 mm, ISO 100
(Download)
Feb 14, 2018 20:26:50 #

Feb 14, 2018 20:29:25 #
If you want to reply, then register here. Registration is free and your account is created instantly, so you can post right away.