Learn-and-Share: Adding Textures To Photos
Aug 8, 2016 12:34:25 #

Does anybody else enjoy experimenting with textures on your images, or want to learn more? In this Learn and Share thread, let's share what we know, and if you haven't experimented with them, jump in and give it a shot! Post your images that use textures to this thread, and tell us a bit about what you did, including hints and tips. If you're just experimenting for the first time, post your experiments and ask for help if you need it.
Why would we want to play with textures? What are they anyway?
- A texture is one or more images overlaying (or underlying) your original, for the purpose of adding impact. You do this to create a certain mood or style, such as vintage, or to add more depth - the illusion of real texture.http://photo.net/learning/digital-photography-workflow/techniques-tips/adding-textures-flower-photos/
Where do we get the textures?
- Some programs have them built in. Topaz has a special program just for textures. But truthfully, you don't need a special program, just some program that does layers.
- I enjoy making my own textures by photographing concrete, brick walls, water, stucco, rough paper, etc. There are also free sources on the internet. http://www.makeuseof.com/tag/10-websites-finding-free-photoshop-textures/.
What kinds of images might work OK with textures?
- Some of my favorites are old buildings, old autos, city streets, farm scenes, flowers. But you can create an interesting image with just about any subject, you just have to match the texture to the subject. I've even done a portrait of my grandson with textures. UHH member Dave Chinn does some amazing portraits with textures as a part of a composite.
What do I do with the texture once I have it?
1. Drag it on top of your image in your layering program or import it in as a layer. (I use Photoshop but any layering program will work)
2. Use your program's commands to resize the texture to fit and/or drag it to where you want it.
3. Try different blending modes. (The ones I use most often are multiply and soft light, but I use others as well).
4. Try different opacity for the texture layer
5. Mask out areas of the texture that interfere with the image itself such as spots on your subject's face.
6. Add other textures as you wish.
Masking basics (for those who want to go this route to lighten or remove parts of the texture in certain areas)
1. Click on the texture layer in your layer stack.
2. Go to Layer/Add Layer Mask/Reveal All which will put a white mask emblem to the right of your image layer. Click on the white mask emblem to select it.
3. Use the brush of your choice with black paint selected at about 10-20% opacity and a feathered edge to lighten or paint out the texture in areas where you think it's too much. Repeat till you are satisfied. Be sure you are painting on the mask rather than the image itself. If you make a mistake, switch to white paint to paint the texture back in.
4. This same process works if you are adding another layer of IMAGE, paint out/paint in pieces of the added image at the opacity you want.
5. The process works equally well if you choose Layer/Add Layer Mask/Hide All. This will hide your mask and will cause a black mask emblem to appear beside the image icon on that layer. With this approach, you will paint with white paint on the black mask to paint in the part of the texture you want at your chosen opacity.
Valuable hints:
1. Name your layers as you go in case you need to find one where you did something you want to change
2. If you can't see what you're doing with your masking, reduce the opacity of the layer you're working on (or the one below or above) so you can see below, then change it back when done.
3. Memorize the COSE shortcut (command+option/alt+shift+e= new layer created on top which is a combination of all layers below)
4. Sometimes duplicating this COSE layer and blending with Soft Light to the layer(s) below gives some depth to your final image.
5. While there are lots of brushes that come built in with Photoshop and other programs, it is fun to add more. I especially like grunge brushes for working with texture layers. Here's some free ones http://www.creativebloq.com/photoshop/free-photoshop-brushes-11121140
Some links to give you ideas
http://www.webdesignerdepot.com/2009/08/100-striking-examples-of-grunge-photography/
http://digital-photography-school.com/how-to-use-textures-to-enhance-your-photographs/
https://www.designcuts.com/tutorials/applying-fine-art-textures-to-your-photography-work/
http://photography.about.com/od/developingandprinting/ss/addtexturetophotos.htm
http://www.photomorphis.com/ (commercial site but there's some free stuff)
If you don't have a layering program and want to give this a try, consider a trial download of Photoshop, On1, Elements, Corel or Affinity. Or the ever-free GIMP.
Here's two examples of mine, and please add your own, whether you are an experienced user or just playing around to learn something new. I may add more as we go, if we can drum up enough interest, because there are endless variations on what you can do creatively.
This is the image that started this conversation. Original of a blah image of an irrigation machine doing its work.
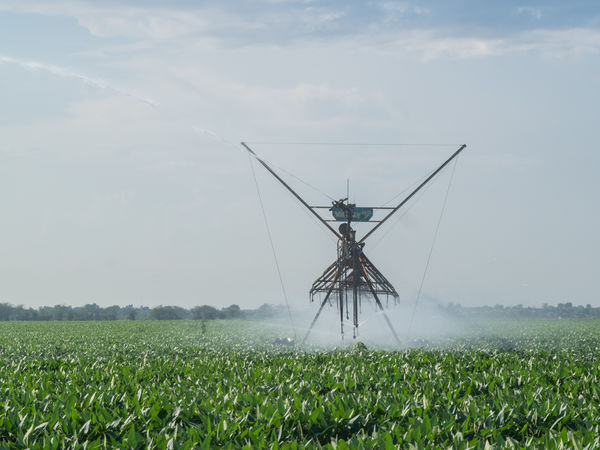
(Download)
Converted to sepia, sepia layer blended at reduced opacity to preserve some color in the plants, then two textures with local masking and blending
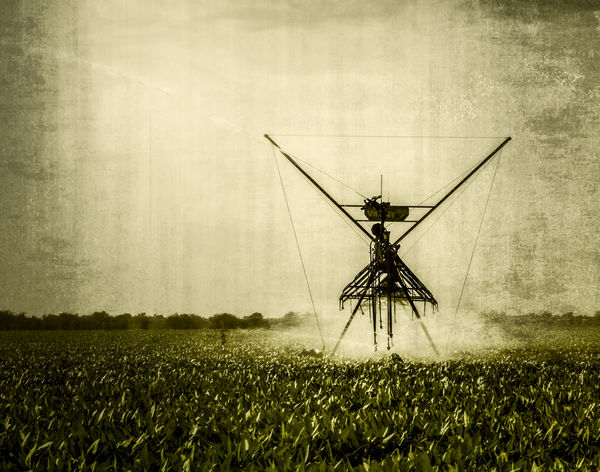
(Download)
A "seascape" that I was pretty satisfied with as is, but it didn't print very well
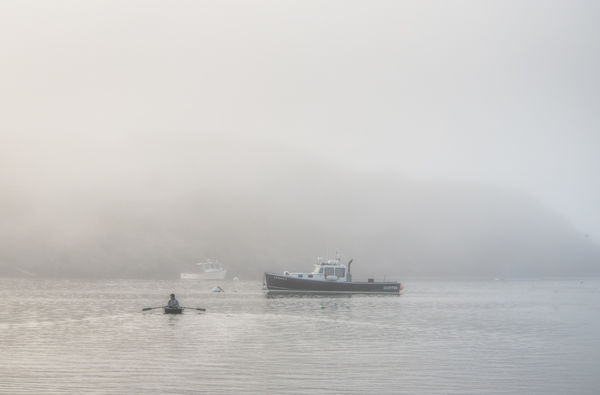
(Download)
so I worked it up with textures to add drama and printed it on canvas, with a nice result
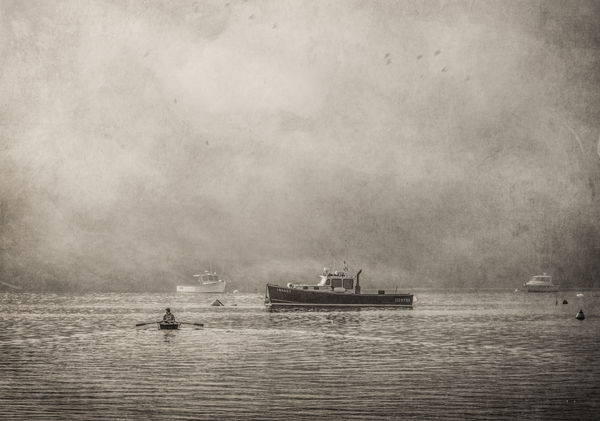
(Download)
Aug 8, 2016 12:56:35 #
thanks for putting this together! I am interested in learning more about this, the whys and wherefores in particular - great examples.
Aug 8, 2016 13:35:34 #

Minnie, at what point in the process do you determine you want to use a texture for the final look? Does it vary with each pic, or do you have a sense of where you're going right from the beginning of pp?
I will post an attempt shortly.
Thanks so much for starting this. The information in your opening was very well organized and easy to follow. Great links too!
I will post an attempt shortly.
Thanks so much for starting this. The information in your opening was very well organized and easy to follow. Great links too!
Aug 8, 2016 14:22:58 #
pfrancke wrote:
thanks for putting this together! I am interested in learning more about this, the whys and wherefores in particular - great examples.
I look forward to seeing some of your work, Piet.
Aug 8, 2016 14:41:31 #
Having only tried this once before, more than a year ago, I have very little sense of what textures work best with what images. Plus, I was starting with a photo I was already happy with, which I suspect is not the way to go - lol.
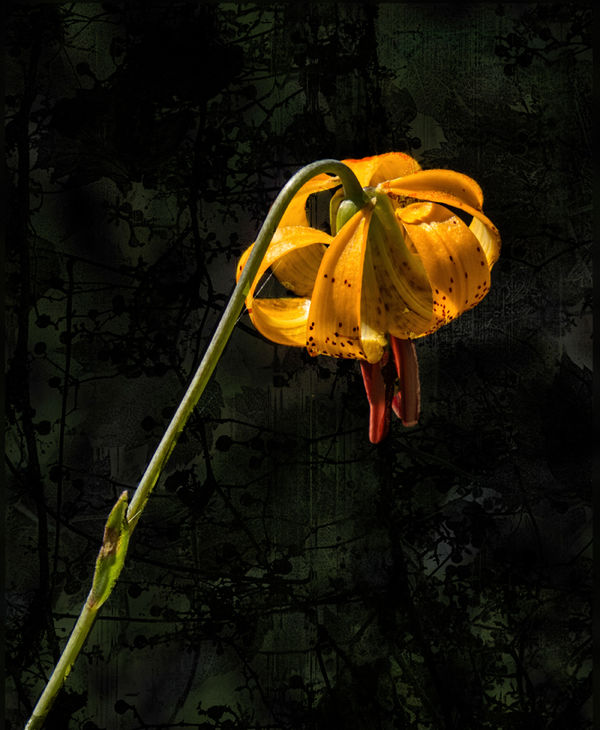
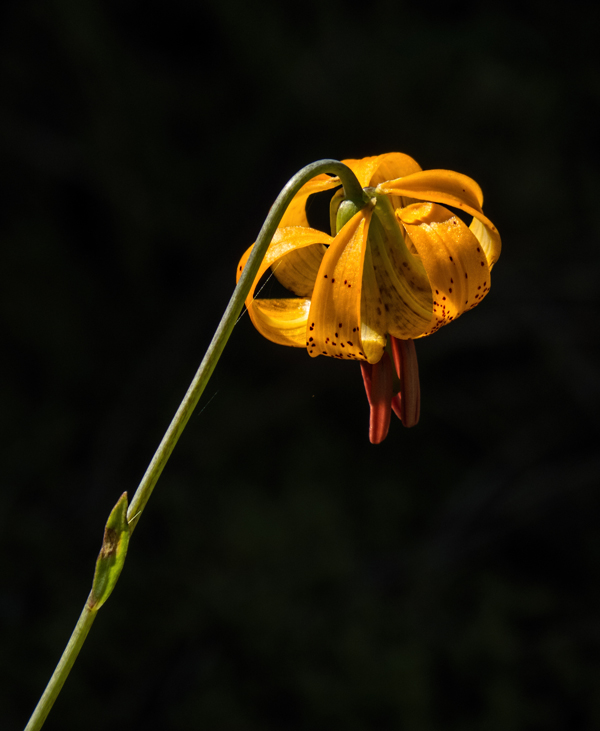
The texture is a b&w crop of one of my grapevines-through-windows shot. Soft light blend mode at 100%, masked the flower from the effect.
The texture is a b&w crop of one of my grapevines-through-windows shot. Soft light blend mode at 100%, masked the flower from the effect.
Aug 8, 2016 14:45:32 #
Linda From Maine wrote:
Having only tried this once before, more than a year ago, I have very little sense of what textures work best with what images. Plus, I was starting with a photo I was already happy with, which I suspect is not the way to go - lol.
The texture is a b&w crop of one of my grapevines-through-windows shot. Soft light blend mode at 100%, masked the flower from the effect.
The texture is a b&w crop of one of my grapevines-through-windows shot. Soft light blend mode at 100%, masked the flower from the effect.
I like it Linda -- I suspect that starting with an image that you like IS the way to go!!! LOL. I get the feeling that as always, it is a good technique to add flavor, or mood, or something to an image, but probably not a good idea to use it to try to SAVE an image.. Although.... who knows, seems like a lot of power in these textures.
Aug 8, 2016 14:48:15 #
Another question for Minnie and those well experienced in this technique: would a strongly recognizable background be considered a texture, or are we now heading to just composite territory?
Your boat pic seems so seamless and the "parts" very much of the whole - dramatic and very engaging!
Your boat pic seems so seamless and the "parts" very much of the whole - dramatic and very engaging!
Aug 8, 2016 14:51:07 #
Linda From Maine wrote:
Minnie, at what point in the process do you determine you want to use a texture for the final look? Does it vary with each pic, or do you have a sense of where you're going right from the beginning of pp?
I will post an attempt shortly.
Thanks so much for starting this. The information in your opening was very well organized and easy to follow. Great links too!
I will post an attempt shortly.
Thanks so much for starting this. The information in your opening was very well organized and easy to follow. Great links too!
I find my way at different points with different images. With the irrigation-monster image, I knew on-site what I wanted to do. The sky was boring, the light was bad, there was absolutely nothing else to include in the image to improve composition, and I had a ton of sensor goop. I was already thinking around those obstacles.
With the boat picture, I was perfectly happy with the original capture and its straightforward editing - until I tried to print it. The top of the image didn't print well at all, so I cast about for alternatives. I found a texture that had clouds and other stuff built into it, experimented, and liked the results.
Then too, I'm an experimenter, and often try various photo editing options, just for the fun of it.
Aug 8, 2016 15:00:09 #
Minnie, so much info to absorb. Having been somewhat familiar with textures I will make every attempt to come up with something soon.
I absolutely love your sepia textured boat image. Very dramatic !!!
Dave
I absolutely love your sepia textured boat image. Very dramatic !!!
Dave
Aug 8, 2016 15:05:55 #
Linda From Maine wrote:
Having only tried this once before, more than a year ago, I have very little sense of what textures work best with what images. Plus, I was starting with a photo I was already happy with, which I suspect is not the way to go - lol.
The texture is a b&w crop of one of my grapevines-through-windows shot. Soft light blend mode at 100%, masked the flower from the effect.
The texture is a b&w crop of one of my grapevines-through-windows shot. Soft light blend mode at 100%, masked the flower from the effect.
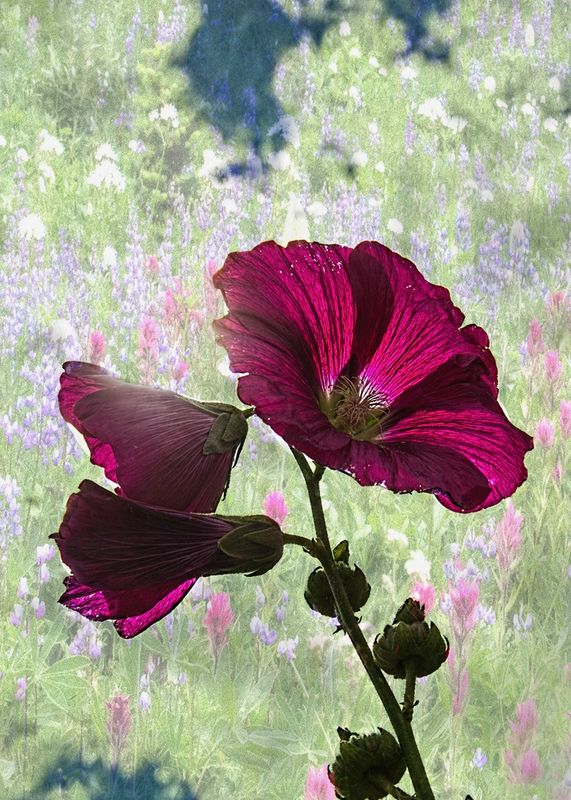
Linda, I'm not much of a flower shooter but I will have to say all of yours (especially the last one) with the textured layers has my attention. I do like them very much and that, as I said is coming from a non flower person. Well done !!!
Dave
Aug 8, 2016 15:28:04 #
Linda From Maine wrote:
Having only tried this once before, more than a year ago, I have very little sense of what textures work best with what images. Plus, I was starting with a photo I was already happy with, which I suspect is not the way to go - lol.
The texture is a b&w crop of one of my grapevines-through-windows shot. Soft light blend mode at 100%, masked the flower from the effect.
The texture is a b&w crop of one of my grapevines-through-windows shot. Soft light blend mode at 100%, masked the flower from the effect.
This is a good example of a subtle use that is quite simple. Both versions of the image are equally pleasing, the starting image as a simple and elegant flower portrait, but the textured image has some depth and complexity. They both work.
Texture is seldom a good rescue operation, but it can (among other things) help add interest to plain backgrounds, or it can help counteract busy backgrounds. Some folks use textures with composites to help blend the various elements together, pulling separate images into a cohesive whole by providing a uniform background or overlay pattern that can also disguise the boundaries between elements.
Aug 8, 2016 15:30:13 #
Linda From Maine wrote:
Another question for Minnie and those well experienced in this technique: would a strongly recognizable background be considered a texture, or are we now heading to just composite territory?
Your boat pic seems so seamless and the "parts" very much of the whole - dramatic and very engaging!
Your boat pic seems so seamless and the "parts" very much of the whole - dramatic and very engaging!
I would see this more as a composite but I could as easily be wrong as right

There are endless ways to use this stuff, all it takes is some fiddling.
Aug 8, 2016 15:30:41 #
Dave Chinn wrote:
Minnie, so much info to absorb. Having been somewhat familiar with textures I will make every attempt to come up with something soon.
I absolutely love your sepia textured boat image. Very dramatic !!!
Dave
I absolutely love your sepia textured boat image. Very dramatic !!!
Dave
Looking forward to seeing what you share Dave, you're one of our Photoshop Masters!
Aug 8, 2016 15:42:52 #
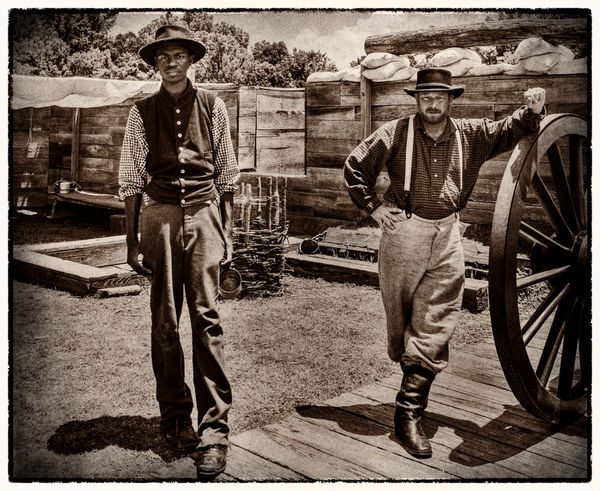
For those of you who like making photos look "old", textures can be one of the tools in your toolbox.
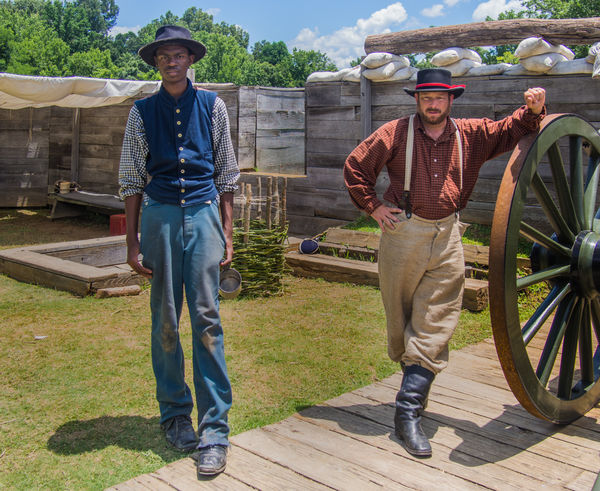
This shot of two Civil War re-enactors at Vicksburg was taken in blinding noonday sun and many modern distractions. Sepia conversion, textures, and a different edge helped me make up a little collection of a half-dozen shots from that event that are different from their out-of-camera counterparts.
This shot of two Civil War re-enactors at Vicksburg was taken in blinding noonday sun and many modern distractions. Sepia conversion, textures, and a different edge helped me make up a little collection of a half-dozen shots from that event that are different from their out-of-camera counterparts.
Aug 8, 2016 17:00:19 #

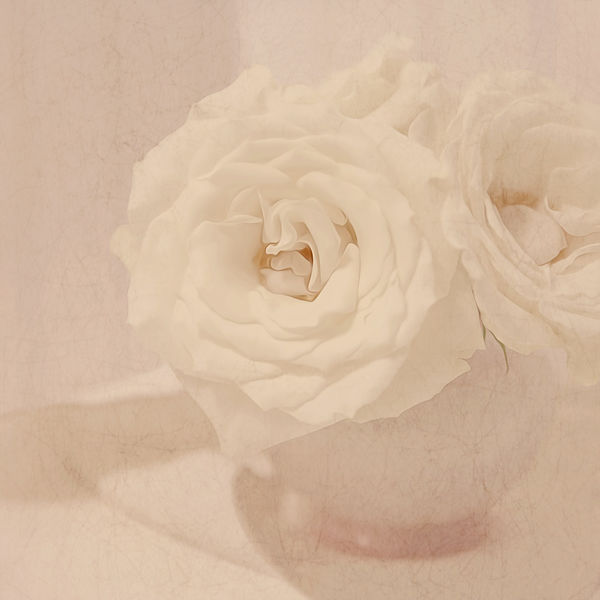
Here are examples of textures used on two different kinds of images. The first one started out as a simple vase of white roses on a white background. I used a crackle texture by Sarah Gardner and removed in increments the texture from the center rose. Then I added two pink gradients diagonally and finished with a slight curves adjustment. The second of the wren worked well with textures because of the amount of empty space. I used another Sarah Gardner texture applied twice and partially masked from the wren. I use the brush tool to remove texture from the subject rather than a layer mask in order to remove texture but not the color of the texture.

If you want to reply, then register here. Registration is free and your account is created instantly, so you can post right away.