What setting for this?
Sep 24, 2011 09:33:20 #
Sep 24, 2011 09:54:28 #
I'll probably get burned at the stake for this one...
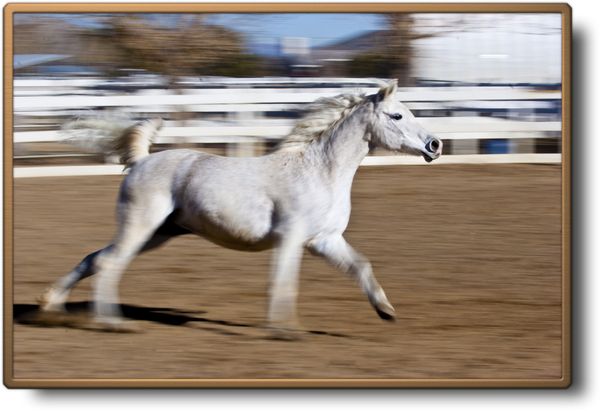
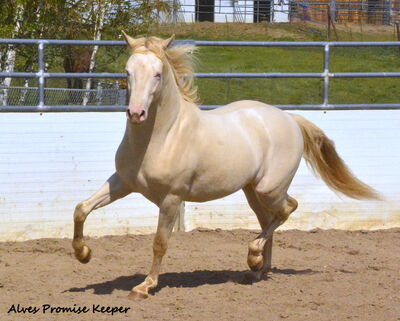
You don't HAVE to freeze action all the time. The shot isn't unsalvable, the edits brought the exposure and color levels up, and the movement of the legs can only be frozex witha faster shutter speed. If you can't or won't :-) use a higher ISO, you can selectively use a slower shutter speed and pan with the subject.
I find most images that embody a sense of speed more pleasing than frozen action.
Gordon
Sep 24, 2011 10:00:43 #
Wouldn't shooting in RAW at a faster shutter speed allow easy editing of the stopped leg action?
Sep 24, 2011 10:13:16 #
GTinSoCal wrote:
I'll probably get burned at the stake for this one...
You don't HAVE to freeze action all the time. The shot isn't unsalvable, the edits brought the exposure and color levels up, and the movement of the legs can only be frozex witha faster shutter speed. If you can't or won't :-) use a higher ISO, you can selectively use a slower shutter speed and pan with the subject.
I find most images that embody a sense of speed more pleasing than frozen action.
Gordon
No burning at the stake. This is a great example of another way to work with the subject. I like it and the motion adds to the drama of the image.
I purposely look to get blur on some subjects, like dancers, but catch the face clear and stop motion.
Not ever photo has to have every element fixed in stop motion. This photo and the one that started this conversation, IMHO, demand that the legs be in motion and panning is a good technique here. Not many good options sitting in the sends with a zoom lens.
You can rent good glass from several sites online. I have done so several times this year to see the difference on my camera.
All I can say is Wow! Try out some at f2.8 and below. I had one lens, 70-200 f2.0 across the board. Opens up a whole new world. Renting a $2k or $3k (or more) lens can be just the ticket for a short project or weekend.
Sep 24, 2011 10:15:43 #

If the legs blur the movement of the horses is too fast for your shutter speed. Set it at 1/250 if the horses are just moving about in a walk of slow trot. If they are moving faster, go to 1/320. Each time you make a shutter speed adjustment look at the results. If the blurring disappears, but the picture is too dark, increase the exposure value and/or the ISO.
Sep 24, 2011 10:35:57 #
Actually increasing the ISO does not lose resolution as an earlier post says, it increases the light sensitivity of the image sensor. This is sometimes necessary in poor/low light situation. What it typically does is add digital noise to your image. Some noise can be dealt with in post processing by software such as Lightroom, or by a plugin such as Noiseware.
I noticed that on first Nikon photo of the post it says it was shot at ISO 1600, already quite high for an entry level camera such as the D5000 or a Canon Rebel.
Later when discussing the EXIF data it says that the exposure bias was set at -0.7 which (if I understand the Nikon terminology correctly) means that the image was purposely being underexposed by 0.7 stops (almost a full stop). Probably not a good idea in low light.
Understanding the relationship of ISO, aperture, and f-stop is important.
The issues are that entry level cameras such as my Canon Rebel XSi coupled with a not very "fast" lens such as Canon EF-S 55-250mm f/4-5.6 will simply not be able to shoot at a shutter speed fast enough to stop the blurring. When you zoom this lens with its variable f-stop to 250mm, you get a maximum aperture of f/5.6.
Let's compare to a lens that can get to f/2.8 at the same zoom level. It is typically very expensive to have a lens that is "fast" across the entire zoom range - such as Canon 24-70 f/2.8 - capable of maintaining f/2.8 throughout the zoom range. This lens sells for $1400 new. A Canon EF 70-200mm f/2.8L IS II sells new for $2500+. These are considered fast because of their maximum f/2.8 aperture capability.
Each full f-stop change doubles or halves the amount of light coming through the lens (e.g., using f/5.6 as the center you would compare as follows: f/4 vs. f/5.6 vs. f/8.
So, if you were shooting at f/2.8 at 1/1000th to freeze the leg motion, to get the same image exposure at f/4 you would have to slow your camera down to 1/500th (possibly getting some blurring), to shoot at f/5.6 (the maximum possible when zoomed with the kit lens), you will have to shoot at 1/250th. So the camera will take 4 times as long to capture the image and it is very likely that the legs will appear blurred. This leaves us with only one out, increase the ISO even more. Doubling the ISO sensitivity is the same as adding an f-stop.
For example exposure-wise, shooting at f/5.6 1/500th ISO 100 is the same as f/4 1/500th ISO 200. Every time you double the ISO, you increase sensitivity by same amount as opening the lens one full stop (e.g., change from f/8 to f/5.6) or doubling the exposure time (e.g., 1/500th vs. 1/250th). To shoot at higher shutter speed, we increase the ISO (in this example if we increase ISO to 400 (vs. original ISO 100) we can now shoot at f/5.6 1/2000 ISO 400 - compared to our original setting f/5.6 1/500th ISO 100 in this example. freezes the legs, adds noise.
Anything above ISO 800 on entry level Canon camera (Rebel XS or XSi) will inject noise into the image and I am not sure what the threshhold is for Nikon cameras but physics are the same in terms of noise and sensor sensitivity. Sometimes we simply have to endure the noise if we are going to get the image at all (because we have to keep cranking up the ISO so the camera can properly expose the image).
Here is a link to a 2007 article on cameraporn.net (ITS NOT PORN) that is a decent explanation of the relationship of the triangle of exposure called ISO, Speed, Aperture http://www.cameraporn.net/2007/12/24/aperture-iso-and-shutter-speed-the-good-kind-of-threesome/
Lastly, here is the camerporn.net link to 60 useful photo web sites (it is helpful to have this in your favorites!) http://www.cameraporn.net/2008/05/12/60-photography-links-you-cant-live-without/
Sep 24, 2011 10:56:35 #
Sep 24, 2011 13:22:40 #
Sep 24, 2011 14:17:37 #

Notice the overall underexposure of your first posted image. The EXIF data shows a -.7 bias, which to me means the camera underexposed the image by 2/3 of a stop. This fact would account in part for the horse having little detail and tonality.
Keep it simple. Set the ISO to 400 (or perhaps 800). Put your camera on Shutter Speed Priority, and set it for, say 1/200 sec. This SS should stop the motion of horse legs strutting. The camera will select the Aperture.
Set the camera for Evaluative Metering. This setting will read the whole scene for setting exposure.
At some distance, even a large aperture like f/2.8 will tend to keep the main subject in focus showing sharp detail.
With these settings, the camera will of course try to expose the scene for an 18-percent gray tone (thereby producing an underexposed image). So set the Exposure Compensation to +1 or +1.5. Experiment with the EC.
These settings will also work for photographing airborne aircraft and for objects in snow or bright sand (except you'd likely start with a lower ISO setting). The same circumstances of a dark subject against a bright field will prompt the camera to underexpose the main subject. Ride the EC to gain a good exposure under these circumstances.
The histogram of an image will tell you if the exposure values have been adequately captured. In the histogram, you should see the displayed values reaching the rightmost part of the graph without touching or bunching up against the right side of the graph.
Learn the histogram if you havent already. It informs you of the image exposure. This Web page presents a useful explanation of the histogram in photography: http://www.luminous-landscape.com/tutorials/understanding-series/understanding-histograms.shtml
Sep 24, 2011 14:44:19 #
anotherview wrote:
Notice the overall underexposure of your first pos... (show quote)
Very nice reply. I agree, experiment with the Bias (EV on my Olympus). Each camera is built within a certain tolerance and the lens too. If they are both near the extreme of that and at opposite ends then then you might find you always need to be 1/3 or more of a stop up or down from what the metering wants. My camera likes (or should I say I like) -0.3 EV on my camera with the lenses I have now.
This being said, when I rent really good (expensive) glass I need to check with a few test shots to see if I need that EV setting.
I read something recently that said, if you don't know for sure the setting or don't have time to try again, use Bracketing and multi-shot and you will get three different (or more depending on the camera) shots of different exposures. There are different kinds of bracketing you can use so check you manual. Might be worth the experiment anyway. Digital has no penalty for a few extra shots except for more images to sort through...
Sep 24, 2011 16:16:16 #
I don't comment often, but I do read here everyday. I have really learned alot and truly appreciate all of the comments and help given. It is very generous of you all to be so kind with your comments and overflowing with information. Thank you thank you.
I also use a Nikon D5000 and and continue to learn more about the camera. Don't know how many more ah ha moments I'll have but I love everyone of them. Ceil
I also use a Nikon D5000 and and continue to learn more about the camera. Don't know how many more ah ha moments I'll have but I love everyone of them. Ceil
Sep 24, 2011 16:21:36 #
Another approach. Set your camera to Program Mode. In this mode, the camera will set both the Shutter Speed and the Aperture. Set the ISO to Automatic. The camera will select the ISO value. Set the camera metering to Evaluative Metering so the camera meter reads the whole scene for the exposure.
Using these settings, the camera exposes the image for the scene automatically. Most of the time, the camera will capture the scene with an acceptable exposure. Very interesting.
You may notice, however, that for a given scene, the camera will underexpose the image. Adjust the Exposure Compensation to increase exposure as needed.
P Mode does have shortcomings. For example, this mode may select a large Aperture setting, blurring the background when you prefer it to show in focus.
If so, you could do the following: Note all the settings P Mode used for the exposure. Then put your camera in Manual Mode. Set it for the Shutter Speed used. Select the desired Aperture. Then adjust the ISO higher to match the change in value of the Aperture.
For example, if P Mode used f/4, and you wanted f/5.6 (a full stop difference), then you would boost the ISO one stop higher, from, say, 200 to 400.
Obviously, going from f/4 to /5.6 cuts the incoming light by one half (also known as one stop). Raising the ISO from 200 to 400 doubles the sensitivity of the digital sensor. This ISO doubling compensates for the Aperture halving.
Let me please say I understand this description may appear difficult to follow. I taught myself photography, and hence recall the painful learning curve of this process. If I had it to do all over, I'd spend more time early on learning the inter-relationship of ISO, Shutter Speed, and Aperture. A change in any one affects exposure.
BTW: I do use P Mode. Recently, I walked around in Europe during a 3-week tour shooting in this mode, generally capturing properly exposed images. I had to shoot quick and dirty to keep up with my tour group. Now and then, though, Id quickly revert to Manual Mode as described above, when time permitted, to adjust camera settings for a better exposure.
Good luck.
Sep 24, 2011 18:58:46 #
Jschneir
Loc: Santa Monica, CA
Great editing, you are very talented. Problem is now it appears, at least to my old tired eyes that you have made a statue of the rider and horse. Some blur IS needed to create the illusion of movement.
Sep 24, 2011 19:06:13 #
Jschneir
Loc: Santa Monica, CA
I seem to be raining on people parades these days. Each camera manufacturer handles increased ISO speeds differently. Increasing the ISO can have all sorts of effects on the shutter/aperture settings. A lot depends upon how far out you have zoomed, how much more aperture is available, and if the camera has a scene detection program, the camera may already have decided ion a shutter speed/aperture/ISO different from what you have set. You need to go out and try a bunch of pictures and see what your camra will do. Another related problem is how much a change in settings will result from just a slight shift in the camera view.
anotherview wrote:
Another approach. Set your camera to Program Mode... (show quote)
Sep 24, 2011 21:47:02 #

If you want to reply, then register here. Registration is free and your account is created instantly, so you can post right away.