Photo Boost Needed
Apr 23, 2014 01:58:43 #

Apr 23, 2014 06:33:02 #
mooseeyes wrote:
Let's see how this works for you.
Ken
Ken
I like that, mooseeyes.
:thumbup: :thumbup: :thumbup:
Apr 23, 2014 06:50:48 #
Apr 23, 2014 06:55:41 #
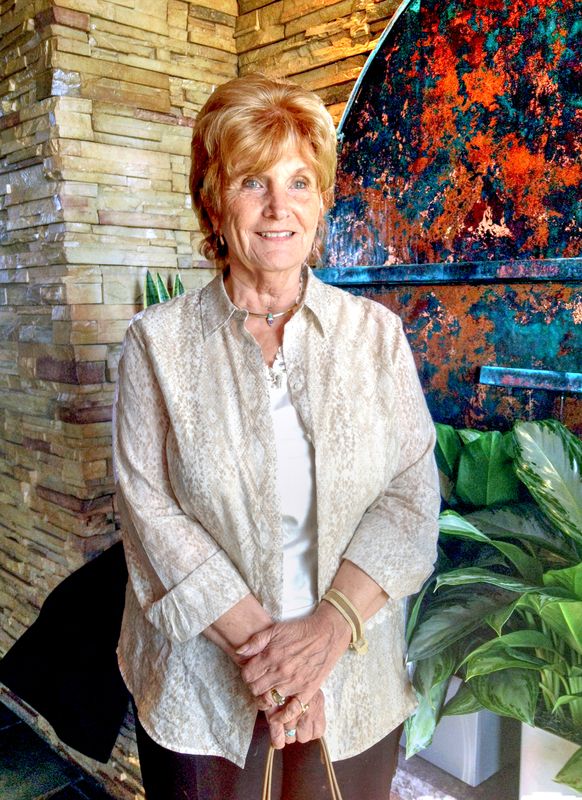
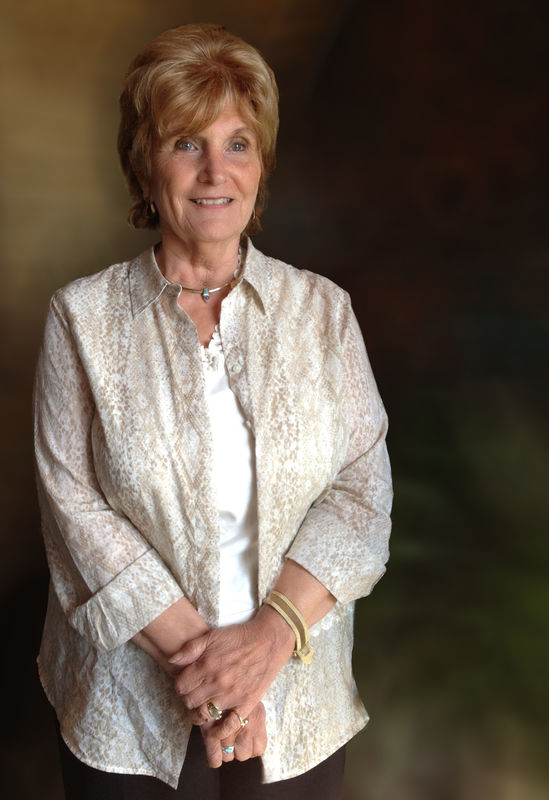
I took this gently as mature ladies are easily offended: adjusted brightness, contrast, shadow, highlights, color,
saturation. Teased the lines on the face a tad to smooth a few lines without transforming the lady into an 18 year old. Hope this works. Program: GIMP.
saturation. Teased the lines on the face a tad to smooth a few lines without transforming the lady into an 18 year old. Hope this works. Program: GIMP.

Apr 23, 2014 09:47:26 #

Apr 23, 2014 10:55:45 #
gypsy02 wrote:
I'm using PSE12, just upgraded from using PSE2 although I had PSE7 and 9. I'm good with layers but haven't mastered the masking yet. But, I actually did try to mask this (so I did have the right idea) but it ended up with a shadow around the back of the shoulders and I didn't know how to fix that. I need to go back and follow your directions as I get mixed up with where to start with the mask. Thanks for your time playing with this and for your helpful instructions!
When you make an adjustment layer, it asks what type of layer you want, pick brightness/contrast, and it will make a new layer above the active layer with a mask already there. The mask is all white, meaning everything in the picture will be affected by the brightness/contrast adjustments you make. Make the face brighter which will make everything brighter (not what you want). Next, with the white mask active, and with a black foreground, white background (press D to change to these colors) then, press alt+backspace and it will fill the white mask with black. Now NONE of your brightness changes will show through.
Next, press B for brush, press X to switch fore/background colors, so your brush is now white. Paint (in the picture, not the layer) white over the parts of the picture you want affected by your previous brightness changes. Play around a bit and you will quickly get the hang of it. Use the brackets to [ ] increase/decrease the size of the brush. Don't worry too much about painting on the lines, you can tidy things up later by blowing the picture way up with a smaller brush of white or black. Press X to switch between black and white. You can do this with additional adjustment layers as well.
You can always go back to the adjustments (click on the left of the adjustment layer, to the left of the mask) and adjust the amounts of brightness/contrast. Also, you can fool with the transparancy levels of the adjustment layers, and also the opacity of the brushes when painting.
Once you get the hang of it, it is easy, although deciding what you like is not so easy. You can see from all the variations submitted deciding what to do is always a challenge. Most people (meaning me) tend to go overboard. Some people have a knack for it. I have to go back often days later to see what I missed, and how badly I overdid it.
BTW, I really liked your picture. It is a great pose, and is a great subject to tweak a bit. Doesn't need much.
Apr 23, 2014 12:40:29 #
gypsy02
Loc: Indiana
JohnnyT789 wrote:
Another attempt
Very nice!! Nice clean look with the saturation.
Apr 23, 2014 12:42:07 #
gypsy02
Loc: Indiana
MyPharo wrote:
Here is my version of a fix .
Another nice fix with light and colors. Thank you.
Apr 23, 2014 12:49:03 #
gypsy02
Loc: Indiana
Shakey wrote:
I took this gently as mature ladies are easily offended: adjusted brightness, contrast, shadow, highlights, color,
saturation. Teased the lines on the face a tad to smooth a few lines without transforming the lady into an 18 year old. Hope this works. Program: GIMP.
saturation. Teased the lines on the face a tad to smooth a few lines without transforming the lady into an 18 year old. Hope this works. Program: GIMP.
It works very well! Very nice gentle approach, Shakey. Very nice facial adjustments. And the gentle approach is even more evident on the hands which, IMO, detract from the photo. I'm a little surprised that more people haven't selected to crop this photo for a more pleasing view. However, I'm not a pro and that's what I'm here for .... to hear other opinions and learn from them.
Apr 23, 2014 12:52:13 #
gypsy02
Loc: Indiana
kubota king wrote:
all adjustments made using camera raw inside PS CC. Tommy
Kubota King .... Excellent job of bringing out the face and keeping the color in the blouse! Thank you for your work. I'll have to work on getting better with those raw adjustments.
Apr 23, 2014 13:16:40 #
gypsy02
Loc: Indiana
BigDaddy wrote:
When you make an adjustment layer, it asks what ty... (show quote)
Thank you so much for the detailed instructions! I've practiced with your instructions on quite a few pics I found in my files and I'm getting results. One question ... there is a contrast/brightness adjustment layer. When the mask is added, should that be an additional mask layer or mask on the brightness layer? I did not make a new mask layer and it has been working. However, I wanted to go back and adjust the brightness adjustment more and couldn't do it. I know about the black & white of a mask layer but I think my confusion has been whether to paint on the mask or on the photo. Also whether to use the paint bucket to fill the mask or fill the photo. It's been very frustrating over the last 3 months watching many videos and "learn how to mask" tutorials and then not being able to do it! It appears easy. Thanks again for your time to post these directions. I have printed them to refer to until "I get it"!!
Apr 23, 2014 13:35:37 #
gypsy02 wrote:
It works very well! Very nice gentle approach, Shakey. Very nice facial adjustments. And the gentle approach is even more evident on the hands which, IMO, detract from the photo. I'm a little surprised that more people haven't selected to crop this photo for a more pleasing view. However, I'm not a pro and that's what I'm here for .... to hear other opinions and learn from them.
I must be getting old, I forgot to crop it. So here is a cropped version and I removed the plant growing out of her shoulder.

Apr 23, 2014 19:32:03 #
Bubu wrote:
with lot of respect, a beautiful picture and subject. Congratulations. The stance is serene and wise. Here is what I did , hoping you like it. Just a bit of clarity makes it (I think).
may now you can selective darken the highlights on the blouse.
may now you can selective darken the highlights on the blouse.
Using photoshop. Blur bkg and soften a little. Hope it is ok. Took out purse handle and cropped a little
Apr 23, 2014 21:28:42 #
This is my attempt.
gypsy02 wrote:
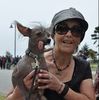
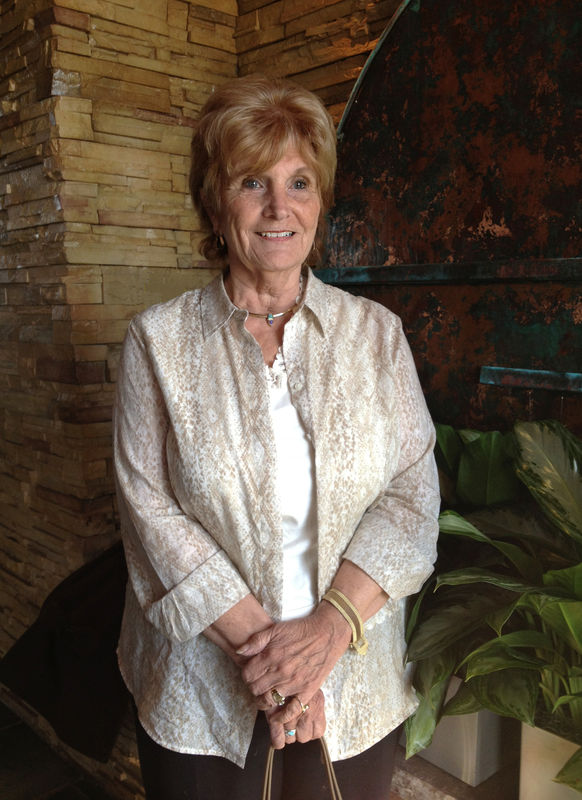
I've been trying to boost this photo out of the shadows without blowing out the highlights and design in the blouse. The first is the original and the second is my attempt with also some touch up on facial lines. Still appears a little flat. Any help or suggestions will be appreciated.
Apr 23, 2014 22:38:21 #
gypsy02
Loc: Indiana
Mile wrote:
Using photoshop. Blur bkg and soften a little. Hope it is ok. Took out purse handle and cropped a little
Very nice with the blurred background. The little softening adds a nice touch too. Thank you.
If you want to reply, then register here. Registration is free and your account is created instantly, so you can post right away.