Posts for: dave.m
Feb 12, 2020 07:00:32 #
As already mentioned by imagemeister, I use a monopod and tilting head when tracking moving aircraft at typically close range at air shows. I originally tried a ball head but it was no good as when friction set to allow up and down movement (in X forward direction) , it also allowed the camera to move side to side (Y direction).
I use Manfrotto fittings and the 234 is ideal. From advice from a pro photographer, I use a strap around my neck, then extend the monopod well in front, and with feet apart at 10 and 4 oclock'ish the setup is very stable. The neck strap is tensioned for the camera to be pushed forwards, and though counter intuitive at first, the pod and me form a fairly stable, rapidly adjustable 'tripod'.
Because the monopod is extended in front it is easy to elevate the camera for high angle shots with a short step forward and rotate the head. Much easier to do than describe, and helps for fast, high angle tracking shots considerably.
Feb 8, 2020 12:21:39 #
dave.m wrote:
I have used Microsoft's free Synctoy for years. I ... (show quote)
Forgot to add that it copies folders recursively so if you have several sub-folders just select the top and everything below will be copied. And if you select contribute, only new and changed is copied so stuff you backed up each day is not copied again unless you have changed it
Feb 8, 2020 12:18:16 #
jlb0725 wrote:
What is the best way to move photos from computer to an external hard drive? Should you copy & paste or use a different method. I have both a Mac & a Windows computers.
I have used Microsoft's free Synctoy for years. I think it is a brilliant program for Windows to back up a folder/file selection.
There are several benefits (for me) I would mention:
* easy to use and understand.
* you can run a preview without doing anything to check you are getting what you want
* it does a straight copy/ rename/ optional delete depending what actions you pick, without any database
or whatever, so copy is non-proprietary and can be read on anything
* you can save selection, Action, and Options with a name to repeat any time you like.
* To use, make a selection of a source and target folder (a folder pair, called Left and Right)
* you then choose the 'action'
- Syncronise - new and changed files and folders are copied both ways. Renames and deletes on
either side are repeated on the other. Makes Left and Right Identical whatever you have done to
either. To Risky for on the go backup IMO
- Echo - new and changed files and folders on the left are copied to the right, renames and deletes
on the left are repeated on the right. Makes Right match Left.
- Contribute - new and updated files are copied left to right. No deletions. This is my ideal choice for
on-the-go backup to USB. Everything I've added or modified on the laptop is repeated on the backup
but NO deletes.
* there are also several options, one of which is ' check file contents' (verify) but of course that takes
a while
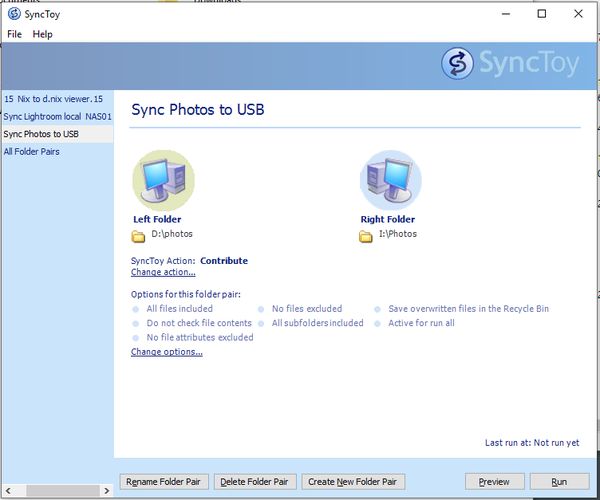
I have all my stuff in a folder called D:\Photos on the laptop hard drive. When I exit Lightroom I backup the catalogue to D:\Photos\LRcatalogue folder.
I then run Synctoy with 'Sync Photos to USB' with a Contribute setting. Result - anything I've done in this session is copied to USB with no mistakes and no deletes on the USB.
I have shortcuts on the desktop so don't even have to look for it so starting it takes seconds.
When I'm on a trip I do this each evening as soon as I have uploaded my SD card/s to the PC, and again if I have fiddled around with lightroom. I Repeat twice to 2 separate USBs so have now have 3 copies. I can happily reformat the SD cards for use again if I choose.
I also have other folder pairs setup to copy to NAS when I get home and to my desktop.
Jan 26, 2020 07:14:26 #
Ballard wrote:
Hi Dave br This is a stack of 20 images, each 3 mi... (show quote)
Wow! it is temping to be flippant and ask if I can get the bits at Walmart, but seriously, thanks for such a detailed reply, parts of which I understood (multi- llong-exposure stacking, the need for a top end tracking device for such very long cumulative exposures, and suitable stacking software.)
I'm in the process of building Gary Seronik’s analog barn door tracker which while in a much lower league I hope will give me a start in long star exposure with tele lens. Will read up more on the bias frames to remove noise.
Thanks again Ballard
Jan 25, 2020 15:56:12 #
always interested in star photography - tried it more than once with only a little success.
Can you give us camera/ lens / exposure details and how you post processed so we can learn from you?
Can you give us camera/ lens / exposure details and how you post processed so we can learn from you?
Jan 12, 2020 07:34:09 #
my thoughts:
there are a number of photographic genres: reporting, documentary, fine art, to identify 3 that reference this thread.
For me it is unforgivable to photoshop reporting imagery except, and only to make the image clearer in what it is reporting (eg bring up shadows to be able to see relevant detail that would not be visible otherwise.) Anything else is potentially manipulating the truth.
* Documentary work is similarly but there is some latitude providing it is not deliberately attempting to deceive (a classic is images of the northern lights - the human eye is very poor in the green spectrum in low light whereas the digital camera is not. When you see the images the sky is alight with great swathes of swirling green, often sufficiently so that there is green illumination of the land as well - on the occasions when I have been fortunate to see the lights, my view is nothing like so bold as the photo.
* fine art - whether by a professional or amateur is an expression of what the photographer saw in their mind or wants the viewer to experience. For me, anything goes. Obvious cases include using black and white instead of colour. In the vast majority of cases you can't get a more unrealistic representation than that. Similarly the ramping up of magenta on sunset images; use of HDR etc etc.
The level of photoshop 'cooking' is a matter of personal taste, and as has been mentioned, imagery processed on one screen often looks a lot different on another. Yes, some looks overdone to me but that is my view and not that of the originator.
And for this thread, the rhetorical question: is wedding photography reporting, documentary or fine art? !!
And definitely the last comment from me - any language such as English will naturally evolve in the locations of most common usage - there are about 4x as many Yanks as Brits so it will tend to evolve more rapidly in USA than UK - and thank goodness they use English instead of German (which was seriously considered at one time apparently!) So celebrate and smile at the differences I say :)
Dec 4, 2019 08:54:03 #
rook2c4 wrote:
And the thief is doing all this in front of me while the camera is on my chest... and I'm not noticing what's going on? I doubt even you believe such a ridiculously absurd scenario is actually possible. There's being safe, and then there's giving in to full-out paranoia. This would most definitely fall under the latter! It would be far easier for the thief to simply cut my throat and take whatever he/she wants while I'm bleeding to death.
On a package tour to Galapagos which included a stop in Columbia, 2 in our group were surrounded by a gang in broad daylight in the main public square and robbed of cameras, jewelry and wallets. No wired strap would prevent that type of threatening assault.
Best advice (after the event!) when in doubt keep clear, if you want to go there don't carry anything visibly ostentatious, carry enough cash in small denominations so they take it and run, carry an emergency credit card/cash in your sock (around your ankle.)
Make sure your insurance is up to date, and never fight back as virtually everything you carry can be replaced.
Picking up on a previous point, don't use ATMs in public places. We are experienced travelers and on a trip to Paris my wife and I got local cash from an ATM in Gard Du Nor station having just got of Eurostar from London. Got the cash, then went down an escalator to the underground. A gang of kids came running and yelling down the escalator so I stood behind my wife to protect her while they stormed past. Didn't feel anything but just glanced down and saw a pair of fingers lifting my wallet out of a velcro shut side pocket. Just in time - so grabbed the hand, and started calling for the police. So did he!! Neat trick. Try explaining to a police officer without speaking the local language, what has happened. When a number of French adults converged on us I let him go - for all I know he could be screaming I grabbed him!
I now only carry 1 pre-pay debit card, and some cash. No Jewelry except a cheap watch, sufficient camera equipment for the time I'm out. If I doubt the security of the location I take only a an EOS 100 camera which just about fits in a jacket large pocket. If threatened would just hand over the lot.
Again, picking up on another previous point, my wife and I have been fortunate to travel widely over the last 45 years, and have been directly or indirectly involved in just 2 incidents.
Nov 13, 2019 10:00:56 #
tcthome wrote:
https://www.youtube.com/results?search_query=nightscape+photography
https://www.youtube.com/watch?v=KNuii78MiMU hope these help, the second vid should do it on the how to. & enjoy your trip.
https://www.youtube.com/watch?v=KNuii78MiMU hope these help, the second vid should do it on the how to. & enjoy your trip.
s**t! another group of essential videos that must be viewed that I didn't even think to look for until I read this UH thread....
Oct 25, 2019 06:05:20 #
I often 'pre-chimp'
With the superb live EVF on the EOS R I have one viewscreen which shows the histogram in real time so can apply exposure compensation and see the immediate effect
With the superb live EVF on the EOS R I have one viewscreen which shows the histogram in real time so can apply exposure compensation and see the immediate effect
Oct 22, 2019 05:20:07 #
I spent MONTHS trying to square that circle!!!
* Things that matter - phones are not calibrated and tend to be too blue as it makes whites look whiter. (Samsung actually have a blue filter option on my phone which when enabled makes whites look off, but once I got used to it I realised the colours were much better - also very good for the eyes apparently)
* only keen photographers typically calibrate their monitors so there is an immediate mismatch potential with anything that is not.
* I have a ColorMunki that calibrates screen and printer. The printer option is ok but not perfect. In the end I paid to have my printer calibrated for my ink and the papers I use. Just printed off their test files, posted of, and calibration files emailed. Results much much better.
* if camera / phone, processing PC, and printer driver are using different colour spaces you will get issues with colour. I always use RAW so standardised (eventually) on adobe RGB and got a monitor from EIZO that supported most of adobe RGB (most support sRGB so that may be a better colour space choice? Although colour space with RAW files is a processing choice it isn't once converted to JPEG for distribution/ printing - once the conversion merges/omits colours there is no way to get them back.
* prints especially will only show a fraction of either sRGB or adobe RGB so will seldom
There are a million references on the web on this problem but a couple I found really helpful in my quest for monitor = print are below. The guy is a pro photographer who knows his stuff!
Another incredible resource has to be Cambridge in Colour.
The problem with both is that a 10 minute quick look quickly becomes another interesting evening of investigation. Computer-assisted-time-wasting at its very best :)
http://www.northlight-images.co.uk/why-prints-look-wrong/
http://www.northlight-images.co.uk/printer-test-images/
https://www.cambridgeincolour.com/
Oct 21, 2019 06:24:42 #
I think they are different words for the same thing? Large monitors have back lighting. Used to be fluorescent but now LED. If both monitors are Dell just check specs on their web site and see what words they use. LED is much better than fluorescent in my opinion - no warm up time to stable colour, lower wattage by far, lasts much longer before colour degradation (look at old monitor and most are positively off white!)
Bottom line (probably :) if it looks good when set up then who cares how its done. Calibrate the monitor to start, at least with microsoft monitor calibration. Test in a darkened room, use a blanket colour (I used to have an app that cycled though primary and secondary colours, and black and white to check for dead or hot pixels. Look for backlight 'bleed' on a black screen, Ikf the black is not even all over. Dunno if it works with other monitors but Eizo have a comprehensive monitor check app on line which is very thorough
https://www.eizo.be/monitor-test/
Sep 27, 2019 14:33:45 #
get a copy of Fastone Image Viewer - works a treat for CR2, CR3, and shedloads of other raw formats, and can save in JPG or DNG, in batch or individually. Windows or Win emulation on Macos.
Dunno why it is free - its one of the best, fast, general purpose editors around IMO. I probably use it more that LR and PS
Dunno why it is free - its one of the best, fast, general purpose editors around IMO. I probably use it more that LR and PS
Sep 2, 2019 03:21:36 #
Also if your lucky enough to be in the Northern Lights activity area the USAF app is really useful
http://aurora-alerts.com/
http://aurora-alerts.com/
Sep 1, 2019 16:08:49 #
I too was a little disapointed when I first saw the Northern Lights, yet the camera saw it just fine.
So a bit of investigating after the event. The reason is the human eye is poor at seeing green at low light levels. A modern camera sensor is the complete opposite. So the camera will always see much more than we do in that part of the spectrum. Also of course the eye is an 'instantaneous' view whereas we typically expose for several seconds for a night exposure. Incidentally, the lights can be several colours, green the most common. The green is an indication that there are high oxygen content.
So a bit of investigating after the event. The reason is the human eye is poor at seeing green at low light levels. A modern camera sensor is the complete opposite. So the camera will always see much more than we do in that part of the spectrum. Also of course the eye is an 'instantaneous' view whereas we typically expose for several seconds for a night exposure. Incidentally, the lights can be several colours, green the most common. The green is an indication that there are high oxygen content.
Aug 17, 2019 16:09:24 #
with Canon, the manual describes which are: for this shot only; for this session until camera switched off; or semi-persistant (ie until you reset them. The thin user guide does not go into detail but the full manual (2 or 300 pages depending on model) does. Same as Nikon full manual?