Posts for: rambler
Dec 11, 2012 22:54:43 #
When you drive through the Smokies, be sure to visit Cades Cove.
(Great Smokey National Park)
(Great Smokey National Park)
Dec 11, 2012 22:49:01 #
Peterson is always talking about getting the "correct exposure" using Manual Mode. In Manual mode you can quickly change the shutter speed without changing the Aperture and the Aperture without changing the Shutter Speed, all towards getting the exposure meter to the Zero. Then if you want you can switch to changing only the exposure value. Meanwhile you can see the effects of each change right from viewing the LCD.
For each subject there are at least six "correct" exposures, each depending on your choice of what you see as "correct" in the image effect you want to portray which usually has to do with depth of field and what you want the background to look like.
Check out Peterson's you-tube lessons. he has great energy, enthusiasm and a willingness to share his ideas. Check out http://www.ppsop.com/index.aspx Take a course!
Nov 26, 2012 13:18:45 #
Okay. I will stop searching through the manual. But, I did notice if I leave the playback setting to the one that shows the all-white histogram, it does appear in the LCD screen for a few seconds along side the image (the time can be programed) immediately after taking the shot for a quick look.
Nov 26, 2012 12:52:15 #
On the D7000, get in live view mode (Using the LCD), now hold down the exposure button on top of the camera, just behind the on/off switch, the one with the +/- Icon.
While holding down the button with a finger, with your thumb, turn the dial nearest your thumb, and look at the screen. You will be changing the exposure valuation either up or down and you will be seeing the effects in the LCD screen which will either be getting lighter as you overexpose or darker if you underexpose.
If you do this in Manual Mode, the aperture and shutter speed will not change as they would if you just change the exposure values without pushing the button.
If you do this in Aperture or S mode, the aperture and shutter speeds will change, but you can still see the effects of the change in the LCD.
Take the shot even though it is "overexposed" to get it brighter to see more detail in the previously shadowed areas.
Try using the bulb mode, too, to keep the shutter open as long as you wish. Do that into a scene that looks totally black on the LCD screen and you will get a shot that is bright and clear. (In Manual Mode, Scroll down to 30" in the shutter speed and one more click down will get you to "bulb" where you hold the shutter open for as long as you hold the shutter button down. Apologies if you already know that.
With the D7000 I have not been able to see the histogram before taking the shot, but if you choose the correct setting in Playback, you can have the histogram appear next to the shot in the LCD for a few seconds (you can program in the time) as soon as you have taken the shot. And, of course, you can look at it for as long as you want in the Playback view.
To change the info options in playback mode, keep pressing "up" on the the "OK button dial" to scroll through the options including two different read outs of the histogram.
But, maybe you already know that!
Nov 26, 2012 11:48:58 #
Speaking about the D7000....is there a way to view the histogram of an image BEFORE engaging the shutter button? I see that the only a way to view the histogram is from the playback window, ie. only AFTER the image has been taken. Is that correct?
May 31, 2012 22:15:34 #
Hi Hangman. Approximately how far away was your lens from the insects? BTW Great shots!
May 21, 2012 12:21:26 #
The June 2012 issue of Outdoor Photographer magazine has a cover article entitled "Macro Flash Gear, Make Close-Ups Pop!"
It shows some images and some remarkable looking camera set ups both Canon and Nikon.
It shows some images and some remarkable looking camera set ups both Canon and Nikon.
May 21, 2012 12:14:06 #
The top photo shows some nice detail of the mountains that are not evident in the second photo, but the second image has a more effective composition. I would suggest cropping out most of the sky in #1. Note it is just a large area of a nice blue, but nothing very interesting to look at, no shapely clouds for example. So cut it out and we will look longer at the mountain which is the main subject.
#2 The palms frame the mountain and we can see their shapes nicely. The fence gives us something to look at in the foreground and it gives the image some depth. We can see that the mountains are far away.
#3 Wonderful flowers. Crop out the dark bars on the right. No need for us to look at them and draw our attention away from the flowers. The dark background helps to bring out the detail in the cactus.
May 12, 2012 23:22:31 #
I think sun or lighting can effect the look of focus. Too much light tends to create wash outs which in turn effect sharpness, clarity, contrast which bring out detail and, therefore effect the focus or look. In other words the focus might be fine, but the sun or light eliminates contrast which helps detail stand out. More detail reveals more that a sharp focus will achieve.
In the top photo look at the top of the head where the light is shining. the focus on that areas does not matter. The light has washed out any detail. That is the extreme, but you can see what is meant by light effecting.
In the top photo look at the top of the head where the light is shining. the focus on that areas does not matter. The light has washed out any detail. That is the extreme, but you can see what is meant by light effecting.
May 8, 2012 12:39:10 #
Want an instant sky for free? Scroll down to the photo at the bottom of the page:
not for Macs, however.
http://www.dougitdesign.com/downloads_pg3.html
not for Macs, however.
http://www.dougitdesign.com/downloads_pg3.html
May 7, 2012 18:08:48 #
My brother in-law knows his bugs and confirms this to be a midge, but defers to other experts to determine the exact species.
What a wonderful photo!
What a wonderful photo!
May 4, 2012 12:00:33 #
Thanks for your fast response. I was just returning to the post to say never mind , because I saw you had photographs of your set up at another thread. BTW I had noticed references to 100+ mm macro lenses and I wondered about their advantages over my macro which is 50 mm.
I came across this article: http://www.slrphotographyguide.com/camera/lens/best-macro-lens.shtml
I came across this article: http://www.slrphotographyguide.com/camera/lens/best-macro-lens.shtml
May 4, 2012 11:16:41 #
The last one really does it for me. Beautiful. Nicely in focus, too. What lens, etc.?
May 4, 2012 10:57:52 #
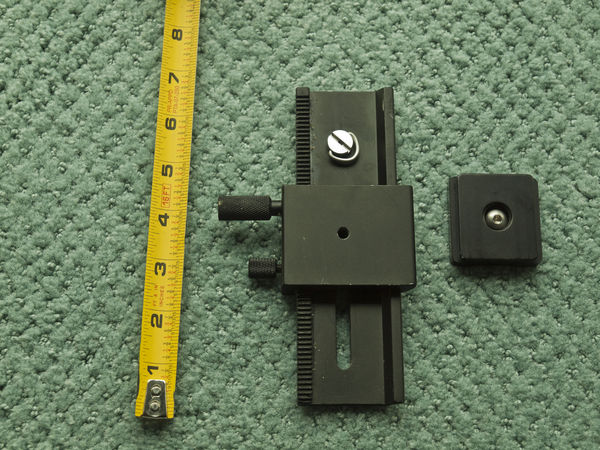
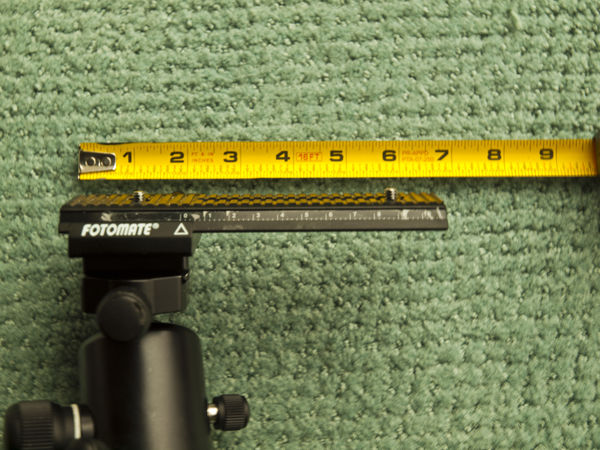
The tripod adapter on right is attached to bottom of the rail, shown here with bottom side up. Note two large adjustment knobs, the larger of which moves the rail. The smaller knob locks the rail in place, once you choose position where you want rail to be held tight.
When attached to tripod, the rail can move about 6-inches closer or away from subject, so you are focusing with the rail without having to touch the lens, or you can just move the camera closer and then focus as usual. The camera is attached to the rail by one of the two screws you see. The front screw is also in a slot, and second screw is in a fixed position. Just two alternative ways to attach your camera.
As less expensive option:
http://www.dinodirect.com/Aluminium-Alloy-Macro-Focus-Rail-Plate-LP-01.html
Bottom-side of rail
rail attached to tripod and in forward most position
May 3, 2012 09:06:13 #
Sounds like you guys need to read this book before you head out:
http://books.google.com/books/about/Saturday_Night_at_Moody_s_Diner_Other_St.html?id=sVI5dn6G4YIC
http://books.google.com/books/about/Saturday_Night_at_Moody_s_Diner_Other_St.html?id=sVI5dn6G4YIC