The Zone System, ETTR/EBTR, and a Bit of Luck
Mar 31, 2020 07:53:04 #

I'm not sure that this is the best place to post this but the only other which I could consider is Post Processing. This requires processing but most are done prior to taking the photograph.
As many of you know, I believe in two photographic techniques The Zone System (TZS) and the use of ETTR and EBTR to do the vast majority of my digital photographs. Similar to, but opposite, the way The Zone System, as used with film, these techniques allow for better control in placing selected exposure values in an appropriate Zone. With film one meters the shadow (dark) area of the scene and then exposes to place that area in the appropriate Zone, as the photographer chooses. In processing the film, the highlight areas of the scene are controlled by the processing.
In digital photography, when using TZS and ETTR/EBTR, things work the opposite. The metering is done on the brightest parts of the scene and exposing in such a manner as to place those highlights in the appropriate Zone. That is, the brightest areas of the scene are exposed in such a manner as to place them just shy of the sensor overexposing. The dark areas of the scene are controlled by processing in an appropriate software package. My preference is Photoshop.
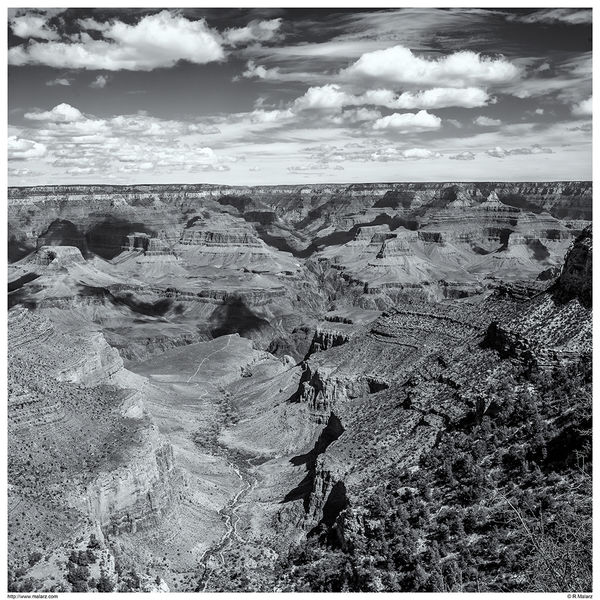
Recently, I purchased a digital back for my Hasselblad 500c/cm. As with any new film, camera, lens or sensor, I tested it. These are structured lab tests, not just a few random photos taken around the neighborhood. This testing would determine how much additional exposure I could apply before the image of a test chart was not capable of being adjusted to its original appearance. After determining the capabilities of the sensor, it was time to take the camera out and do a few photographs with it. The Grand Canyon was a planned trip. So, it was as good a place as any to put the experimental data to use.
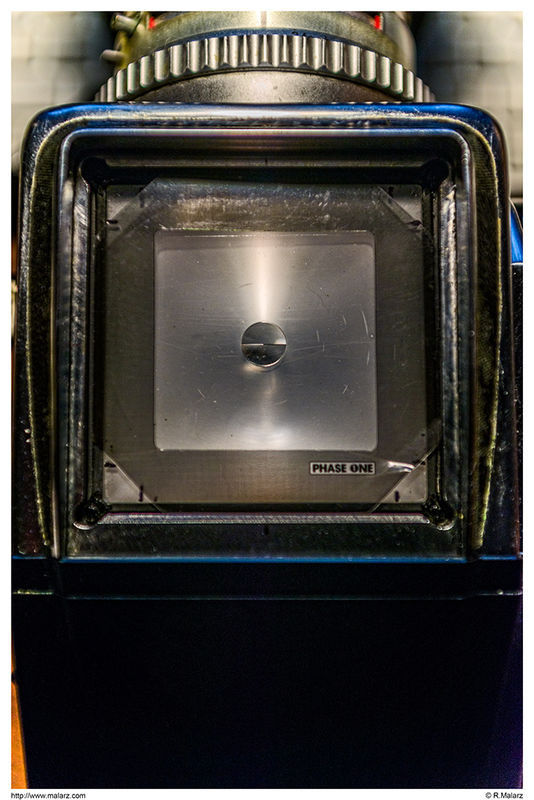
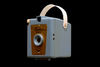
Here's where the luck figured in. The manufacturers of the back include, in the kit, a mask that shows the portion of the viewfinder that is going to be captured by the smaller sensor. (see image 1) There were several included in the "kit". One of them was made of transparent gray plastic. Now, the metering viewfinder I use reads the entire focusing screen area. Thus, the transparent gray mask is going to reduce the amount of light the meter actually sees.
As such, the meter will indicate a setting which is more exposure than if the mask weren't there. By luck, the exposure reading is the same as the additional amount of exposure I'd have needed to "calculate" to produce an ideally exposed image for processing. Thus, I can simply meter the scene, set the exposure to what the meter indicates and I have a sufficient amount of additional exposure to push the image the appropriate amount to the right.
So, now to the Grand Canyon photograph.
The first image shows the viewfinder with the mask in place.
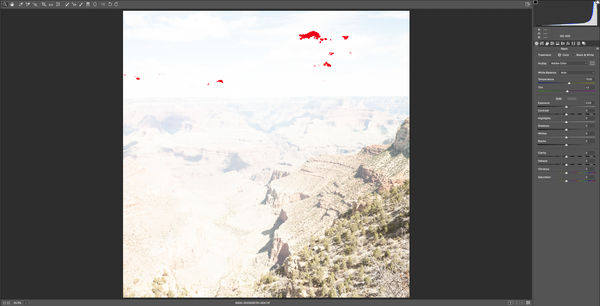
The second image shows a screenshot of ACR prior to adjustments.
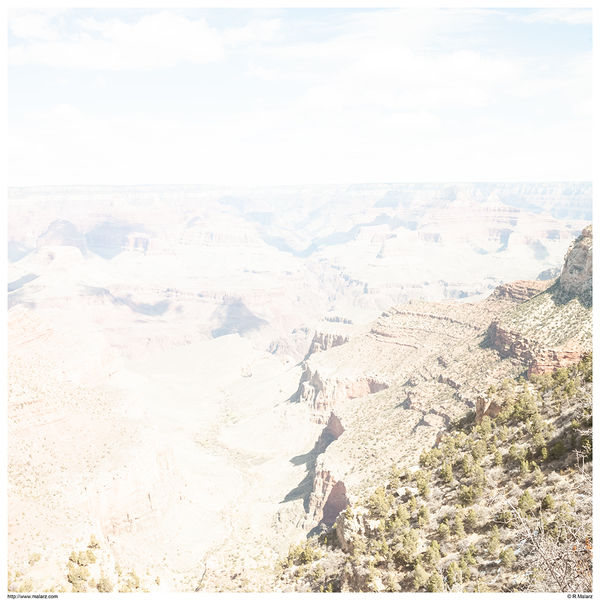
The third shows the SOOC image.
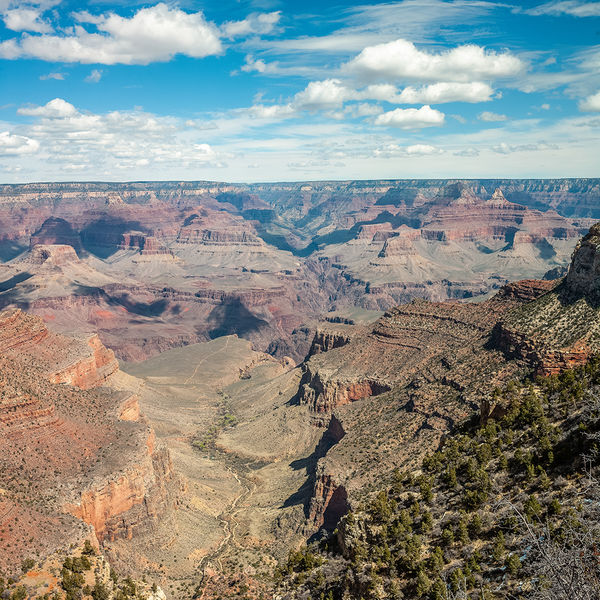
The fourth image shows the image in PS after my usual adjustments are made in ACR.
The fourth shows the black and white conversion and finished "print".
One of the added benefits of Exposing To The Right and Exposing Beyond The Right is that the inherent noise within each photosite of the sensor is masked by the additional light allowed to reach each photosite.
--Bob
As many of you know, I believe in two photographic techniques The Zone System (TZS) and the use of ETTR and EBTR to do the vast majority of my digital photographs. Similar to, but opposite, the way The Zone System, as used with film, these techniques allow for better control in placing selected exposure values in an appropriate Zone. With film one meters the shadow (dark) area of the scene and then exposes to place that area in the appropriate Zone, as the photographer chooses. In processing the film, the highlight areas of the scene are controlled by the processing.
In digital photography, when using TZS and ETTR/EBTR, things work the opposite. The metering is done on the brightest parts of the scene and exposing in such a manner as to place those highlights in the appropriate Zone. That is, the brightest areas of the scene are exposed in such a manner as to place them just shy of the sensor overexposing. The dark areas of the scene are controlled by processing in an appropriate software package. My preference is Photoshop.
Recently, I purchased a digital back for my Hasselblad 500c/cm. As with any new film, camera, lens or sensor, I tested it. These are structured lab tests, not just a few random photos taken around the neighborhood. This testing would determine how much additional exposure I could apply before the image of a test chart was not capable of being adjusted to its original appearance. After determining the capabilities of the sensor, it was time to take the camera out and do a few photographs with it. The Grand Canyon was a planned trip. So, it was as good a place as any to put the experimental data to use.
Here's where the luck figured in. The manufacturers of the back include, in the kit, a mask that shows the portion of the viewfinder that is going to be captured by the smaller sensor. (see image 1) There were several included in the "kit". One of them was made of transparent gray plastic. Now, the metering viewfinder I use reads the entire focusing screen area. Thus, the transparent gray mask is going to reduce the amount of light the meter actually sees.
As such, the meter will indicate a setting which is more exposure than if the mask weren't there. By luck, the exposure reading is the same as the additional amount of exposure I'd have needed to "calculate" to produce an ideally exposed image for processing. Thus, I can simply meter the scene, set the exposure to what the meter indicates and I have a sufficient amount of additional exposure to push the image the appropriate amount to the right.
So, now to the Grand Canyon photograph.
The first image shows the viewfinder with the mask in place.
The second image shows a screenshot of ACR prior to adjustments.
The third shows the SOOC image.
The fourth image shows the image in PS after my usual adjustments are made in ACR.
The fourth shows the black and white conversion and finished "print".
One of the added benefits of Exposing To The Right and Exposing Beyond The Right is that the inherent noise within each photosite of the sensor is masked by the additional light allowed to reach each photosite.
--Bob
The Mask
(Download)
ACR Screen Shot
(Download)
SOOC
(Download)
Intermediate
(Download)
Final Black and White Photograph
(Download)
Mar 31, 2020 08:01:38 #
rmalarz wrote:
I'm not sure that this is the best place to post t... (show quote)
Wonderful - you would be pleased

Mar 31, 2020 08:03:59 #

Mar 31, 2020 08:49:29 #
PGHphoto
Loc: Pittsburgh, PA
rmalarz wrote:
I'm not sure that this is the best place to post t... (show quote)
Great shot as always. One question: shouldn't your technique have prevented the clipping as shown in ACR or would that just be part of the compensation you still need to tweak for the mask area ? I understand your process but with the digital back, is the specific metering you need not possible if the goal is to eliminate clipping ? Just curious.
Mar 31, 2020 08:52:44 #

Mar 31, 2020 09:13:40 #
Nice set, especially like the B&W with sharp detail and shadows with a beautiful sky in the background.
Mar 31, 2020 09:28:00 #
John, thanks for viewing and leaving a comment. I was quite pleased. As such, I'm going to be using that back a bit more.
--Bob
--Bob
JohnR wrote:
Wonderful - you would be pleased
Mar 31, 2020 09:28:34 #
Thank you very much, Bob. I appreciate you stopping by and commenting.
--Bob
--Bob
bobmcculloch wrote:
Beautiful shot esp the B&W.
Mar 31, 2020 09:32:52 #

PGHphoto wrote:
Great shot as always. One question: shouldn't your technique have prevented the clipping as shown in ACR or would that just be part of the compensation you still need to tweak for the mask area ? I understand your process but with the digital back, is the specific metering you need not possible if the goal is to eliminate clipping ? Just curious.
The idea of ETTR and more specifically Exposing Beyond The Right (EBTR), is that the highlight 'clipping' warnings are inaccurate. Those blinking 'reds' are a warning, not necessarily a fact. How and how much your individual camera is capable of capturing data in the highlights, regardless of the warnings, is a matter of experiment and experience. As Bob has shown in this excellent example, these 'warnings' are just warnings of clipping, not actual lost data in the RAW file.
You may find these two posts useful. The first of the links includes links to multiple discussions on the internet that dive deeper into the discussion of the how and they why of ETTR / EBRT.
ETTR in Practice
ETTR in Practice II
Mar 31, 2020 09:34:12 #
rmalarz wrote:
I'm not sure that this is the best place to post t... (show quote)
Bob, wonderful demonstration and capture of the Canyon and my old friend, Bright Angel Point!
Mar 31, 2020 09:37:09 #
Hi, PGH. First off, thank you for the compliment. In all reality, since I push my exposures as much as each camera will allow, I get a lot of 'red' areas and warnings when I first open a photo in ACR. If I didn't, I'd be surprised.
To quote Scott Kelby, "Another cause of clipping is when you’re editing the photo in Camera Raw. You could have increased the Exposure amount (or Whites or Highlights sliders) enough to create clipping that wasn’t in the photo. Hey, it happens. If you know what you’re doing, it might be okay. More on that later."
The warning areas fall along those lines. I'm not as familiar with the internal workings of ACR but know how to use it effectively. It's similar to not knowing the intimate chemical processes involved in developing film but being able to control tonal qualities of a negative to produce the densities desired.
--Bob
PGHphoto wrote:
Great shot as always. One question: shouldn't your technique have prevented the clipping as shown in ACR or would that just be part of the compensation you still need to tweak for the mask area ? I understand your process but with the digital back, is the specific metering you need not possible if the goal is to eliminate clipping ? Just curious.
Mar 31, 2020 09:38:10 #
Thanks for the thumbs, Charles. I really appreciate them.
--Bob
--Bob
Irvingite Charles wrote:
Mar 31, 2020 09:38:46 #
George, thanks for the compliment. I appreciate it.
--Bob
--Bob
gsmith051 wrote:
Nice set, especially like the B&W with sharp detail and shadows with a beautiful sky in the background.
Mar 31, 2020 09:40:35 #
Paul, thanks for the two replies and the compliment. Yup, Bright Angel Point is just one of my favorites in The Canyon.
--Bob
--Bob
CHG_CANON wrote:
Bob, wonderful demonstration and capture of the Canyon and my old friend, Bright Angel Point!
Mar 31, 2020 10:17:02 #
Bob on 06/10/2013 @ 3:35 pm with my first DSLR I took a photo from almost the same location, and all I can say is I bow to the Master. The only thing I got right was pointing the camera in the correct direction.
Charles
Charles
If you want to reply, then register here. Registration is free and your account is created instantly, so you can post right away.