ETTR in Practice
Dec 6, 2018 09:47:22 #

Below are a few examples of images Exposed To The Right (ETTR) and then processed to a "normal" exposure. What is ETTR? It's a digital photography technique based on modest (to extreme) overexposure for the purpose of capturing the majority of the image data to the right side of the histogram. The technique assumes (a) the use of RAW and (b) RAW processing tools to create the final result.
If you're wondering whether ETTR is science or theory, see the various links posted as a response to this post (added as a response so hopefully this post doesn't get sent quickly to the links and resources section). I won't bore you here with some pretty technical topics like Dynamic Range or 12-bit vs 8-bit or tonal-range of a sensor or whether ETTR is better for static scenes or dynamic. The examples presented here all involve subjects where my ETTR settings are relatively conservative as in "up to" but not much over the right side of the historgram. I've also found that the higher the ISO, the more relevant the need to expose to the right for an image that starts with less noise in the shadows before processing.
These example RAW images come from two Canon EOS bodies (5DIII, 7D) and a Sony A7II. I don't have any examples from Nikon or other camera types. I also don't have examples from ISO invariant cameras, another propeller-head topic. I do ask that you note the high ISO settings used on most of these examples, high ISOs in both dark and well lit situations.
When reviewing these examples, note the modest noise in the shadows that was then addressed with both noise processing software and a general darkening of the shadows in post processing rather than needing to brighten an underexposed image. The processed images are presented at 1024-pixels on the long side. You can view larger versions by clicking on the URL title link and they'll resize to your screen from the host Flickr site. You can click a bit further into the image details on the Flickr page, if desired. EXIF data is available from the host Flickr pages as well. On the Flickr site, use your <L>key for Large and the <F11> for the full-screen.
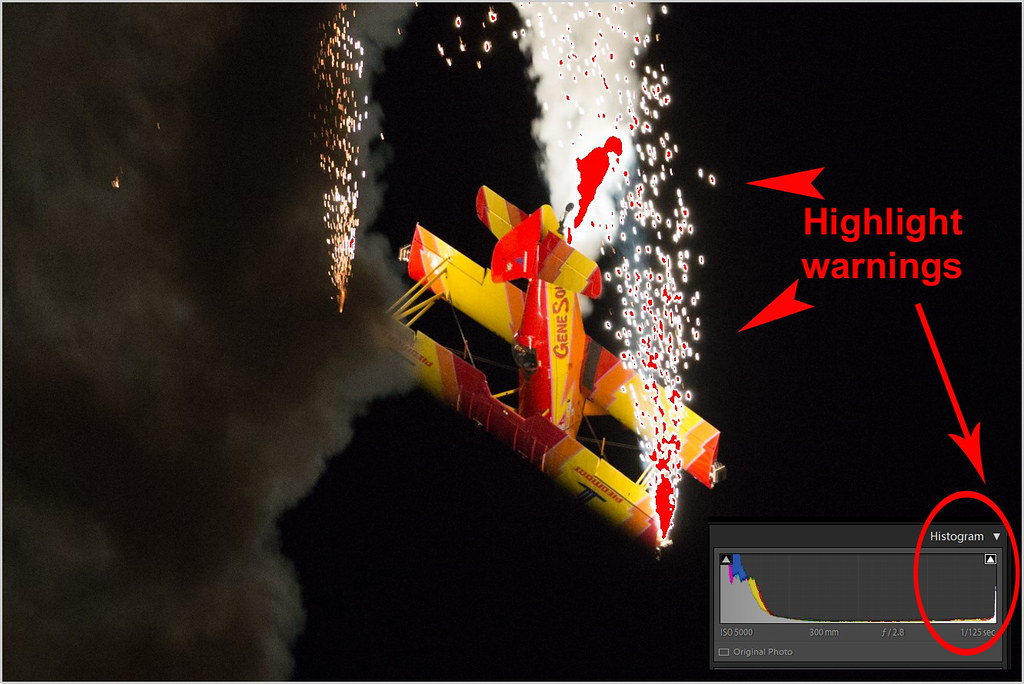
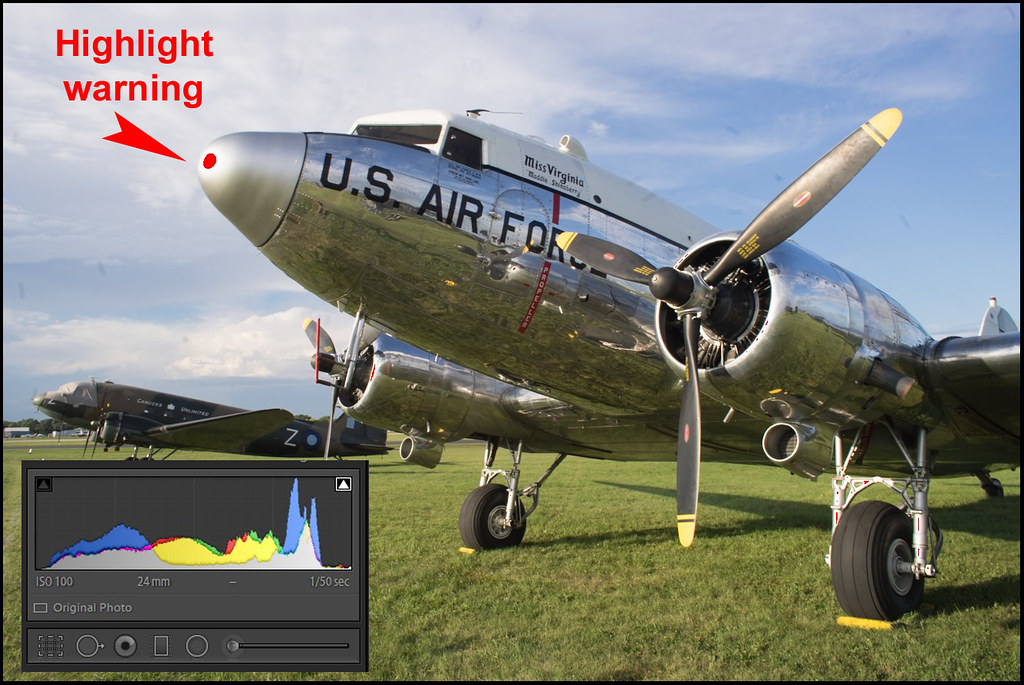
EXAMPLE 1 - 1/125 sec at f/2.8, ISO-5000 (Canon EOS 5DIII)
Processed results - LR6 and Topaz DeNoise v6
Oshkosh at night by Paul Sager, on Flickr
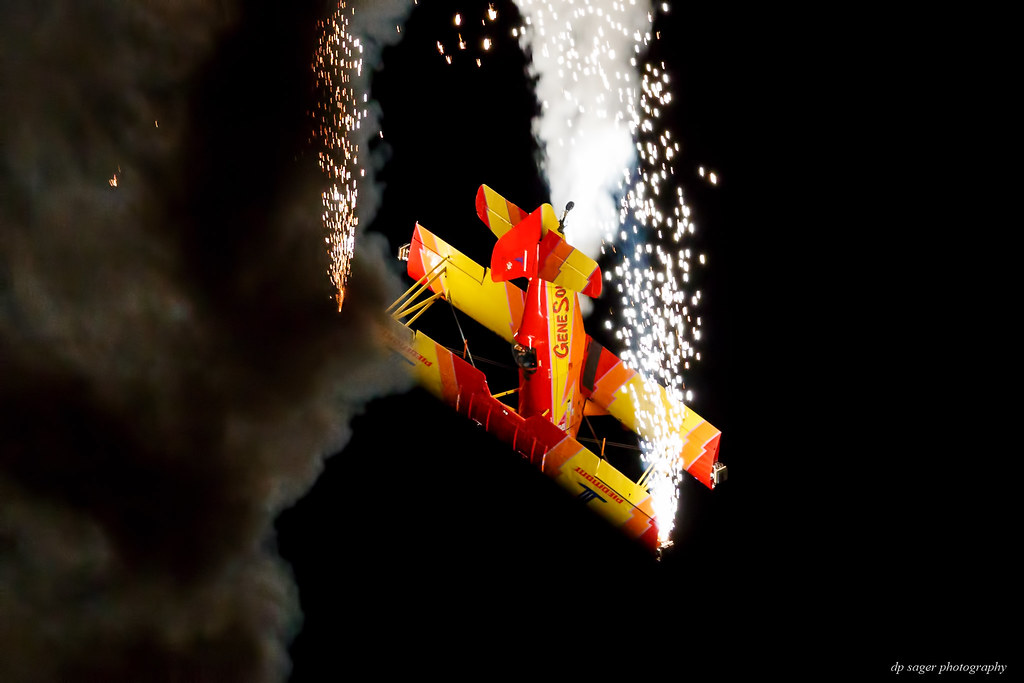
Original - cropped after initial LR import with red highlight warnings. Note the highlights warnings do not fall on the body of the plane, the focus of the image. In the original, the plane is virtually noise free while a grain exists in the smoke cloud along the left side of the image. The processed image shows the shadows of the smoke darkened and the noise / grain removed.
While looking for examples and looking at the highlight warnings and histograms in Lightroom, I found maybe I've been talking a bigger game in ETTR than these examples demonstrate. That is, these examples are not examples of extreme highlight warnings. Rather, there's some warnings on the non critical highlights within the image, or in the case of the Monument Valley landscape, no highlight warnings at all (example 4).
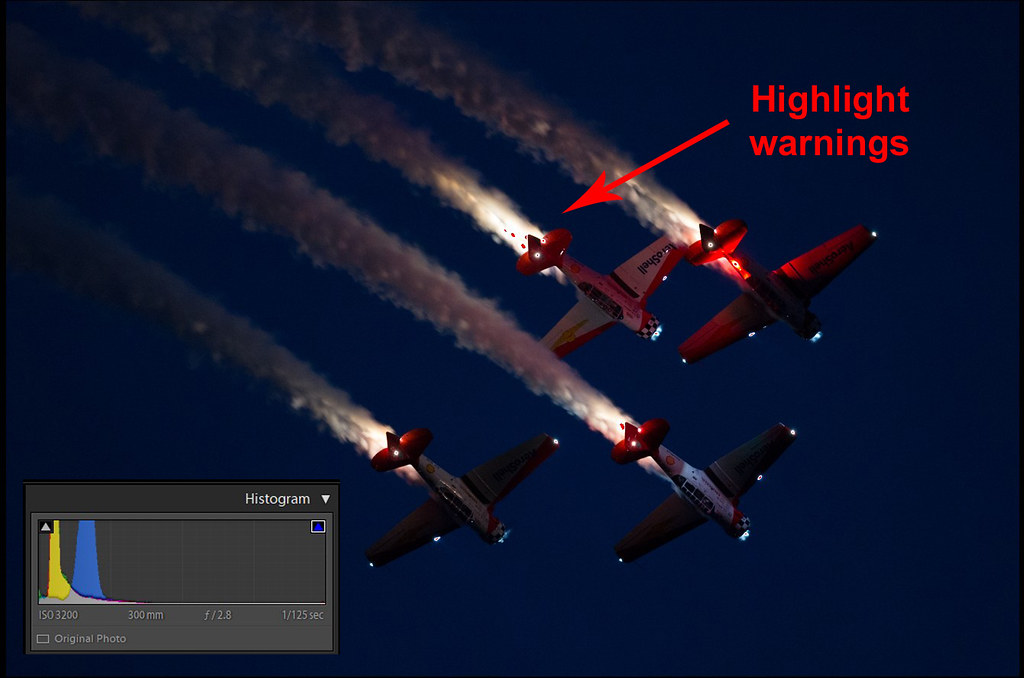
EXAMPLE 2 - 1/125 sec at f/2.8, ISO-3200 (Canon EOS 5DIII)
Processed results - LR6 and Topaz DeNoise v6
Oshkosh at night
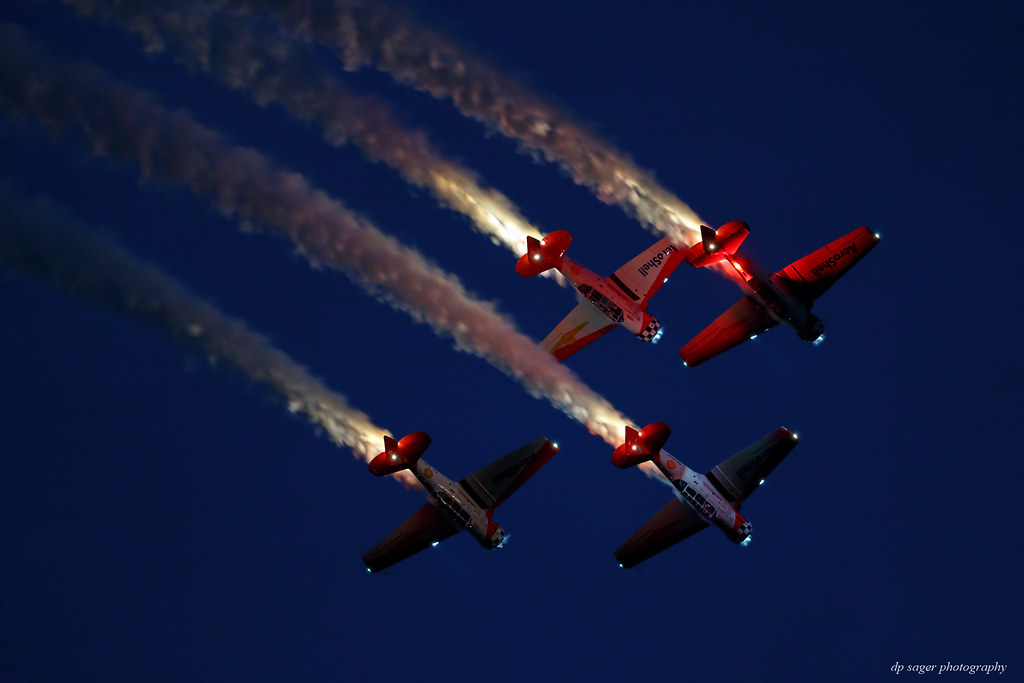
Original - cropped after initial LR import with red highlight warnings. Note the highlight warnings occur only in a small section of the smoke trails behind a few planes. In this example, the image was brightened slightly in post without creating a noise problem in the shadows.
EXAMPLE 3 - 1/50 sec at ?? (manual focus lens), ISO-100 (Sony A7II)
Processed results - LR6
C-47 Skytrain

Original - cropped after initial LR import with red highlight warnings. A highlight warning occurs on the nose of the plane, much as your eyes would see the plane in the evening sunlight (less the sensor dust). Note the details of the clouds in the background of both the original and processed versions and how 'white' the whites were in the original RAW with virtually no change through the processing beyond adjustment to the temperature and tint in the White Balance. Another benefit of the ETTR technique is to adjust for the camera's bias for middle grey, where exposure settings that result in the meter at 0 will tend to turn white within the image to grey.
ETTR is applicable to all digital images, up to the extent you are not blowing the highlights resulting in non-recoverable detail. The RAW file will retain more data for post processing than the SOOC JPEG (Straight Out Of Camera). But even for JPEG shooters, a histogram pushed to the right, with possibly some minor blinking of the highlight warnings, will be a better starting point for processing. Keep in mind too, different cameras behave differently and you have to research, test and confirm your own specific model and brand to determine whether ETTR is a technique applicable to your tools, interests, shooting style and editing style. The new generation of ISO invariant cameras may lessen the importance of the ETTR technique; the truth of that story has not yet been written.
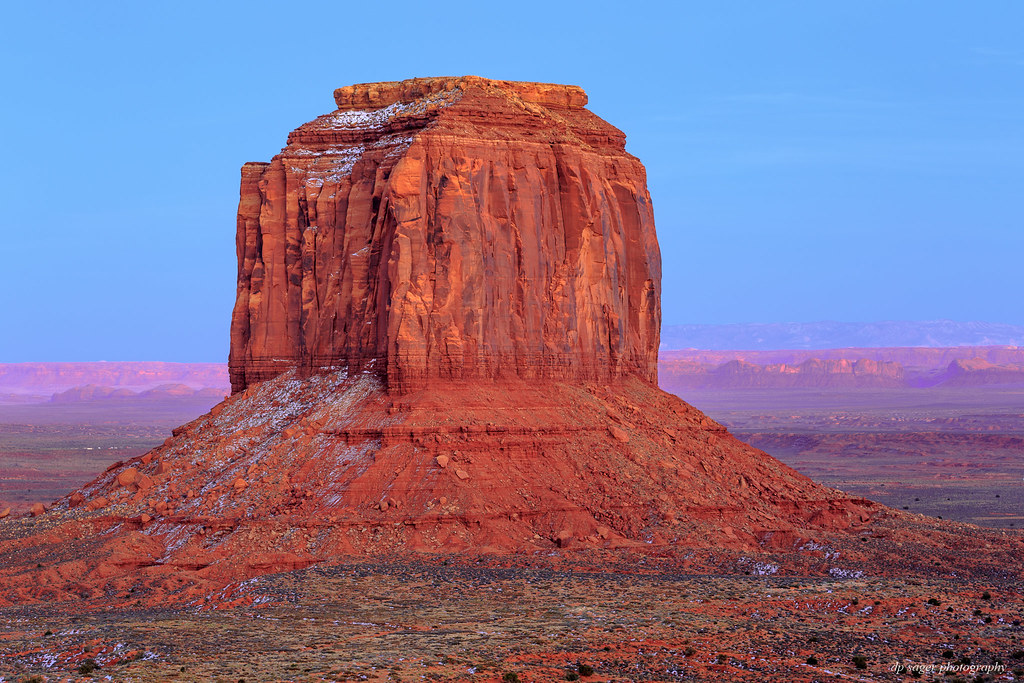
EXAMPLE 4 - 6 sec at f/10, ISO-100 (Canon EOS 5DIII)
Processed results - LR6 and Topaz DeNoise v6
Merrick Butte
Original - overexposed, but no highlight warnings
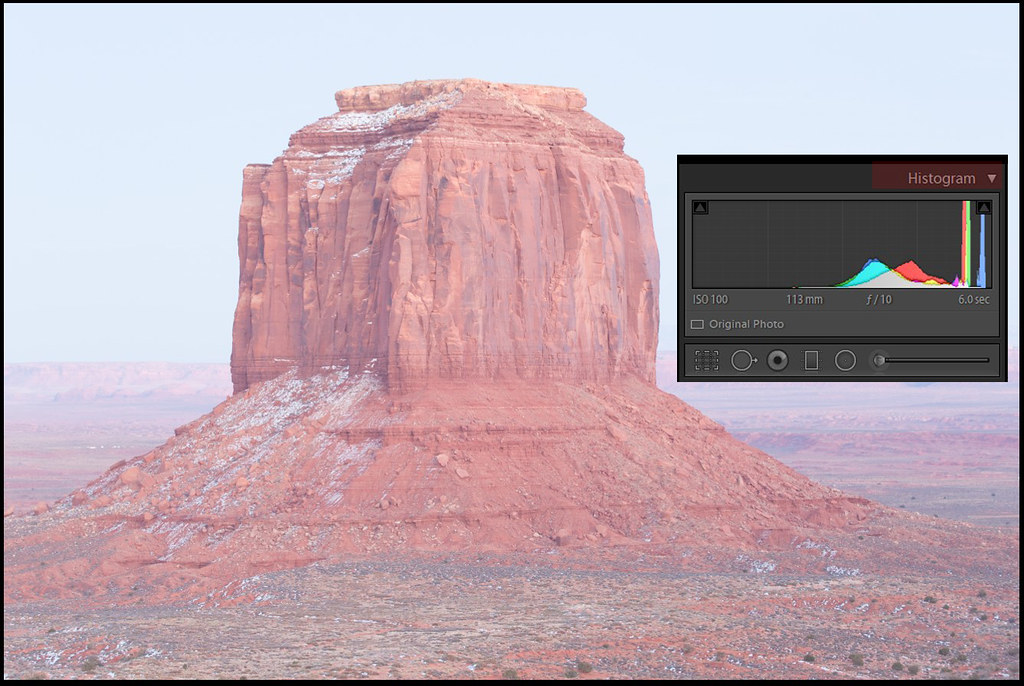
This image was captured to be art, via editing, not what the camera thought the exposure should be nor what the camera saw. When determining the exposure for any shooting situation, my technique is to look at the meter in the view finder and assure, typically, that I've pushed meter to around +1 from 0. I'll capture a test image and will review the highlight warnings / histogram. I will push the exposure, via either the shutter speed or ISO, so the highlight warnings are just blinking, and depending on where those highlight warnings occur, I may pull back by 1/3 stop or leave the exposure at the current setting. It's situation dependent.
For this image for example 4, the EXIF shows a central timezone recording at 19:30 on Dec 28, so it was probably 6:30pm locally or maybe 5:30p given this was the AZ side of the park. Given that exposure time, it was at sunset to maybe as much as an hour past, that is, a rather dark setting.
EXAMPLE 5 - 1/400 sec at f/11, ISO-2000 (Canon EOS 5DIII)
Processed results - LR6 and Topaz DeNoise v6
Chicago bee and flower

Original - overexposed with highlight warnings, with a small highlight on the bee's eye (if you look closely)

Note the absence of noise in the original RAW file. In film photography, you would tend to underexpose in this bright sun to saturate the colors. In digital photography using the ETTR technique, you process the image file by lowering the overall exposure and adjust the 'blacks' within the image and adjusting the shadows and the highlights. You then add saturation and / or luminance to the entire image or to selected colors.
As mentioned above, the technique assumes RAW files and medium to extensive post processing using industrial-strength tools. When out shooting, your exposure decisions are still based on your composition needs and are then tweaked based on information provided by the camera's histogram and highlight warnings. Hopefully, by showing a thumbnail-ish version of the original below the processed result, these examples will help you consider whether the result justifies the effort. If the computer side of photography is not your interest, ETTR based on RAW captures definitely will not be an interest.
EXAMPLE 6 - 1/80 sec at f/8, ISO-3200 (Canon EOS 7D)
Processed results - LR6 and Topaz DeNoise v6
Jamaican boa
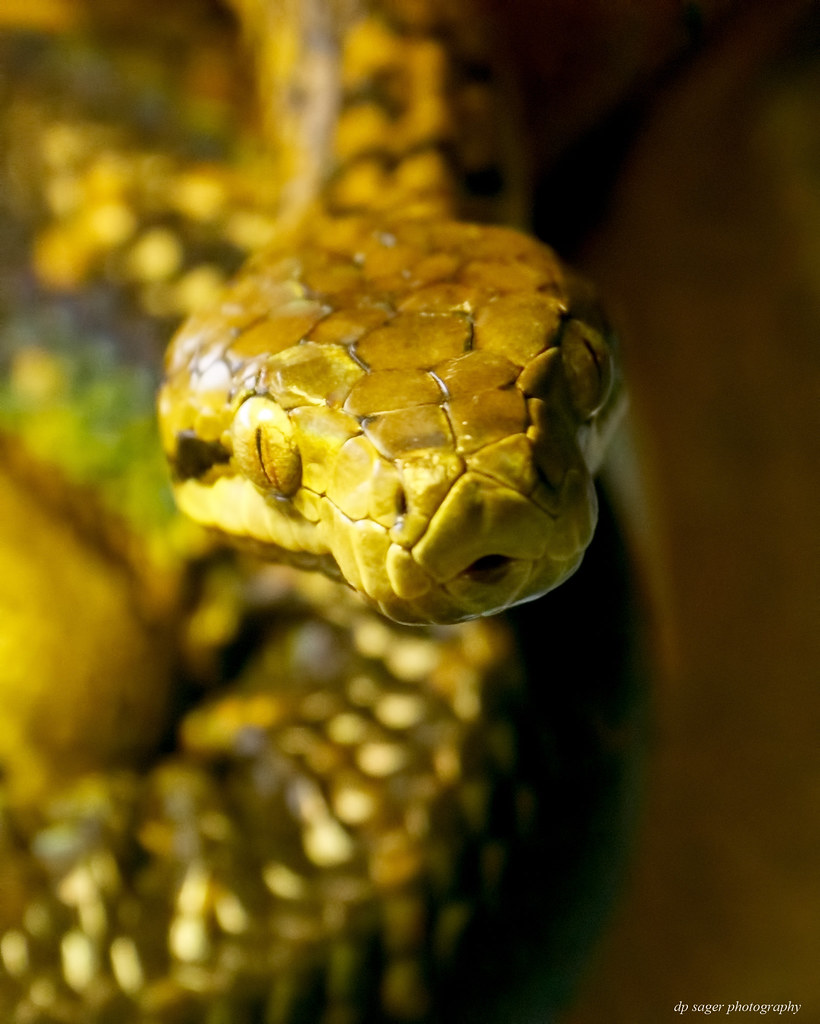
Original - overexposed with highlight warnings on a critical portion of the image (the eye), but processing can easily recover from the RAW
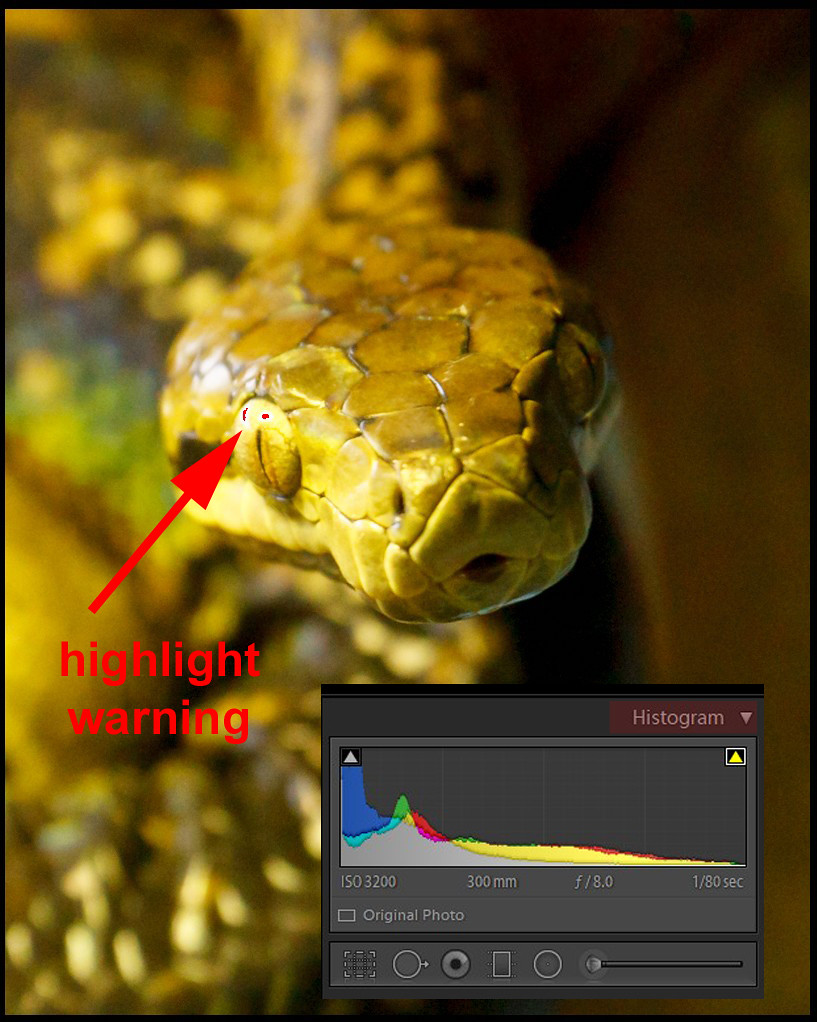
This final example image comes from a high ISO challanged EOS 7D. Note the exposure is virtually the same in the processed version where the shadows are darkened and the modest (for ISO-3200) noise has been removed. Letting the camera meter a neutral 0 in this low light would typically yield an image not worth taking.
If you're wondering whether ETTR is science or theory, see the various links posted as a response to this post (added as a response so hopefully this post doesn't get sent quickly to the links and resources section). I won't bore you here with some pretty technical topics like Dynamic Range or 12-bit vs 8-bit or tonal-range of a sensor or whether ETTR is better for static scenes or dynamic. The examples presented here all involve subjects where my ETTR settings are relatively conservative as in "up to" but not much over the right side of the historgram. I've also found that the higher the ISO, the more relevant the need to expose to the right for an image that starts with less noise in the shadows before processing.
These example RAW images come from two Canon EOS bodies (5DIII, 7D) and a Sony A7II. I don't have any examples from Nikon or other camera types. I also don't have examples from ISO invariant cameras, another propeller-head topic. I do ask that you note the high ISO settings used on most of these examples, high ISOs in both dark and well lit situations.
When reviewing these examples, note the modest noise in the shadows that was then addressed with both noise processing software and a general darkening of the shadows in post processing rather than needing to brighten an underexposed image. The processed images are presented at 1024-pixels on the long side. You can view larger versions by clicking on the URL title link and they'll resize to your screen from the host Flickr site. You can click a bit further into the image details on the Flickr page, if desired. EXIF data is available from the host Flickr pages as well. On the Flickr site, use your <L>key for Large and the <F11> for the full-screen.
EXAMPLE 1 - 1/125 sec at f/2.8, ISO-5000 (Canon EOS 5DIII)
Processed results - LR6 and Topaz DeNoise v6
Oshkosh at night by Paul Sager, on Flickr
Original - cropped after initial LR import with red highlight warnings. Note the highlights warnings do not fall on the body of the plane, the focus of the image. In the original, the plane is virtually noise free while a grain exists in the smoke cloud along the left side of the image. The processed image shows the shadows of the smoke darkened and the noise / grain removed.
While looking for examples and looking at the highlight warnings and histograms in Lightroom, I found maybe I've been talking a bigger game in ETTR than these examples demonstrate. That is, these examples are not examples of extreme highlight warnings. Rather, there's some warnings on the non critical highlights within the image, or in the case of the Monument Valley landscape, no highlight warnings at all (example 4).
EXAMPLE 2 - 1/125 sec at f/2.8, ISO-3200 (Canon EOS 5DIII)
Processed results - LR6 and Topaz DeNoise v6
Oshkosh at night
Original - cropped after initial LR import with red highlight warnings. Note the highlight warnings occur only in a small section of the smoke trails behind a few planes. In this example, the image was brightened slightly in post without creating a noise problem in the shadows.
EXAMPLE 3 - 1/50 sec at ?? (manual focus lens), ISO-100 (Sony A7II)
Processed results - LR6
C-47 Skytrain
Original - cropped after initial LR import with red highlight warnings. A highlight warning occurs on the nose of the plane, much as your eyes would see the plane in the evening sunlight (less the sensor dust). Note the details of the clouds in the background of both the original and processed versions and how 'white' the whites were in the original RAW with virtually no change through the processing beyond adjustment to the temperature and tint in the White Balance. Another benefit of the ETTR technique is to adjust for the camera's bias for middle grey, where exposure settings that result in the meter at 0 will tend to turn white within the image to grey.
ETTR is applicable to all digital images, up to the extent you are not blowing the highlights resulting in non-recoverable detail. The RAW file will retain more data for post processing than the SOOC JPEG (Straight Out Of Camera). But even for JPEG shooters, a histogram pushed to the right, with possibly some minor blinking of the highlight warnings, will be a better starting point for processing. Keep in mind too, different cameras behave differently and you have to research, test and confirm your own specific model and brand to determine whether ETTR is a technique applicable to your tools, interests, shooting style and editing style. The new generation of ISO invariant cameras may lessen the importance of the ETTR technique; the truth of that story has not yet been written.
EXAMPLE 4 - 6 sec at f/10, ISO-100 (Canon EOS 5DIII)
Processed results - LR6 and Topaz DeNoise v6
Merrick Butte
Original - overexposed, but no highlight warnings
This image was captured to be art, via editing, not what the camera thought the exposure should be nor what the camera saw. When determining the exposure for any shooting situation, my technique is to look at the meter in the view finder and assure, typically, that I've pushed meter to around +1 from 0. I'll capture a test image and will review the highlight warnings / histogram. I will push the exposure, via either the shutter speed or ISO, so the highlight warnings are just blinking, and depending on where those highlight warnings occur, I may pull back by 1/3 stop or leave the exposure at the current setting. It's situation dependent.
For this image for example 4, the EXIF shows a central timezone recording at 19:30 on Dec 28, so it was probably 6:30pm locally or maybe 5:30p given this was the AZ side of the park. Given that exposure time, it was at sunset to maybe as much as an hour past, that is, a rather dark setting.
EXAMPLE 5 - 1/400 sec at f/11, ISO-2000 (Canon EOS 5DIII)
Processed results - LR6 and Topaz DeNoise v6
Chicago bee and flower
Original - overexposed with highlight warnings, with a small highlight on the bee's eye (if you look closely)
Note the absence of noise in the original RAW file. In film photography, you would tend to underexpose in this bright sun to saturate the colors. In digital photography using the ETTR technique, you process the image file by lowering the overall exposure and adjust the 'blacks' within the image and adjusting the shadows and the highlights. You then add saturation and / or luminance to the entire image or to selected colors.
As mentioned above, the technique assumes RAW files and medium to extensive post processing using industrial-strength tools. When out shooting, your exposure decisions are still based on your composition needs and are then tweaked based on information provided by the camera's histogram and highlight warnings. Hopefully, by showing a thumbnail-ish version of the original below the processed result, these examples will help you consider whether the result justifies the effort. If the computer side of photography is not your interest, ETTR based on RAW captures definitely will not be an interest.
EXAMPLE 6 - 1/80 sec at f/8, ISO-3200 (Canon EOS 7D)
Processed results - LR6 and Topaz DeNoise v6
Jamaican boa
Original - overexposed with highlight warnings on a critical portion of the image (the eye), but processing can easily recover from the RAW
This final example image comes from a high ISO challanged EOS 7D. Note the exposure is virtually the same in the processed version where the shadows are darkened and the modest (for ISO-3200) noise has been removed. Letting the camera meter a neutral 0 in this low light would typically yield an image not worth taking.
Dec 6, 2018 09:48:09 #
One topic not mentioned above is the metering mode. These are all based on the general purpose Canon Evaluative Metering. Adjusting the exposure is done in the Manual mode, but Shutter Priority and Aperture Priority and using Exposure Compensation will move the meter + / - relative to 0 in the same way.
Dec 6, 2018 09:48:14 #
Additional Reading
ETTR links
https://luminous-landscape.com/expose-right/
^^^ see links
https://www.anthonymorganti.com/2015/08/21/understanding-ettl-and-ettr/
^^^ look at examples
http://schewephoto.com/ETTR/
^^^ note the noise example
ETTR links
https://luminous-landscape.com/expose-right/
^^^ see links
https://www.anthonymorganti.com/2015/08/21/understanding-ettl-and-ettr/
^^^ look at examples
http://schewephoto.com/ETTR/
^^^ note the noise example
Dec 6, 2018 11:34:57 #

CHG_CANON wrote:
Below are a few examples of images Exposed To The Right (ETTR) and then processed to a "normal" exposure. ...
Excellent examples of the use of ETTR and highlight warnings.
Because tiny warnings represent specular highlights or reflections of light sources, they can be understandably tolerated or ignored. It's only when they cover a substantial amount of subject matter that they really matter.
Your posts made me realize that we may not be entirely on the same page when referring to highlight warnings. The ones you show here are visible during post processing. The ones I have been referring to in other threads are the warnings we see on the cameras LCD - the blinkies.
Dec 6, 2018 11:47:33 #
selmslie wrote:
Excellent examples of the use of ETTR and highligh... (show quote)
These would be blinking on the camera as well, but the only way to demonstrate is to ask the processing software to show. I used LR for convenience where the Canon DPP software is a more exact match to the back of the blinking on the camera. The only example that people tend to struggle with is the sky behind the C47s. Blowing this sky or the clouds is probably what most people fear and struggle with, although the planes are not in shadow so it wasn't that much of a struggle. In this type of image in brighter daylight, I'll typically allow the clouds above the plane to blink although not the more distance clouds on the horizon where I'll want the details of those clouds not to be lost in 'over' ETTRing.
Dec 7, 2018 06:30:01 #

Excellent CHG_CANON ... education is IMO, one of the big goals of UHH.
For those without LR, there is a free, open source, program called Light Zone. This program also gives a warning and a mode to correct problems.
http://lightzoneproject.org/
For those without LR, there is a free, open source, program called Light Zone. This program also gives a warning and a mode to correct problems.
http://lightzoneproject.org/
Dec 7, 2018 07:14:15 #
Great lesson. Need reread and practice this.......Didn't want to spend the day cleaning the workshop anyways. LOL
Dec 7, 2018 07:15:27 #
catchlight..
Loc: Wisconsin USA- Halden Norway
Excellent photography!
For action... absolutely, but I look forward to the first camera that will do simultaneous bracket exposures. When dealing with dynamic range I always bracket if its stationary.
ETTR definitely will make you a better photographer non the less...
For action... absolutely, but I look forward to the first camera that will do simultaneous bracket exposures. When dealing with dynamic range I always bracket if its stationary.
ETTR definitely will make you a better photographer non the less...
Dec 7, 2018 07:31:16 #
ggab
Loc: ?
CHG_CANON wrote:
Below are a few examples of images Exposed To The ... (show quote)
Nicely done.
Thanks for posting this.
George
Dec 7, 2018 07:54:01 #

Dec 7, 2018 08:13:08 #
Dec 7, 2018 08:39:07 #

Dec 7, 2018 08:47:50 #
Excellent learning opportunity with excellent examples and explanations. Thank you for presenting your knowledge with examples and clarity. JimmyT Sends. 
Dec 7, 2018 08:53:23 #

At one time, I was a big believer in ETTR. That was until I screwed up too many photos by trying to squeeze in the entire dynamic range. I am now much happier making sure that the exposure looks good on the back of the camera. As Scotty pointed out, some highlights will be blown out simply because the camera does not have the extreme dynamic range. And that is what is happening in your shots. I would rather have good exposure of the mid-tones than to capture specular or other extreme highlights and force the mid-range into the shadows. Just my take. I wonder what others think.
Thanks for taking the time to put this together.
Thanks for taking the time to put this together.
Dec 7, 2018 09:10:57 #
Excellent images, Paul and really appreciate you taking the time to explain this procedure more thoroughly to the ones that really need help such as me! I have been trying to expose to the right more often with mixed results, and this should really help and have bookmarked this post so I can go back and try to let a little more soak in from time to time.  Thanks again and take care!
Thanks again and take care!
If you want to reply, then register here. Registration is free and your account is created instantly, so you can post right away.