ETTR in Practice II
Jan 13, 2019 15:11:25 #

Below is a demonstration of the post-processing of an image captured using Exposing to the Right (ETTR) for a white subject in a mixture of sun and shade.
The American White Ibis used for this demonstration was a wild bird hanging out at the Naples Zoo in Naples, Florida in November 2018. Of the images I have of this bird after culling, there are 4 remaining where this seems the best and was the last of the sequence. The sequence runs for 5 minutes based on the timestamps, so I'm sure I reviewed images and their exposure histograms to make both exposure and focus adjustments to eventually capture this image. I also watched how the bird moved around, hoping for a good position in the light and looking at me.
IMAGE-1

I shoot in Manual with Canon's Evaluative Metering, where the entire frame is used. The EOS model was a 5D mark III, a model with other metering options that are based on declining percentages of the entire frame using readings from the center of the frame. As shown in image-1, the near-center of this image is the sun-highlighted portion of this demonstration. However, the point of focus is the bird's eye, slightly off center toward the upper left corner of the frame.
Image-1 shows the ibis straight out of camera after importing to Lightroom, the left-side. Being literally the SOOC / RAW import, it probably could look better with nothing more than application of WB, Picture Style and Sharpening as would have occurred by Canon's Standard profile for a JPEG created in the camera, the right-side image (processed from DPP). The JPEGs of these two versions are linked at the bottom of this post (2048-resolution) for comparison to the final process version. The same exposure could have been achieved by using the camera in Aperture Priority mode (or the other semi-auto modes) by adjusting the Exposure Compensation (EC) while using any of the EOS metering modes.
Image-2 shows a DPP analysis of the RAW file before adjustments. The red highlight warnings on the bird's chest show where the complete white is RGB (255,255,255). So already, one might wonder if anything needs to be done further. The all-white highlights are minor and seem to occur in the out-of-focus blur of the shallow depth of field. Is there a reason to go down a rabbit hole of editing this image, particularly when the sunlight is not directly on the bird's head / face / eye? The bird is looking directly as me and in sharp focus, let's see what else might happen ...
(SOOC - Straight Out Of Camera)
(DPP - Canon software Digital Photo Professional)
IMAGE-2

Image-3 is a screen capture from LR after clicking the auto-tone (see Whites / Blacks adjustment) and then manually adjusting the exposure and highlights to recover available detail from the RAW. Theoretically, this image-3 version is spot metering off the bird's chest in the center of the frame and then underexposing from the metering. I don't have that actual version, so we'll call image-3 "theoretical". Image-4 shows LR versions with the exposure modified to -1 and -0.5 on the exposure, holding the highlights at -80. Again theoretically, either version in image-4 could be the actual SOOC results by spot metering and keeping the meter at the 0-mark or slightly to the left of zero. The uncropped version of image-3 is provided as attachment-3, at the bottom of the post.
IMAGE-3
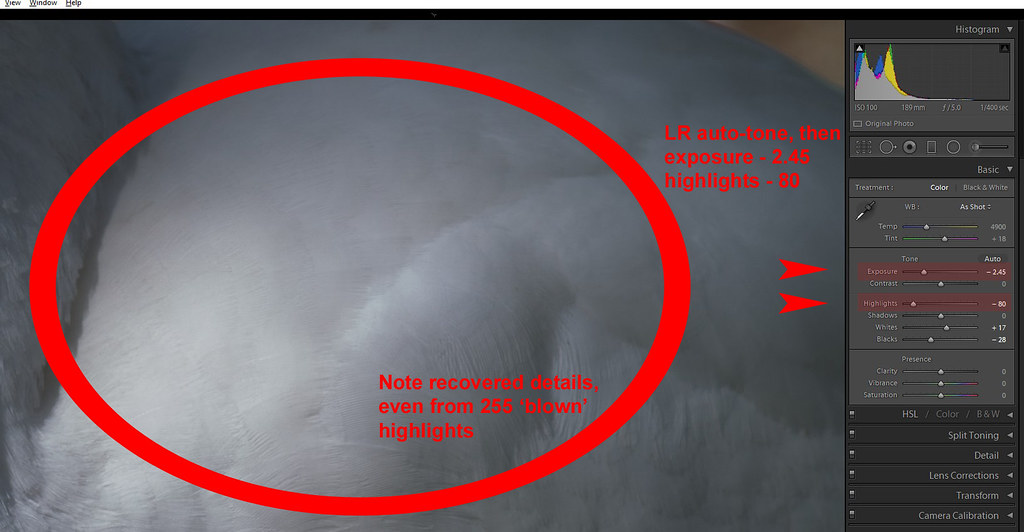
IMAGE-4

Neither of these versions in image-4 (nor image-3) seems as good as the auto-tone version from DPP that has been been provided as attachment-2, below. Other than investigating how to recover the highlights, I haven't worked further to finish these versions. I don't have a 'normal' or 'underexposed' image to process to finish for a "true" comparison of approaches. When shooting at the Naples Zoo, this demonstration wasn't the purpose of capturing this ibis. Rather, I was just thinking yesterday about using an actual example of shooting in RAW, using ETTR and demonstrating the processing of results that move "left" to harvest the data in the ETTR capture.
The work-in-progess versions shown so far have tried to demonstrate the processing considerations based on an analysis of the details of the image. Now the artistic decision:
Where on the continuum of brightest exposure to the most detailed highlights is the best result?
For my own photography, the shadowy versions above at -2.45 / -1.0 / -0.5 are undesirable; this is an American White Ibis, not grey nor whitish. I desire an image that is representative of this wild bird looking for a possible handout at the zoo. The final version as image-5 has adjusted the 255-highlights in the chest while cleaning up and darkening the background to better isolate the bird and remove distracting highlights from the background. I can't get a screen capture that shows moving the mouse around the chest area registering values at 99%, 99.1%, 99.2% for the R/G/B. So, I ask that you accept my representation that the earlier SOOC 'blown' highlights are now adjusted to be just slightly below 'complete white' via editing.
All of this editing was done in Lightroom, with no subsequent / 3rd-party noise processing. Possibly, a layered approach could have been used to (a) further darken the background, (b) lower the exposure and highlights on the bird's body and (c) raise the exposure of the bird's head and beak, possibly even adding some more yellow "sunlight" to the bird's head as if it had been better positioned in the sunlight. I don't find this image to be worth that kind of effort, even if I had those Photoshop skills. If someone does have the interest, shoot me a PM with your direct email and I can send a dropbox link to the CR2.
Image-6 shows a screen capture of the basic parameters from LR for image-5. There was more work done including an adjustment brush over the white of the bird's head where the exposure and whites has been slightly increased to improve the head as described for candidate PS edit idea (c). I also addressed some of PS idea (a) with a second LR adjustment brush to lower the exposure, saturation, and color temperature of the sun-lit grass behind and below the tip of bird's beak.
IMAGE-5
White ibis by Paul Sager, on Flickr
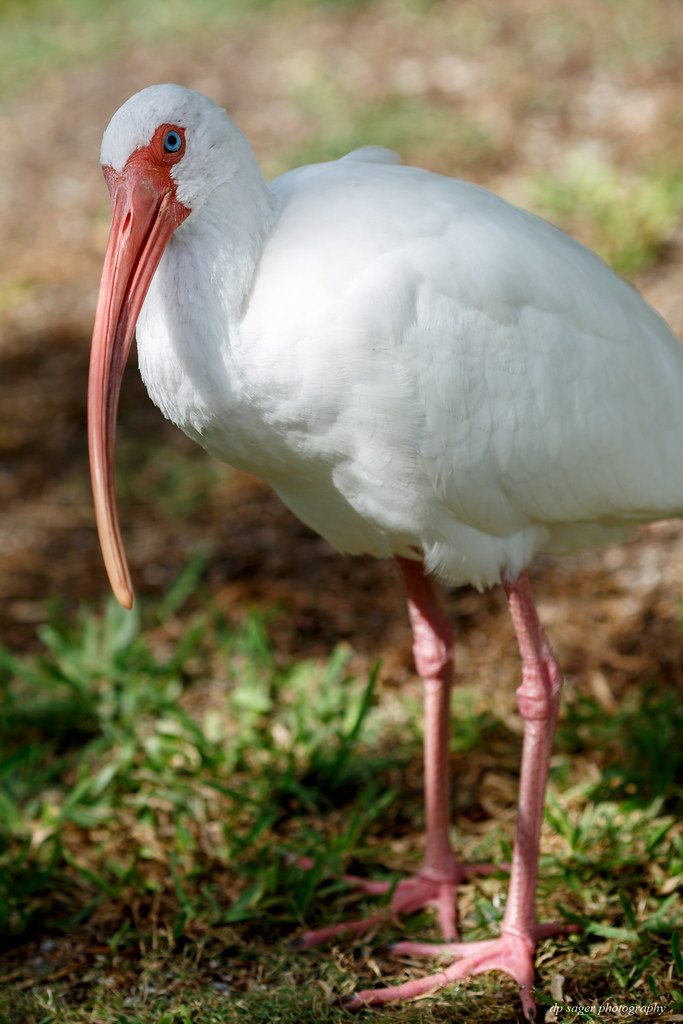
IMAGE-6

Regarding Exposure and Metering Modes
Exposing to the right does not mean that you have to go "over" the right. When considering the 255 highlights, probably 1/3-stop faster on the shutter (1/400 to 1/500) would have prevented all of the 255-whites in the RAW and had an image that registered nearly all-white for the bird's chest. Once I selected the f/5 aperture and set the ISO at ISO-100, the only decision was how fast (or slow) for the shutter to push the exposure to the right, whether just below, or just at, or just over the right side of the histogram, based on experience with the camera and the desired result.
The final result could have been achieved in any metering or exposure mode. The exposure of 1/400 at f/5, ISO-100 is the image exposure. If I had been using Aperture Priority with f/5 and ISO-100, moving the EC dial would have changed the shutter speed between 1/400 and 1/500 exactly the same as I was adjusting the shutter speed in manual. The same applies to the metering. Whether I spot metered on the chest or evaluated the entire frame, the meter in the view finder (and the histogram and highlight warnings on the camera display) will be the same based on the combination of these three exposure parameters.
I mentioned earlier of having 4 images left after culling, image-7 shows the thumbnails. The timestamps cover 5-minutes and the image sequence numbers cover nearly 45-images. The small lake at the Naples Zoo was filled with fish and turtles and you could buy a hand-full of pellets to feed the fish, turtles and / or birds. It seems that nothing from the turtles worked and only this ibis remains after culling the results, now about 2-months later. The three other images in the string below differ only on the shutter where they're 1/1000. From the thumbnails, the exposures all seem the same: bright and white. I don't have a video tape or audio log of those 5-minutes, but I likely looked at the highlight warnings and continued to slow the shutter as I pushed the histogram to the right (ETTR) until highlight warnings just began to appear on the bird's chest as shown in image-2, earlier.
Once ETTR was giving me a highlight warning, I know from experience that I should still find the details in the RAW file as shown in image-3 for the all-white chest. If I didn't trust my own experience of pushing the RAW exposure to the right, I could have used a shutter anywhere from 1/500 to 1/1000 to yield essentially the same bright white results such as the three other thumbnails in image-7.
IMAGE-7

When considering "how far" is too far to the right, it does depend on the specifics of the composition. As mentioned in similar posts, I personally consider the issue where the highlights occur to be the relevant question, rather than if there are all-white highlights. Given the uneven lighting of this image, I consider the chest highlights of image-5 to be more pleasing and natural to other possible edit options. And honestly, this isn't the greatest image even if it did present a useful demonstration of ETTR in practice, from image-capture through editing. Replace the bird with the face of a young woman and I would still want my RAW file to be as far to the right as possible coming out of the camera before editing, but I would adjust that shutter speed to an exposure that did not generate any highlight warnings.
The one thing we can't compare is a version from the camera that was 'at exposure' or 'slightly underexposed'. At ISO-100, base ISO for this model, this example probably isn't the most relevant for the noise performance impact of ETTR. Even without an actual specimen, I can say with confidence that a "dark" SOOC image like the example in image 3 would not improve in terms of noise if it had then been adjusted from darker to brighter to achieve an exposure similar to the final result from the ETTR version. The noise difficulties of adding brightness to an under-exposed image tend to get worse for this type of camera when higher ISOs are used above base-ISO.
Conclusion
And after all this exposure discussion, I still find the how / why to focus on the eye and the artistic depth of field of the aperture choice to be more relevant discussions than ETTR exposure technique.
The demonstration shows an image with some highlights in the image file just over the maximum white threshold. Although the analysis digs into the technical details, the editing was relatively basic to recover details from the 'max' highlights where an all-white bird remains all-white in filtered sunlight. The image was not exposed for the best image in the camera. Rather, the image was exposed for the best possible result after editing, where best is a very subjective and personal attribute. If a SOOC image / exposure was desired for the purpope of less editing, using a faster shutter in the 1/800 to 1/1600 range would yield an exposure somewhere between the exposures of attachments 2 and 3, below.
Tell me what you think.
The three links below can be launched from the URL for full screen review of each version (max 2048px).
Attach-1 - (LR Import)

Attach-2 (DPP)

Attach-3 (LR for Details)

The American White Ibis used for this demonstration was a wild bird hanging out at the Naples Zoo in Naples, Florida in November 2018. Of the images I have of this bird after culling, there are 4 remaining where this seems the best and was the last of the sequence. The sequence runs for 5 minutes based on the timestamps, so I'm sure I reviewed images and their exposure histograms to make both exposure and focus adjustments to eventually capture this image. I also watched how the bird moved around, hoping for a good position in the light and looking at me.
IMAGE-1
I shoot in Manual with Canon's Evaluative Metering, where the entire frame is used. The EOS model was a 5D mark III, a model with other metering options that are based on declining percentages of the entire frame using readings from the center of the frame. As shown in image-1, the near-center of this image is the sun-highlighted portion of this demonstration. However, the point of focus is the bird's eye, slightly off center toward the upper left corner of the frame.
Image-1 shows the ibis straight out of camera after importing to Lightroom, the left-side. Being literally the SOOC / RAW import, it probably could look better with nothing more than application of WB, Picture Style and Sharpening as would have occurred by Canon's Standard profile for a JPEG created in the camera, the right-side image (processed from DPP). The JPEGs of these two versions are linked at the bottom of this post (2048-resolution) for comparison to the final process version. The same exposure could have been achieved by using the camera in Aperture Priority mode (or the other semi-auto modes) by adjusting the Exposure Compensation (EC) while using any of the EOS metering modes.
Image-2 shows a DPP analysis of the RAW file before adjustments. The red highlight warnings on the bird's chest show where the complete white is RGB (255,255,255). So already, one might wonder if anything needs to be done further. The all-white highlights are minor and seem to occur in the out-of-focus blur of the shallow depth of field. Is there a reason to go down a rabbit hole of editing this image, particularly when the sunlight is not directly on the bird's head / face / eye? The bird is looking directly as me and in sharp focus, let's see what else might happen ...
(SOOC - Straight Out Of Camera)
(DPP - Canon software Digital Photo Professional)
IMAGE-2
Image-3 is a screen capture from LR after clicking the auto-tone (see Whites / Blacks adjustment) and then manually adjusting the exposure and highlights to recover available detail from the RAW. Theoretically, this image-3 version is spot metering off the bird's chest in the center of the frame and then underexposing from the metering. I don't have that actual version, so we'll call image-3 "theoretical". Image-4 shows LR versions with the exposure modified to -1 and -0.5 on the exposure, holding the highlights at -80. Again theoretically, either version in image-4 could be the actual SOOC results by spot metering and keeping the meter at the 0-mark or slightly to the left of zero. The uncropped version of image-3 is provided as attachment-3, at the bottom of the post.
IMAGE-3
IMAGE-4
Neither of these versions in image-4 (nor image-3) seems as good as the auto-tone version from DPP that has been been provided as attachment-2, below. Other than investigating how to recover the highlights, I haven't worked further to finish these versions. I don't have a 'normal' or 'underexposed' image to process to finish for a "true" comparison of approaches. When shooting at the Naples Zoo, this demonstration wasn't the purpose of capturing this ibis. Rather, I was just thinking yesterday about using an actual example of shooting in RAW, using ETTR and demonstrating the processing of results that move "left" to harvest the data in the ETTR capture.
The work-in-progess versions shown so far have tried to demonstrate the processing considerations based on an analysis of the details of the image. Now the artistic decision:
Where on the continuum of brightest exposure to the most detailed highlights is the best result?
For my own photography, the shadowy versions above at -2.45 / -1.0 / -0.5 are undesirable; this is an American White Ibis, not grey nor whitish. I desire an image that is representative of this wild bird looking for a possible handout at the zoo. The final version as image-5 has adjusted the 255-highlights in the chest while cleaning up and darkening the background to better isolate the bird and remove distracting highlights from the background. I can't get a screen capture that shows moving the mouse around the chest area registering values at 99%, 99.1%, 99.2% for the R/G/B. So, I ask that you accept my representation that the earlier SOOC 'blown' highlights are now adjusted to be just slightly below 'complete white' via editing.
All of this editing was done in Lightroom, with no subsequent / 3rd-party noise processing. Possibly, a layered approach could have been used to (a) further darken the background, (b) lower the exposure and highlights on the bird's body and (c) raise the exposure of the bird's head and beak, possibly even adding some more yellow "sunlight" to the bird's head as if it had been better positioned in the sunlight. I don't find this image to be worth that kind of effort, even if I had those Photoshop skills. If someone does have the interest, shoot me a PM with your direct email and I can send a dropbox link to the CR2.
Image-6 shows a screen capture of the basic parameters from LR for image-5. There was more work done including an adjustment brush over the white of the bird's head where the exposure and whites has been slightly increased to improve the head as described for candidate PS edit idea (c). I also addressed some of PS idea (a) with a second LR adjustment brush to lower the exposure, saturation, and color temperature of the sun-lit grass behind and below the tip of bird's beak.
IMAGE-5
White ibis by Paul Sager, on Flickr
IMAGE-6
Regarding Exposure and Metering Modes
Exposing to the right does not mean that you have to go "over" the right. When considering the 255 highlights, probably 1/3-stop faster on the shutter (1/400 to 1/500) would have prevented all of the 255-whites in the RAW and had an image that registered nearly all-white for the bird's chest. Once I selected the f/5 aperture and set the ISO at ISO-100, the only decision was how fast (or slow) for the shutter to push the exposure to the right, whether just below, or just at, or just over the right side of the histogram, based on experience with the camera and the desired result.
The final result could have been achieved in any metering or exposure mode. The exposure of 1/400 at f/5, ISO-100 is the image exposure. If I had been using Aperture Priority with f/5 and ISO-100, moving the EC dial would have changed the shutter speed between 1/400 and 1/500 exactly the same as I was adjusting the shutter speed in manual. The same applies to the metering. Whether I spot metered on the chest or evaluated the entire frame, the meter in the view finder (and the histogram and highlight warnings on the camera display) will be the same based on the combination of these three exposure parameters.
I mentioned earlier of having 4 images left after culling, image-7 shows the thumbnails. The timestamps cover 5-minutes and the image sequence numbers cover nearly 45-images. The small lake at the Naples Zoo was filled with fish and turtles and you could buy a hand-full of pellets to feed the fish, turtles and / or birds. It seems that nothing from the turtles worked and only this ibis remains after culling the results, now about 2-months later. The three other images in the string below differ only on the shutter where they're 1/1000. From the thumbnails, the exposures all seem the same: bright and white. I don't have a video tape or audio log of those 5-minutes, but I likely looked at the highlight warnings and continued to slow the shutter as I pushed the histogram to the right (ETTR) until highlight warnings just began to appear on the bird's chest as shown in image-2, earlier.
Once ETTR was giving me a highlight warning, I know from experience that I should still find the details in the RAW file as shown in image-3 for the all-white chest. If I didn't trust my own experience of pushing the RAW exposure to the right, I could have used a shutter anywhere from 1/500 to 1/1000 to yield essentially the same bright white results such as the three other thumbnails in image-7.
IMAGE-7
When considering "how far" is too far to the right, it does depend on the specifics of the composition. As mentioned in similar posts, I personally consider the issue where the highlights occur to be the relevant question, rather than if there are all-white highlights. Given the uneven lighting of this image, I consider the chest highlights of image-5 to be more pleasing and natural to other possible edit options. And honestly, this isn't the greatest image even if it did present a useful demonstration of ETTR in practice, from image-capture through editing. Replace the bird with the face of a young woman and I would still want my RAW file to be as far to the right as possible coming out of the camera before editing, but I would adjust that shutter speed to an exposure that did not generate any highlight warnings.
The one thing we can't compare is a version from the camera that was 'at exposure' or 'slightly underexposed'. At ISO-100, base ISO for this model, this example probably isn't the most relevant for the noise performance impact of ETTR. Even without an actual specimen, I can say with confidence that a "dark" SOOC image like the example in image 3 would not improve in terms of noise if it had then been adjusted from darker to brighter to achieve an exposure similar to the final result from the ETTR version. The noise difficulties of adding brightness to an under-exposed image tend to get worse for this type of camera when higher ISOs are used above base-ISO.
Conclusion
And after all this exposure discussion, I still find the how / why to focus on the eye and the artistic depth of field of the aperture choice to be more relevant discussions than ETTR exposure technique.
The demonstration shows an image with some highlights in the image file just over the maximum white threshold. Although the analysis digs into the technical details, the editing was relatively basic to recover details from the 'max' highlights where an all-white bird remains all-white in filtered sunlight. The image was not exposed for the best image in the camera. Rather, the image was exposed for the best possible result after editing, where best is a very subjective and personal attribute. If a SOOC image / exposure was desired for the purpope of less editing, using a faster shutter in the 1/800 to 1/1600 range would yield an exposure somewhere between the exposures of attachments 2 and 3, below.
Tell me what you think.
The three links below can be launched from the URL for full screen review of each version (max 2048px).
Attach-1 - (LR Import)
Attach-2 (DPP)
Attach-3 (LR for Details)
Jul 12, 2022 14:10:14 #
I am rather new to this so I have questions. Why ETTR, when you can get a proper exposure in camera and not have all the post processing/editing? I would think with low iso and the chosen aperture/shutter speed that you could obtain a raw image with no blown whites, no noise and having to do a lot less editing.
If you want to reply, then register here. Registration is free and your account is created instantly, so you can post right away.