Posts for: THRaleigh
Jul 5, 2021 07:17:06 #
Jeffcs wrote:
Snap ridge is one of the reasons I switched to Sony
Plane and simple I just doesn’t work!
Plane and simple I just doesn’t work!
Well, I use SnapBridge for my Nikon and Imaging Edge for my Sony. My own experience is different than yours. SnapBridge works all the times and Imaging edge works most the times.
Jul 4, 2021 20:39:53 #
Wingpilot wrote:
I have the M7, and I got Gary Friedman’s book, “The Friedman Archives Guide to the Sony RX100VII. It’s excellent, easy to read and understand. I think you find Gary’s book well worth the price. You can get it as an e-book as well as a hard copy.
The M7’s menu is extensive because the camera has such an extensive array of features and controls. It takes some getting used to, but very shortly it begins to make sense.
The M7’s menu is extensive because the camera has such an extensive array of features and controls. It takes some getting used to, but very shortly it begins to make sense.

Jul 4, 2021 08:28:19 #
avemal wrote:
Still having problems on this. I let several years go by & would think by now it would be easy to install. It is the same. Nikon closed till Tuesday will try with their help. Any suggestion with your experience ?
Thanks, & Happy 4TH.
Thanks, & Happy 4TH.
What Nikon camera do you have? I have no problem using SnapBridge with my z6 using iPhone 7 Plus and now 12 pro max for several years. I found out after successfully paired. Just leave them alone do not try to re-pairing next time you use it. You can turn on SnapBridge then turn camera on wait for them to connect. Do not try to pair them again. It will mess the whole thing up. If for some reasons you need to repairing them, the best way is to delete the SnapBridge and re-install the SnapBridge app again. By the way I am using Bluetooth not WiFi. The best feature of SnapBridge is all my photos are geotagged. Of course, the auto transfer of small jpeg files is not bad but very slow.
Sep 15, 2020 09:05:51 #
IDguy wrote:
Has anyone gotten theirs yet?
If so, do you mind sharing when ordered and received and who from?
Ordered last month from Adorama and they have no clue on availability.
If so, do you mind sharing when ordered and received and who from?
Ordered last month from Adorama and they have no clue on availability.
Ordered from Adorama on June 23 and received the lens on September 3. I did not order this lens until some professional reviews are available.
Very good lens you will be very happy. I sold my 24-70f4 to mpb .
Jul 2, 2020 17:31:56 #
SteveG wrote:
I don't think I would leave a polarized on all the time unless you are outside in situations where it was going to help. I did that many years ago in Europe during my film days. 1974. I wasn't happy that I did. But if it works for you, great! I think I would want something that I could easily put on when I needed it, or if it were designed where it wasn't impeding the camera in any way. This Nisi kit, Cokin style caught my eye:
https://www.adorama.com/als.mvc/cartview
https://www.adorama.com/als.mvc/cartview
Steve:
With the Lens Mate adapter, you put the filter on only when you need them. I put the CPL on only to show the three accessories I have. As I stated they use 52 mm screw on filter just like any other camera lenses with a 52 mm front thread.
I am very happy with this setup. The LensMate filter adapter do not interfere with the camera operations.
Jul 2, 2020 12:49:24 #
SteveG wrote:
That includes the filters? Looks like Amazon doesn't. I guess I can just take a look
Len Mate has kits including ND filters. I bought my CPL separately. I do not have ND filters.
Jul 2, 2020 10:26:55 #
SteveG wrote:
Is this what you have?
Yes, but I ordered directly from Lensmate with extra adhesives.
Jul 2, 2020 09:26:38 #
SteveG wrote:
Those are excellent suggestions, thank you! I DID order the Sony grip you mentioned. Only $14! It looked like it would be a seemless addition. I guess if it doesn't hold, I'll try this one. I was looking at the Nisi filter kit also? It's like a miniature Cokin type of set up but the other one looks better because, as you mentioned, it uses any 52mm filter. How does it actually attach to the lens exactly?
There are two parts. The first part use two sided adhesive to attach to the camera with a special installation alignment tool then the second part with a 52 mm screw adapter to attach to the first part. The first part is always on your camera. You can take the second one out if you are not using the filter. Go to the lensmate web site to see for details including installation instruction. You can buy extra adhesive (two sides) From Lensmate for future repair.
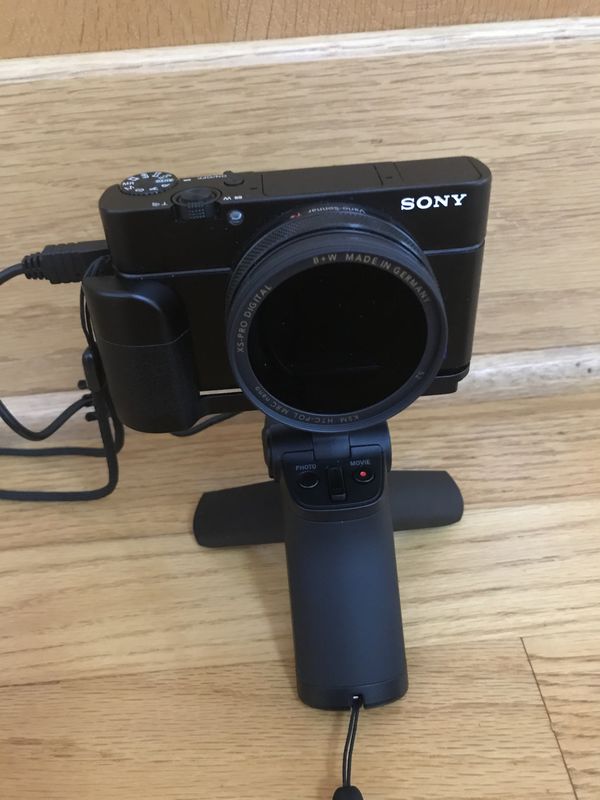
Jul 2, 2020 09:06:49 #
SteveG wrote:
Well, I finally did it! Thanks to a great fellow ... (show quote)
I have 3 very good accessories for my Sony rx100vii. The first one is a hand grip, a JJC one. When I got it the vii version is not available. So I bought the vi version. It cover the hdmi port. You can get one for vii from B&H - UURig R017 for $19.95. Do not buy Sony’s AG-R2 - it use adhesive and will not last. The above one is using tripod socket to screw on. The second one is the shooting grip. I bought the Sony VCT-SGR1 - $98 from B&H. This one use cable to connect to the camera. Sony just comes out with a new wireless one -GP-VPT2BT from B&H for $138. The last one I have is a filter adapter from “lensmateonline.com”. After installed, you can use any 52 mm screw-on filter. I bought a B&W high transmission CPL. it works well. Vi and vii has the same spec for the filter adapter.
Dec 6, 2019 17:54:09 #
photogeneralist wrote:
I printed out your recipes for loading pics into l... (show quote)
I am sorry that you have not been able to get them to work.
First double click the “Macintosh ssd” or whatever is your boot disk. You will see two columns. Left column started with “Favorites” the right side column started with “Name”. Under names the first folder is “Preboot” then “system” then “users”. Click “users” then click your username. You will then see a pictures folder. Double click “pictures” folder then right click “photos library” - then click show package content in the drop down menu. Click and drag the “originals” folder to the “favorites” column. My favorites column shows “recent”, “Applications”, “desktop”, “documents” ... etc. Some earlier MacOS shows “masters” instead of “originals” in the “show package contents”.
I hope this helps.
The followings were the reply from Skylum support :
* launch Finder, click GO > Home. Double click on Pictures
* Right-click on the Photos Library > Show Package Contents > copy and paste the folder Originals somewhere you can easily find it
* lunch Luminar, click Library > Add folder> add Originals folder.
In my case, I just drag the Originals folder to the favorites as a pointer rather than copy them
Dec 6, 2019 17:20:09 #
Stan Gould wrote:
Interesting post.
When dragging the “original folder” from package contents to Luminar 4, is a copy made? If not, does one need to keep a copy of “original folder” in package contents or will a new “original folder” be generated when new photos are taken?
When dragging the “original folder” from package contents to Luminar 4, is a copy made? If not, does one need to keep a copy of “original folder” in package contents or will a new “original folder” be generated when new photos are taken?
The short answer is no. When you drag the “original” folder into “favorite” , it is only act as a pointer not copying. The package contents of the “original” folder is not moved. Luminar 4 does not generate another copy of “original” folder. When you import new pictures into “Photos”, Luminar 4 will see the added pictures. This procedure just help Luminar 4 to see where the stored pictures were located and edit them. You can see edited photo only in Luminar 4 . You will not see edited photo in “Photos”.
Dec 6, 2019 10:27:13 #
rtb220 wrote:
It's Luminar not Lumina.
Thank you very much for the correction.
Dec 6, 2019 08:42:52 #
photogeneralist wrote:
If I cannot get a photo into the software, then the software is useless to me. Otherssseem to have no problems getting their pics into the luminar 4 library. I't must be me?
I have a 2014 mbp and 2015 27” iMac.
In order for lumina 4 library to add pictures stored in “Photos” using add folders function. do the followings as Skylum support told me.
Open finder to see pictures folder , click “pictures”. Under picture you will see “Photos Library” then right click “Photos Library” to open dialogue. Thank click “show package content”. You will see a folder named “original” drag this folder to the left column under “my Favorites”
Next time when you open Lumina 4, go to library/add folder then adding this “original” folder.
All your pictures in “Photos” will appear in Lumina library. For me every picture showed up twice one in jpgs and one in heir(Apple’s file). Raw file only showed up once.
May take awhile to get all in Lumina 4. The Lumina 4 library keeps the “photos” structure - by date which I really like .
I am running Catalina with no issues so far. Also I have no problem running Lumina 4 as “Photos” plug in but this way you edit one file at a time and the edited file still stored in Lumina library.
Cheers
Oct 24, 2019 14:32:09 #
A. T. wrote:
Garth, br br First, thanks for the response. I c... (show quote)
A.T
You can go to the Mac sale web site watch the upgrade video to decide if you want to do the upgrade yourself or not. Upgrade tools includes cutting tool to cut the adhesive tape and suction cup to remove the display glass and the adhesive tape to put display glass back together.
Another option is to buy an external ssd with either usb 3 or thunderbolt interface. Boot up from usb 3 is a little slower than an internal pci ssd but still much better than a fusion drive. This upgrade path let you have endless option to choice ssd drive - speed and capacity.
Good luck with you project.
TH
Oct 24, 2019 13:09:10 #
A. T. wrote:
I'm replacing the fusion drive in my 2017 iMac with an SSD and would like to get some opinions on what would be the best choice in solid state drives.
Go to www.macsale.com (other world computing) to find out the replacement ssd. They have the necessary tools and video to show you how to do it. I successfully upgraded my iMac twice in the past. Their ssd is not the cheapest though.