Posts for: Grahame
Dec 5, 2023 15:35:56 #
tca2267 wrote:
Can some one tell me with the Nikon Z8 or Z9
if the focus should be on
manual or auto when doing focus stacking.
Thanks
if the focus should be on
manual or auto when doing focus stacking.
Thanks
Should be on 'Auto' if using the cameras 'Focus Shift' function.
Dec 4, 2023 04:51:57 #
Normafries wrote:
I have been wanting to move to mirrorless. I need to be able to photograph animals in low light, so also considering getting Nikkor 70-200 2.8. I have been using Canon 7D Mark II for years, with L lenses, and to me, it has been OK but not great. But I have zero experience with Nikon of any sort. A bit concerned about weight, too, as that lens weighs quite a bit.
Any thoughts would be appreciated! Especially those of you that actually own a Nikon Z8....
Any thoughts would be appreciated! Especially those of you that actually own a Nikon Z8....
I own both the Z8 and the Z 70-200mm a superb kit. It's not light but that depends upon how long you carry it, how and where doing what.
If you already have some Canon lenses what advantage do you see in changing brand.
Dec 3, 2023 16:17:34 #
tcthome wrote:
Good morning Grahame. Do you aquire focus before kicking in the 3D at all? I have seen some vids on you tube that suggest this works better for them & was just wondering. Thanks for any replies.
Quick answer is no, because I have it already 'kicked in'.
I'll refer to my scenario where I am photographing people running towards me (or just as applicable to candids of people stood around talking). My camera is set up for AF-C and BBF using the AF ON button or alternatively you could use half shutter button press.
The camera is set to AF- area mode - '3D Tracking', with AF subject detection options set to either Auto, People, Animal, Car, Plane. I'll use the People option for this example.
In the viewfinder a white box is shown where the focus point has been selected, mine always remains on centre. As you move the camera and bring the white box towards the subjects face an additional smaller box will/may show if the camera has detected an eye. With the white box over the subjects face you press AF ON (or shutter half press) to activate auto focus.
At this point the camera locks focus on, in priority, the eye (if detected), the face (if no eye detected), treats it as an 'object' if neither eye or face recognized. In the rare worst case scenario if it recognizes neither an eye, face or object it reverts to Auto Area mode. With the focus locked on and AF ON kept pressed the camera can be repositioned or the subject move position (e.g. closer to you) correct focus will be maintained.
This will also work the majority of time if your subject is something such as a static telephone keypad or flower allowing quick easy composition reframing. It recognises objects within its focus box by color and contrast.
The Nikon Studio software indicates by the size of the red focus boxes whether it achieved AF using eye, face or object recognition.
Dec 2, 2023 23:04:05 #
tkphelps wrote:
I used AF-C Single point mode. The lens was the 24-200/f4-6.3 at 200 mm. I did not try to compare other modes with this subject. What I was prompted to do was to use all the modes and try to find subjects that photograph well with those modes. The point, if there is one at all, is that I got results that amazed me with the first effort at "practice". I very much respect the capability of the autofocus.
Thank you for the explanation.
I've had the Z8 for some months now and could not be happier with the camera. The Z6 and D800 had been what I was using. The primary reason I got it was for the hope that its AF would make it 'easier' to focus and maintain focus on fast moving subjects, which were race competitors running towards, or, obliquely towards me. I have been amazed at its capabilities with respect to accuracy and consistency in achieving this.
I highly recommend having a play with the AF '3D Tracking' mode. For both moving and static subjects it can almost completely alleviate the need to ever move the 'focus point' from the centre position, allowing easier quicker framing for composition on just about anything.
Dec 2, 2023 21:45:44 #
tkphelps wrote:
Thom Hogan, in his Z 8 guide recommended lots of practice with focus modes and all the focus controls on the camera. I might have gotten the same result without his prodding, but this shot seems to make the effort worthwhile. This is a crop from the center of a 200 mm shot hand held at about 10 feet.
Can you tell us which specific 'focus' mode/settings you used with the Z8 to capture this and why it was especially advantageous compared to other focus modes available in the Z8?
Dec 2, 2023 20:44:44 #
Gilkar wrote:
I am suspicious that it has something to do with the battery grips I am using but I have not tested that theory as yet. I bought battery grips as soon as they became available for both of my Z8's in order not to have to change batteries in the middle of the shoot.
I would suggest you test that theory a.s.a.p. This may enable you to confirm if the problem is relevant only to either camera or either grip.
No similar problems with my Z8.
I can not think of any camera set up (menu option) within the Z8 that is going to cause a total shutdown, only a sleep mode that you can instantly wake up. Additionally, cards and buffer are extremely unlikely to shut a camera down.
Nov 27, 2023 14:59:51 #
dpullum wrote:
Grahame said, "it's problem is that you are p... (show quote)
You can undertake a "controlled" comparison using the same image with various software options.
Photographing a plain black/white/coloured surface at high ISO will enable you to play with removing the noise with the software's your are testing and they will all be able to do that from zero to total removal.
But, what that testing method is not going to reveal is 'real world' evidence of how that software has affected the fine hairs hanging over a subjects face when it is viewed at the size required for your intended output use.
Nov 27, 2023 06:08:45 #
dpullum wrote:
When comparing things it is typical to use complic... (show quote)
Whilst 'being scientific' with a test as you suggest is an option, it's problem is that you are photographing something you never will under normal circumstances.
Defining what is acceptable to you in that case will be far more difficult than using something we commonly photograph and look at.
Nov 26, 2023 22:55:13 #
rwm283main wrote:
I shot this photo at dusk today with an ISO settin... (show quote)
I have a few different choices of denoise tools. If I take one of my very high ISO noisy images there are a zillion (slight exaggeration) permutations of noise removal I can do.
Getting the odd result by working on your image from someone who may have not have even used their denoise software to its best possible ability will be of little value to you. Why not undertake your own testing, the majority of software has a trial period?
Nov 26, 2023 20:19:53 #
bdk wrote:
when all else fails, go back to the beginning. Look for the two green dots next to buttons. Press and hold those buttons at the same time.
I'm absolutely amazed that there are those around who do not consider the absolute simple basics of investigating problems before suggesting such possible drastic and time wasting procedures.
Nov 26, 2023 19:46:23 #
ewlutz wrote:
This is an example of me having to move further back to take the pictures. I do the church directory and take these pictures every Sunday.
The image you posted is 6000x4000px, this is the max (L) pixel image area of your D5300. It was taken with a 55-200mm lens at 60mm.
From the above it suggests all is normal with respect to subject distances.
Nov 26, 2023 02:04:04 #
Grahame wrote:
Top pic.
What I meant to say was top pic is correct, lower pic inverted. All to do with the angle it was taken from.
Nov 26, 2023 00:28:19 #
Nov 24, 2023 17:43:39 #
dustie wrote:
Trying a little more subtle moving of some adjustm... (show quote)
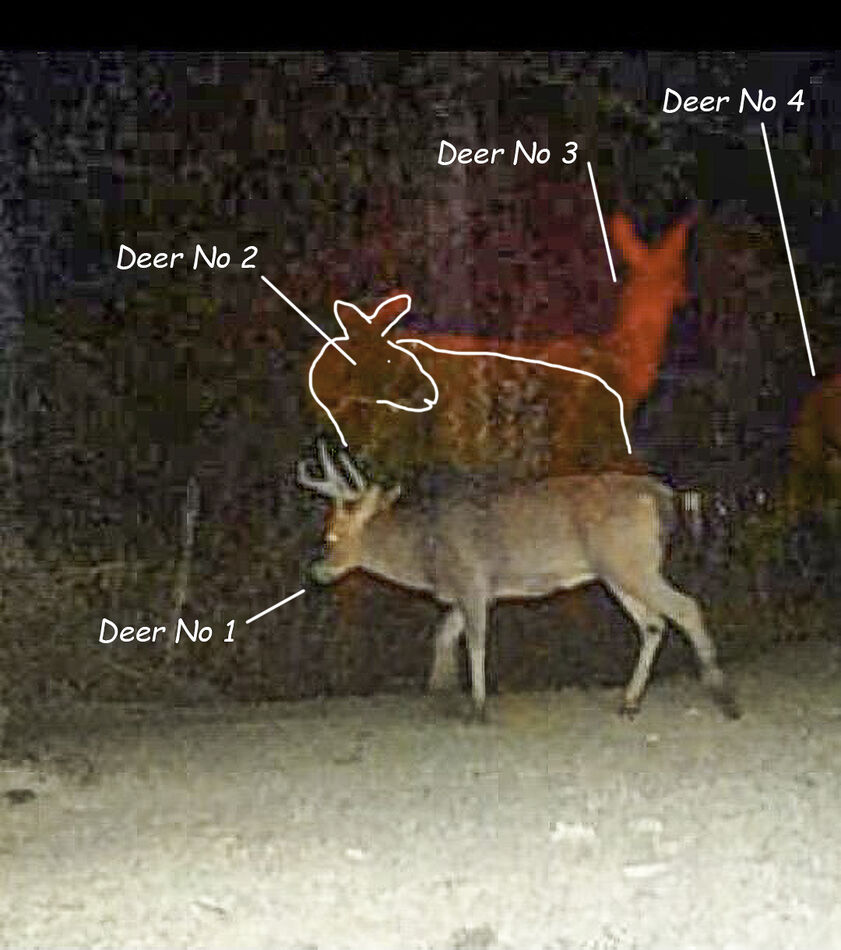
Good work outlining them and here's how I had interpreted Deer 2. Not being a Deer expert, what is the possibility of Deer 1 with the antlers being that physical size compared to the others behind it?
Nov 22, 2023 18:33:05 #
Fencehog wrote:
I love your photograph of a beautiful dog having fun. If I am not mistaken all four of its legs are off the ground.
Thank you. Rusty was found in our garden almost nine years ago in a pretty sad state, he adopted us and is the most loyal four legged friend you could ask for. More pics here https://fijitime.smugmug.com/Birds-and-Animals/Rustys-Gallery/