Check out Black and White Photography section of our forum.
Posts for: pfredd
Mar 23, 2012 18:51:44 #
English_Wolf wrote:
200 ISO DX40 Download and compare.
Had to reload both, using the same prtscr.
photogrl57 wrote:
You asked for itYeah I wasn't real impressed with that ... it didn't do the same experiment at a lower ISO .... show me one that proves that with an ISO of 100 .. :)
200 ISO DX40 Download and compare.
Had to reload both, using the same prtscr.
To any who think the 1/125 underexposed VS 1/25 does not show high noise I say download both and adjust level on the under exposed to match normal's level - EW's theory holds.
Mar 22, 2012 19:11:02 #
Couple further points many don,t realize....Think of RAW as just the data the sensor recorded, but must be processed to see. Like sheet music - you can't hear it till it is played on some instrument. The plug-in (with monitor) is like the orchestra for eyes, so we can see what the camera recorded as a pic. The image we see is still an interpretation of recorded data. To keep it we must record it. We can keep like original but to hear it we need the orchestra again. So we need some format that can be widely read. With music we use CD, tape, vinyl iTunes etc. In photography it's PSD, PNG, TIFF, JPG and a dozen more. The saved file size and usage may be a consideration. JPG is the smaller with the worst fidelity, RAW files 2 - 3 X larger, PSD & TIFF near 4 X bigger than RAW ( can be huge if saved with layers not flattened ).
You mentioned working with layers, the single strongest and best tool. I remember in earlier Adobe Elements layers were awkward to use but E 10 handles them more like PS5. Think about buying E 10, shoot RAW, process and print with E 10, save the RAW file and PSD or TIFF for printing again, or save RAW + JPG which can be used for web, e-mail and quality prints up to 4X6.
To any who say you must save processed files ( They can be enormous ) remind them the XMP from RAW is a map beck to that beautiful print if you need.
Mar 22, 2012 15:45:22 #
What you are missing is the raw plug-in for your camera. Plug-ins are part of the operating software of your PS. Think of it as a connecter from PS to your camera model. As new camera models come out Adobe must add plug-ins for them.
If your PS is an early one (before CS/PS3 I recall) adding plug-ins was dicey, and your Rebel XT might not have been in the PS2 software. If that is the case you will need to buy a converter. If you convert to JPG you lose too much in the compression. TIFF and PNG are uncompressed so maintain integrity. TIFF is a tad better in that it may be more widely used.
The Adobe site mentioned is valueless for your situation. There you will only find raw updates for new cameras to Adobe's latest, PS5 and Elements 10 hardly your problem
You might weigh cost of buying conversion program vs buying Elements 10 which will do conversions and lots more.
As to the buying Adobe Bridge, a rather convenient program, surely ask Adobe if it can be added to whatever PS program you have.
Mar 22, 2012 14:44:43 #
So shall we all become photo activists march in the street before our favorite photo store boycott internet suppliers write letters demanding all camera/gadget bags must be 50% outside and 15% grey inside. Pass it on !
Mar 22, 2012 14:16:07 #
francesca3 wrote:
quote=WxGuesser Taken with a Cannon A40 f2.8 1/80... (show quote)
Your approach rather unique and interesting, but seems to go too far. The blue cast is replaced by a definite red cast as seen in the gutter snow ans sky haze. While red cast is common morn and eve when the sun is near the horizon. Shot lighting says this taken right around noon. Also the tree's green faded to grey because of the red.
Perhaps you can try halting your technique while the sky is still winter day grey that is close to neutral with R,G & B values equal.
Mar 20, 2012 22:10:41 #
The banding has the fingerprint angle of stitching. Cure is, as mentioned above, smudging OK in bland no detail areas like sky, NG in detailed areas.
Prevention is shoot full manual so matching margin colours are same. Because of the slash angle polarizers don't work smooth either.
Another cause is often lens distortion (not aberration) which can be easily removed in good editing software unless the lens is off brand.
Prevention is shoot full manual so matching margin colours are same. Because of the slash angle polarizers don't work smooth either.
Another cause is often lens distortion (not aberration) which can be easily removed in good editing software unless the lens is off brand.
Mar 19, 2012 01:10:57 #
senad55verizon.net wrote:
quote=pfredd This whole issue seems to have becom... (show quote)
You are right, sir. We can't determine the light temperature in the room. The entire garage might have been bathed in red light so the camera capture was dead on. The OP did noi see that. He asked for corrections. The first offered was in deed pushing a scrubber to show the problem he saw was called
temperature, and easily altered.
The 10 second manouver is an easily applied to correct what you may see as a 'somewhat difficult photographic situation.' Some might opt for far more difficult corrections
using coloir substitution, channel torquing and other esoteric approaches. My approach assumed whites should be white and blacks black within the capture. If you would like puce sidewalls and deep purple shadows O,K., we can do it, but that degree was not captured so may take 30 seconds.
Since correcting the pic elicited so much ink but was fast and easy it seemed a tempest in a teapot (a very old English ezpression),
Check out Traditional Street and Architectural Photography section of our forum.
Mar 18, 2012 22:22:18 #
This whole issue seems to have become a tempest in a tea pot.
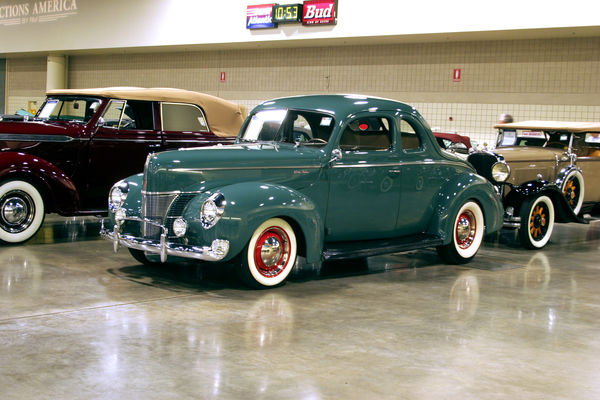
First - you aren't after white balance. Your problem and solution lies in temperature (°K). drop that by about 50° in whatever simple program you using OR, adjust levels using white wall tyre for lightest ( the other whites are spectral or tan, thus no good).
Second - choose darkest area (under the ford) as the true black. There it is in 2 clicks, took maybe 10 seconds including proving the whites and blacks. No colour replacement, no need for RAW conversion, no stoop, no squint, no squat.
P.S. those red marks on the wall mark location of fire extinguishers.
Mar 17, 2012 19:22:47 #
To get metaphysical, there is no reality, only what each person perceives through the filters of his life. What is beauty, a red sunset (how red) - a red rose bloom (is a white rose bud ugly) - a young model ( not your D.L. photo?).
Each can be 'improved' by the painter's brush, sculpture's clay, Ansel's darkroom. Was there ever a fashion magazine published without air brush or PS.
For that matter, how many glamor shots through a soft focus lens or silk stocking even landscapes through graduated filters? Proper or PhotoShop?
Each can be 'improved' by the painter's brush, sculpture's clay, Ansel's darkroom. Was there ever a fashion magazine published without air brush or PS.
For that matter, how many glamor shots through a soft focus lens or silk stocking even landscapes through graduated filters? Proper or PhotoShop?
Mar 17, 2012 16:38:18 #
Perhaps those that haven't spent the time to learn PhotoShop would prefer to use that time to learn their cameras and proper photo technique.[/quote]
Perhaps PhotoShop is a tool capable of improving shots taken with proper techniques. Perhaps too, PS lets express something beyond proper technique imagination !
Perhaps PhotoShop is a tool capable of improving shots taken with proper techniques. Perhaps too, PS lets express something beyond proper technique imagination !
Mar 17, 2012 15:41:51 #
Has anyone else noticed those who post 'purism' photography of meticulous setup to get the desired photo out of the box are posters who can't handle PhotoShop.
Perhaps, too, those purists dislike action, news and some wildlife photography as well.
Yet, their art form, still- life, is the foundation of our art from the caves of France to 19th century masters.
Now post processing has advanced from darkroom to computer why not use then to expand our art? When man invented paint and brush did cave dwellers wave charcoal sticks in descent-maybe. Did they whinge because there weren't easy teachers of the new tools?
I would suggest the hours with your computer and PhotoShop are very worthwhile. Open any mundane or defective shots, process this way and that way with any tool you are curious about. Before long you may teach yourself more about PS, about what you want from it, than any book or professor can give. Soon you may begin to see how PS might improve that image you see in the viewfinder of that perfect composition before you shoot it. Both schools in synergy.
Check out Professional and Advanced Portraiture section of our forum.
Mar 17, 2012 14:15:10 #
Shooting a partial eclipse for detail in shaded and bright is nearly impossible. Previous reply of working back from fastest shutter w/ largest f# is good. Maybe there will be a quick reset to open up enough to capture shadow detail in a second frame so HDR will work.
Remember lens sharpness is usually round f5.6-6.3 and cranking manual focus over to infinity will be out of focus. So be eye safe, pre-focus on a far hill or set hyper-focal point.
Back in the film days we set up a large piece of fine textured white paper facing the sun. set the camera squarely to photo it. Next prepare a piece of dark poster board with a 3"± hole. Cover hole with aluminum foil, pierce foil with small hole, Hold behind camera. What you have is sort of a pinhole camera where you can safely see and shoot the sun's image on the white paper now shaded by the poster board. Experience the good days, try it.
Mar 16, 2012 19:03:51 #
Have you thought of photographing coins? Using a simple converter yields better images than scanning - plus you can cross light, control DOF, adjust colour, add perspective, etc. Inexpensive tripod, couple of LED lights abd squares of velvet and you're on your way.
Mar 16, 2012 01:16:18 #
Amazing quantity of wonderful advice without knowing equipment and conditions. Which experts can do better while standing on one leg in a rocking boat shooting a point and shoot with one hand?
Of course you and I could, so I'll give two advices dim the background light spots, but not the one defining the sharp beak and do not go to full body cause bird legs are ugly.
It is a very nice pic.
Of course you and I could, so I'll give two advices dim the background light spots, but not the one defining the sharp beak and do not go to full body cause bird legs are ugly.
It is a very nice pic.
Mar 12, 2012 14:37:17 #
Oh, what is so rare as the confessions of a good photographer?
May I add two from my secret vault. I anger myself with any change in camera settings during the shot series, such as leaving any on 'auto'.
Second - the scene: oblique shot from high with town streets crossing the frames - The problem: neither I nor any stitching software could get vertical alignment of streets after hours of manipulation. Solution : click on "remove lens distortion" box,,,,, DUHH.
Check out Traditional Street and Architectural Photography section of our forum.