Posts for: Anvil
Jun 28, 2019 13:36:08 #
Linda From Maine wrote:
I remember the first time I saw Lake Tahoe, on the CA-NV border, the color was a brilliant emerald. I enjoyed your story and photos very much, Jim!
Thanks!
I finished each photo in Lightroom, only. For the waterfall, I did something a bit different, for me. I skipped my normal sharpening routine, opting for a mixture of texture and clarity (just a taste) on the rocks, and a touch of texture on the water.
Jun 28, 2019 11:14:12 #
Recently, family matters took the Anvils back to the Bay Area, briefly, then up to Washington. The Washington leg of the trip centered around a celebration of life for Mrs. Anvil's uncle. The celebration was held in Mazama, Washington. It was the first time either of us had visited that area. Simply beautiful.
The drive from Seattle to Mazama is between three and four hours, depending upon traffic (in Seattle), and how often one wants to stop, just to behold. We beheld, a few times, though not as often as we should have. The day was rather cloudy, which makes things easy on the photographer, but also does not put the beautiful, blue skies in the photos.
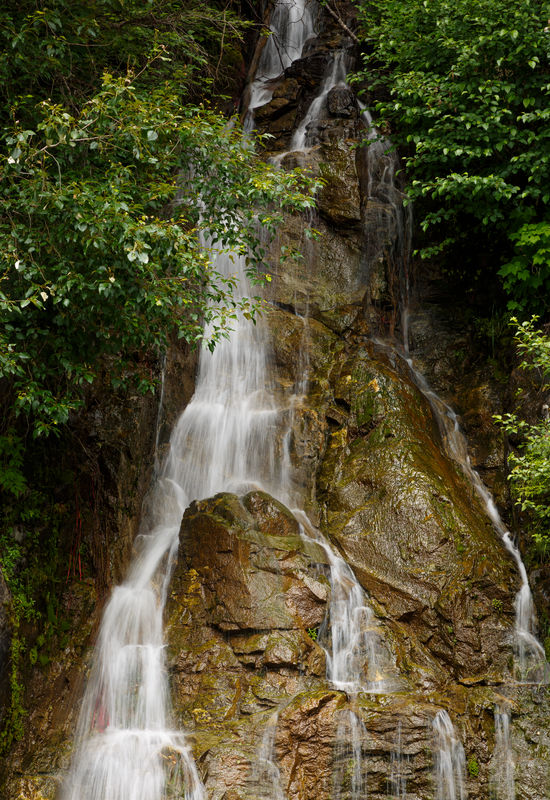
There were two shots that I really liked, both taken in the North Cascades National Park. The first of these is a nondescript waterfall that we encountered in the parking area of a viewing area. There was a longer waterfall, in the distance, but it was far enough away that a photo really didn't do it justice. (Quite long and thin, making it look like a white ribbon, in the distance.) The one in the parking lot posed in interesting challenge. I did not bring a tripod, on this trip -- flying with a sturdy travel tripod is a pain -- so I had to strike a balance between shutter speed and my ability to hold the camera steady. It turns out that 1/8 second was all I needed to get the effect I wanted, and I can be a rock, for that long.
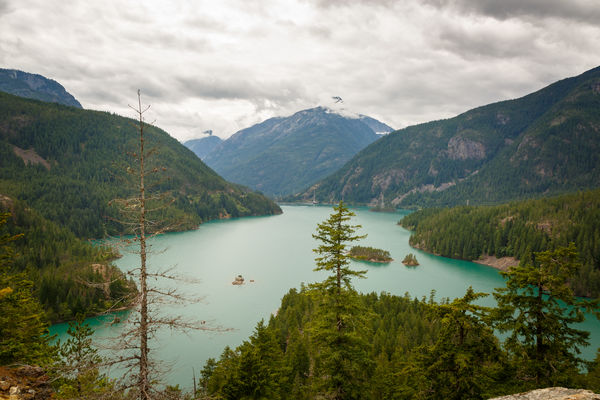
The next is a view of Ross Lake. The color of the lake was quite interesting, and probably enhanced by the lack of direct sunlight. I would have liked the snow capped peak, in the distance, to have been more prominent, but the clouds simply refused my bidding.
The drive from Seattle to Mazama is between three and four hours, depending upon traffic (in Seattle), and how often one wants to stop, just to behold. We beheld, a few times, though not as often as we should have. The day was rather cloudy, which makes things easy on the photographer, but also does not put the beautiful, blue skies in the photos.
There were two shots that I really liked, both taken in the North Cascades National Park. The first of these is a nondescript waterfall that we encountered in the parking area of a viewing area. There was a longer waterfall, in the distance, but it was far enough away that a photo really didn't do it justice. (Quite long and thin, making it look like a white ribbon, in the distance.) The one in the parking lot posed in interesting challenge. I did not bring a tripod, on this trip -- flying with a sturdy travel tripod is a pain -- so I had to strike a balance between shutter speed and my ability to hold the camera steady. It turns out that 1/8 second was all I needed to get the effect I wanted, and I can be a rock, for that long.
The next is a view of Ross Lake. The color of the lake was quite interesting, and probably enhanced by the lack of direct sunlight. I would have liked the snow capped peak, in the distance, to have been more prominent, but the clouds simply refused my bidding.
Jun 12, 2019 09:04:18 #
Linda From Maine wrote:
Gorgeous! I really think you need to publish a storytelling picture book, Jim, as your verbal skills equal your photographic. Many thanks for taking us along on the journey.
Thanks! I have dabbled in creative writing, accompanied by photos, though it has always been for family and friends. The whole story of "Anvil" was one such saga, though it was episodic, rather than a unified, single story. That series of tales also documented my photographic progress, from rookie to whatever I am, now. I'm pretty sure that an analyst would say I wrote the stories to compensate for the lameness of my early photo efforts.
Jun 12, 2019 08:51:49 #
UTMike wrote:
Very nice result, Jim!
Thanks! Glad you liked it.
Jun 11, 2019 21:00:40 #
Not long ago, I acquired a slingback camera bag (for those interested, it is a Mindshift Photocross 10) that allows me to combine two activities -- bicycling and photography. I carry the bag on my back, and the bag allows easy access to the camera, or whatever else I put inside. (Trail mix is essential.) This isn't an advert for a bag, though. This post is in the post-processing section for a reason. I'll get there.
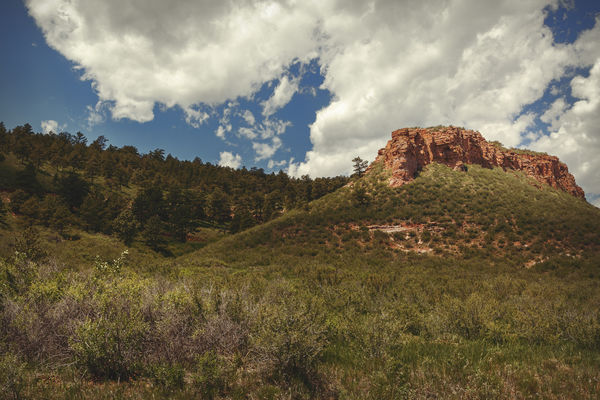
First, the ride. I went someplace I've never been. I saw signs for Carter Lake, and decided to give that a shot. I'd never been there, and the entire round trip would be less than 20 miles. Piece of cake, I thought...
As soon as I passed the ranger station, to get into the Carter Lake park, I noticed a very, very tall wall, painted to look like a road. Upon further inspection, it was determined that the painted wall actually was the road. No good could come of this. It was a perfect storm, a trifecta -- impossible hill, thin air (top of the hill was above 5800 feet), and an aging cyclist a mere three months from Medicare. Oh, and with the added weight of a camera, to boot.
I have more grit than sense, so I made it to the top. (They say his heart grew three sizes, that day.)
It was the trip down that provided the views. I didn't have to bother with pedaling, just braking. (My hat is off to the brilliant people who put pneumatic disc brakes on bicycles.) There was one view that was captivating, so I stopped to take a few shots.
Now, here comes the post processing part. You can see the complex rock formation, typical of Colorado scenes. I took a shot featuring only that rock formation, but I also took one that put the formation in context with the rest of the hills. It made much more sense to have that rock formation on the right side of the frame, rather than the left, because this was such a wicked slope that placing the formation on the left side would have yielded little more than clouds and sky, on the right, and my goal was to place the formation in the context of the hills.
When it came to post processing, I wanted the rock formation to stand out. Typically, I will apply some type of detail enhancement to the subject of the photo, which, when I'm in Photoshop, is usually based on a high pass filter. That, in itself, doesn't make the subject stand out, but it will help make it look good when it finally does stand out.
Typically, I'll create an elliptical shape around the subject, then add a curves layer. After adding that layer, I'll invert the mask, so I can darken everything outside of that elliptical shape. I use Luminosity blending, for this, to ensure that no colors are modified when I darken things. I add a Gaussian blur, to take care of the sharp edges of that elliptical shape. I'm pretty generous with that blur.
Many times, that's all I'll need to do. This time, however, the rock formation did not stand out enough. I didn't want to darken the photo any more than I'd done, already, so the only thing to do was brighten the rock formation. To do this, I simply duplicated the darkening layer. Then, I inverted the mask on the new layer, and modified the curves adjustment to brighten, rather than darken. The new, brightening layer inherited all the Gaussian blur that the original, darkening layer had.
This was pretty good, but it still needed something else, so I added a rectangular vignette -- simply darkening the edges.
The end result.
Jun 1, 2019 10:45:23 #
Toby wrote:
I think they are very good
Thank you!
Jun 1, 2019 10:19:21 #
Linda From Maine wrote:
Beautifully photographed and processed, Jim. I'm envious! Back around 2014/2015 I saw many elder statesmen, though most at great distance. Hope your selfie stick works with the bear 
Thanks! This is the oldest one I've seen. The Bighorns I've seen are often close enough to get a reasonable shot, but they've all been youngsters.
Jun 1, 2019 10:16:02 #
jaymatt wrote:
Nice, especially the first one.
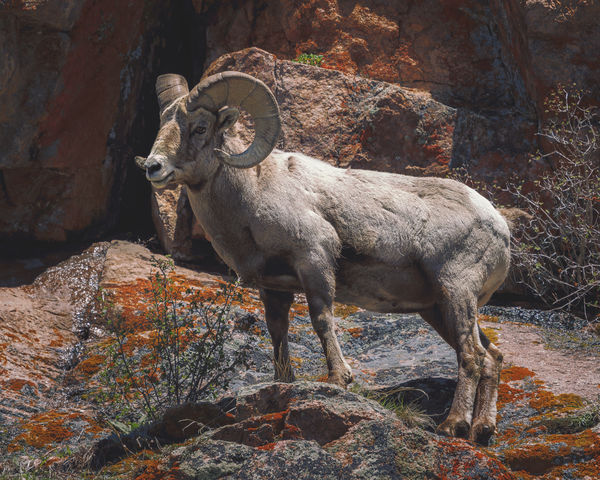
Thanks! I was pleased to get that pose. Most of the time, this fellow had his head behind a bush, or was taking off, as in the second shot.
May 31, 2019 19:28:58 #
UTMike wrote:
Wonderful captures, Jim!
Thanks! It was a great day for wildlife -- elk, mule deer, Bighorns, moose, and even a bear.
Someone in my neighborhood reported a bear, on our street, about 3AM, rooting through someone's trash. I think I'm going to smear myself with bacon, and go out after dark, with just my camera. A friend says I should also bring a can of pepper spray, so the bear can properly season me. All for art.
May 31, 2019 18:40:09 #
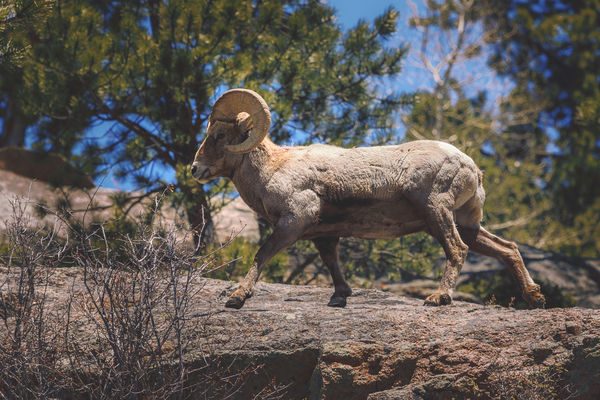
I've touched on this, before: If you want to photograph wildlife, you have to take the opportunities when and where they are presented. Wildlife searches do not always result in success, so you must be ready when you see something.
Once you see the animal, you don't usually have much opportunity to maneuver yourself into an advantageous lighting situation. Maybe you can do that, but prudence dictates that you take some shots while the animal is in sight, because the animal might not wait around while you are searching for a better vantage point. If you're lucky, you are on a perfect line, in between the animal and the sun. If you are even luckier, the sun will be somewhat low in the sky. If your days are like mine often are, not only will the very bright sun be high in the sky, but it will be immediately to the right of you. (Why is the right side so bad? If you are like most folks, you'll be looking through the viewfinder with your right eye. Your right hand will be on the shutter button and the aperture/shutter speed controls, unavailable to block the light that is blasting your peripheral vision, hampering your ability to get a good reading through the viewfinder. If the sun is high, left, it is still inconvenient, but not as bad.)
One animal I've been wanting to capture is a Bighorn Sheep ram that is old enough to have an impressive set of horns. I keep getting teenagers. Well, last week, I finally saw one that was worthy. Certainly, there are bigger horns out there, but I haven't seen them. The same conditions prevailed as with every other time I've encountered Bighorns. The sun is very bright, and high right. I also have to look up, to get the Bighorns. Combine this very harsh light with an animal that has white-ish fur, and you are facing a situation that can challenge the dynamic range of any camera. Normally, in a situation such as this, I'd bracket the shot, and use HDR to take care of the extremes. However, when your subject is a living -- and moving -- creature, having it hold still while you are taking your three shots is, frequently, too much to ask. So, all you can do is prevent blowout on the bright spots, and hope the shadows aren't so bad as to introduce noise, when you lighten them, in post.
It is certainly possible to produce a good result, if the shot was done in very harsh light, but it takes patience. You could achieve your desired result by dodging and burning, but, in the case of very harsh light, your patience may be tested. Luminosity masks are better at this, because they will allow you to exercise pinpoint control. (One step beyond luminosity masks is the approach used by Zone System Express, a product/training from Blake Rudis. This separates the photo into tonal zones, which is even more precise than luminosity masks.)
If the light was very harsh, even lightening/darkening with luminosity masks or zones may still leave you with trouble areas. You can only darken very bright areas so much. Soon, they start looking silvery gray, and that is no good. Here is where color grading can tame the beast. Sometimes, all you'll need is a sepia gradient, maybe using blend-if, if you wanted to leave the darker areas alone. There are all sorts of things you can do with color grading. (For some tutorials on color grading, go to youtube, and search for Blake Rudis. There are others, but he'll give you some free -- and useful -- tools.)
I'll include two, ram shots. These were unbelievably harsh, but I like the way they turned out.
May 30, 2019 20:29:14 #
mffox wrote:
A very nice photo and an interesting finishing technique. Thanks for sharing.
Mark
Mark
My pleasure. Thanks!
May 30, 2019 09:51:49 #
Wanderer2 wrote:
Thanks for posting this. I and family are going to be camping in the Park this early summer and will try to visit this area. I wonder if the road can be bicycled.
The road is open to bicycles. It is one-way.
May 29, 2019 17:10:27 #
UTMike wrote:
Beautiful work, Jim! I appreciate your generosity taking the time to share your work steps and techniques with us.
Thank you!
May 29, 2019 15:44:57 #
R.G. wrote:
It sounds very similar to what split toning does. In many of my landscape shots I add an amber (30-35) to the darks and blue ((215-220) to the highlights. Adding a cool colour to the highlights and a warm colour to the darks keeps things balanced temperature-wise.
That's exactly what color grading is. When you are doing split toning, you are confined to two colors, whereas in Photoshop, you are not so constrained. Of course, that flexibility is a two-edged sword. It's like going to a restaurant that has a fifteen page menu. What do I want to eat?
May 29, 2019 15:41:45 #
gsmith051 wrote:
Very nice images. Especially like #1. Thanks
/George
/George
Thanks, much!