Ugly Hedgehog - Photography Forum
Home Active Topics Newest Pictures Search Login Register
Posts for: bobburk3
Page: <<prev 1 2 3 4 5 6 7 8 ... 35 next>>
Jun 14, 2023 08:34:06   #
AndyT wrote:
I had a Nikon D 7100 with Nikon's 18-140 lens. It was sharp, very versatile and not heavy. I regret selling both.


I love my D7200, which is very similar to your D7100. Thanks for your comments. I will take a look at the 18-140.
Go to
Jun 14, 2023 07:30:00   #
These are great shots of the planes in action.
Go to
Jun 13, 2023 20:37:57   #
CHG_CANON wrote:
Thanks. I don't have the updated / subscription software to make any specific updates. The concepts are consistent to Adobe software and others. PhotoShop has more Sharpening options beyond ideas presented here. Some day, I'll join the subscription and provide some updated ideas.


Thank you so much for your reply. I always enjoy your input to questions
Go to
Jun 13, 2023 19:37:42   #
CHG_CANON wrote:
When you import your RAW images into Adobe Lightroom, only the most basic level of sharpening and Noise Reduction are applied to your image. The exact same defaults are applied to all images, regardless of the camera type, lens model, ISO level, etc. Below are some examples of what to consider when adjusting these defaults.

Link to Adobe > https://helpx.adobe.com/lightroom-cc/how-to/sharpen-photos.html

The Adobe documentation is pretty bare bones. Below are some examples of the four Detail Sharpening sliders in action.

Lightroom Sharpening Defaults

Lightroom "Classic" now defaults to Sharpening amount = 40 rather than the older LR6 (and earlier) default was 25. Remember that no sharpen is performed in-camera on your RAW file (zero, nada, nil, zilch). Your RAW image should immediately look better with even the minimum +40 / +25 sharpening applied by the LR import. The other defaults for radius and detail are generally helpful, but never as much as you'll likely need for the specifics of your image. Worst of all, the most powerful tool in this section of LR, the Masking slider, defaults to 0.

Example 1 shows the 100% details of an image immediately after the LR import. Note the LR6 defaults: Amount = 25, Radius = 1.0, Detail = 25, Masking = 0

https://live.staticflickr.com/65535/48685980336_8e34754710_o.jpg

Sharpening is a technique for editing your digital image to make the fine details appear distinct.

Consider the fine hairs of the bee shown above in Example 1. This image is sharply focused on the nearest eye of the bee. You can distinctly see the individual hairs, particularly around the nearest eye, along the back and along the top edge of the head. The accuracy of the focus, the resolving power of the lens, and the pixel resolution of the digital sensor all came into play when the image was captured. In post processing, you can also adjust the contrast of the edges of the finest details making them appear more (or less) distinct. This is "sharpening". Your over-sharpened / "crunchy" image likely has the miscellaneous digital noise sharpened within the image along with the actual image details.

Explaining the Lightroom Classic Sharpening Detail sliders

Found in the Detail Panel of the Develop Module, these four sliders are available:

1) Amount

The Amount slider is simply the overall strength of the effect. At zero, no sharpening is applied to the image. The higher the number, the more overall sharpening you will see. At 150 (the right limit of the LR slider), the image will tend to be an ugly mess. Finding the "right" value is an interplay between the other three settings, as well as your use of the Noise Reduction settings. You'll need to develop your own personal preference for how your finished images should appear when viewed digitally and / or printed.

2) Radius

The Radius slider controls the size of the sharpening area around the edges of the details within the image. The default value of 1.0 means that LR will apply sharpening over 1 pixel around the edge. Lower values give you a thinner edge, while larger values give you a thicker edge. You should be sharpening the actual details of the image. Too large a radius will sharpen areas around the actual details, possibly increasing the digital noise or creating a 'halo' around the image details.

3) Detail

The Detail slider controls the relative sharpening of the fine versus coarse details (within a given radius value on the Radius slider). The Detail slider also affects the overall strength of sharpening. At 0, only the largest details within the image are sharpened, such as the nearest edge of the bee's wings. At Detail = 100, the finest details within the image are sharpened, such as the finest hairs around the eyes. At higher Detail settings, expect to see the digital noise within the image being sharpened along with the actual images details.

4) Masking

The Masking slider is the "secret sauce" of LR sharpening. Use your <ALT> key on Windows or <Option> key on MacOS to move the slider to the right until you've highlighted only the important details of the image, leaving the unimportant background with no additional sharpening, to better isolate and define the subject from the softer and less defined background.

Demonstrating the Lightroom Classic Sharpening Detail sliders

Example 2 - The Amount Slider

https://live.staticflickr.com/65535/48685638538_703f16990c_o.jpg

The first step in all sharpening work is to zoom to the 100% view of the image details. Adjust your view of the image to display the point of emphasis / subject of the image.

Press your ALT / Option key and move the Amount slider to the right to better "see" the details of the image as you adjust this slider. Example 2 has moved the slider too far to emphasize the effect. You'll likely find your own "right" amount somewhere between 50 and 100 for your RAW images. Your JPEGs were sharpened in the camera. They may benefit from more sharpening, but never to the amount needed for your RAW files.

Example 3 - The Radius Slider

https://live.staticflickr.com/65535/48686153462_7fd0ab9793_o.jpg

Press your ALT / Option key and move the Radius slider to the right to better "see" the details of the image as you adjust this slider. Example 3 has moved the slider too far to emphasize the effect. I've found the Radius slider is very dependent upon the camera being used. If you start at the left side (minimum 0.5) of the slider, as you move the slider to the right, you'll see a "grain" appear along with the image details. I've seen recommendations online for 1.5. Personally, I prefer the minimum 0.5, and up to maybe 0.8. Your specific camera may benefit from a higher value. Remember that the various sliders interact; come back and adjust / re-adjust the Radius slider as you fine-tune your image.

Within Example 3, note the halo developing along the edge of the bee's wing where the radius slider has been moved 'too wide' at setting 2.5.

Example 4 - The Detail Slider

https://live.staticflickr.com/65535/48685638638_8449167bdd_o.jpg

Again while pressing your ALT / Option key and moving the Detail slider to the right, you should better "see" the details of the image as you adjust this slider. Example 4 has moved the slider too far to emphasize the effect. Example 4 shows both the details of the fine hair being emphasized at Detail = 95. But note too, the noise / texture of the background is being sharpened. My adjustment to the Detail Slider tends to be between 0 and 20, and always less than 50.

Example 5 - The Masking Slider

https://live.staticflickr.com/65535/48685638688_35873d6a22_o.jpg

The Masking slider allows you to control where the sharpening effect is applied. With the slider set to 0, the sharpening effect is applied to the entire photo. As you press your ALT / Option key and move the Masking slider to the right, the effect will start sharpening areas with only strong edges. Example 5 shows the 'mask' at 68. I'm usually at 60 to 85, depending on the specifics of the image.

If you're experimenting with these sliders for the first time, cycle through the four sliders tweaking each one until you arrive at the desired amount for your test image.

Remember that Noise Reduction (NR) will soften the fine details in the image. If you have not yet adjusted the NR values, continue onto that work and return to Sharpening and see if you need to refine the Sharpening settings. When you reach a setting you like, make it a preset and test / apply to other images. Try images you've edited / sharpened in the past and compare the results. Display the image history and click between the before and after. Or, create a virtual copy and use the Compare window. Adjust your sharpening settings, as needed.

Example 6 - Details of finished image

https://live.staticflickr.com/65535/48685980296_5b34dc76fc_o.jpg

As discussed in Basics of noise processing, you should review and adjust the Noise Reduction defaults too. A lot of detail can come back into the image by simply adjusting the default Color NR setting applied during the RAW import.

SUMMARY

1. Look closely at any / all default values your tool applies to your RAW files.

2. Look for consistency of Sharpening values at unique ISO values (for each camera model and / or lens, if applicable)

3. Seek a consistent and efficient RAW workflow where you apply our own custom-developed Sharpening defaults to your images.
When you import your RAW images into Adobe Lightro... (show quote)


This is a fantastic discussion that I had not seen before. Since this was written a few years ago, is it still appropriate today, and are there any updates? I mainly use Photoshop for all my editing. Do the same principles and techniques apply to photoshop editing for sharpness with version 2023? I use Topaz Photo IA and it does help, but there is no doubt that after removing noise, the image is not as sharp, even if you add sharpening in the Topaz workflow.
Go to
Jun 13, 2023 18:45:16   #
David in Dallas wrote:
I have used the original VR version and the later VR2 version of this lens. They have been the only lenses on my D50, D7000, and D7100 cameras during my travels. It's a little heavy and awkward, but it does everything I want. It is possible to use the long 200mm setting at closest focus distance to sub for a macro lens (usually flower shots), too.
https://live.staticflickr.com/65535/43450251824_d92796ea32_o.jpgDSC_7391.jpg by David Casteel, on Flickr
https://live.staticflickr.com/2834/33932323881_82e8c05819_o.jpgDSC_3077.jpg by David Casteel, on Flickr
https://live.staticflickr.com/3954/33679726280_c8148a7384_o.jpgDSC_2121.jpg by David Casteel, on Flickr
I have used the original VR version and the later ... (show quote)


I like using my 70-200 for close ups of flowers and butterflies. I think it does a good job.
Go to
Jun 13, 2023 18:20:52   #
burkphoto wrote:
Hi, David. I used to use 'chrome films of all sorts, and printed Cibachromes here and there.

To print slides or 35mm negatives, they must first be scanned at very high resolution (3200 to 6400 dpi).

After color correction in post processing software (Lightroom or Photoshop...), the digital images are sent directly to the printer.

I used to know all sorts of conventional silver halide photo labs in the Charlotte area, and worked for one for decades, but most of them have sold out, merged, or gone belly up. Kenny Color in Charlotte is a top notch commercial custom lab my wife used for years. United Promotions Inc. is a high volume lab if you need lots of machine prints. I probably worked with a few of the people there when we were at another lab in Charlotte.

With the Internet at our fingers, we can choose from dozens of first rate nationally known pro labs. White House Custom Color, Bay Photo, Full Color, H&H, Millers/mPix, Adorama, Shutterfly, Dwayne's Photo, and The Darkroom are just a few of many fine labs out there. Google them all.

https://www.picturesalon.com/home is a gicleé inkjet printer used by many top photographers, artists, design and photography schools, and museums. https://www.nasheditions.com is another gicleé inkjet printer used by many top photographers, artists, design and photography schools, and museums.

'Gicleé is the term used by folks who do the finest inkjet printing available, to deflect fears about inkjet printing. It's not your silly office inkjet technology, but rather, it is advanced, archival, color-accurate, wide gamut printing on the finest papers, canvases, and other substrates available. The printers are made by Epson and Canon. If you want the best, find someone using these printers. If you need the very best scans, find someone with a drum scanner (Hasselblad Flextight scanner).
Hi, David. I used to use 'chrome films of all sort... (show quote)


What a great, detailed response. Thanks for taking the time to share your vast knowledge of the industry. I managed pro color labs for years so I appreciate you input.
Go to
Jun 13, 2023 18:15:12   #
aellman wrote:
nationsphoto.com is a terrific resource for prints from digital files. Exceptional quality and surprisingly reasonable prices. You'll need to call or email them to check on prints from slides. I kinda doubt it. You may end up using two labs, not one. Good luck! >Alan


Nations Photo are strictly digital through the internet. No slides. They are right around the corner from me but I still have to submit over the internet. Very good quality prints in a wide variety of sizes.
Go to
Jun 13, 2023 18:08:42   #
Dalbon wrote:
I shoot with the Nikon D-850 and was carrying around the 24-85 F2.8/ 4 Macro lens but have since purchased the Nikkor AF-S, 24-120mm, F4 lens as my walking around lens. So far I like it because it gives me a good wide angle but also it has a short zoom so it's working out fine. Of course a F 2-8 would have been great but I couldn't find one and then like you I just can't afford the high prices of a lens such as that.
Enjoy, David


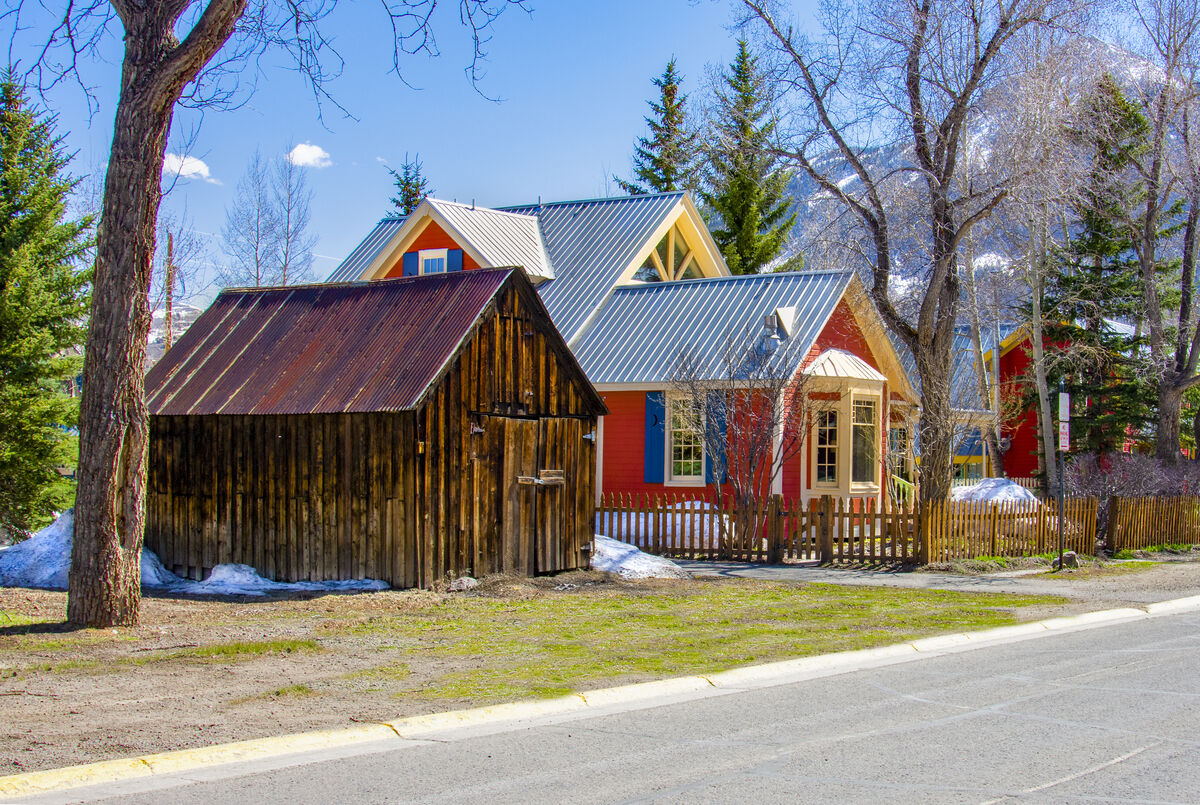
I have the AF-S Nikkor 24-85 1:3.5 4/5 G which I like and I use it for landscape shooting and family gathering. It is sharp, but not tack sharp. Maybe I just need to recalibrate it again. These two shots are edited in Photoshop to try to get the most out of them. Would the F2.8/ 4 lens be any sharper? These were taken in Crested Butte, CO in the middle of May this year. Amazing how much snow was still on the ground there.


(Download)


(Download)
Go to
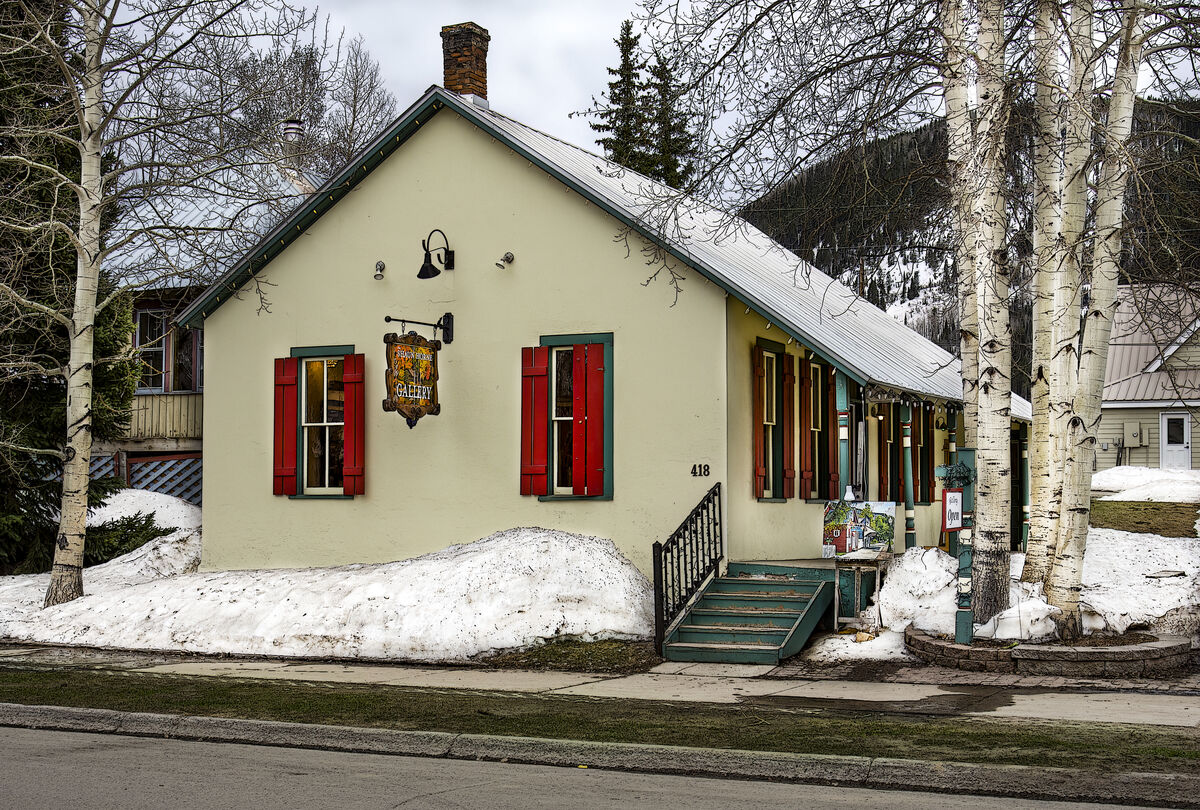
Jun 12, 2023 20:09:49   #
Lots of food for thought. Thank you everybody.
Go to
Jun 12, 2023 11:17:15   #
I'm looking for a good lens to use on my Nikon D7200 for general landscape and some sports. I have a AF-S Nikkor 70-200 1:4 G ED which I like for sports. But I find it too long for some of the landscape shooting I do and for team pictures. I'm thinking the Nikon AF-S NIKKOR 24-120mm f/4G ED VR Lens might be the perfect lens. I want distant objects to be sharp as well as fairly close objects. I want it to have VR. I prefer to buy used since I can't really afford to pay thousands of dollars for a lens that I use as a hobby. But I want sharp images. Any ideas?
Go to
Jun 11, 2023 13:20:47   #
The last one is the best, and unfortunately probably true. Except most politicians have never held a real job in their lives.
Go to
May 26, 2023 12:09:29   #
srg wrote:
You are so right.
That red rectangle bothers me too.


I appreciate your humor.
Go to
May 26, 2023 11:54:34   #
bcheary wrote:
Ask Admin to move it to photo's section.


How do I do that?
Go to
May 26, 2023 11:29:32   #
Gorgeous!!
Go to
May 26, 2023 11:27:54   #
Mac wrote:
That would be better posted in the Photo Gallery or the Landscape forum sections.


Thank you. I forgot about those two forums.
Go to
Page: <<prev 1 2 3 4 5 6 7 8 ... 35 next>>
UglyHedgehog.com - Forum
Copyright 2011-2024 Ugly Hedgehog, Inc.