Posts for: farmerjim
Dec 4, 2013 06:42:31 #
Christine105 wrote:
I am trying to get the 'ghost' that is hovering in the top right hand corner to hover rather than look like its plonked there.
I have tried gradient maps and masks and still not getting it.
Can anyone steer me in the right direction? Basically I am want the 'ghost' from the chest down to fade into the background as a smooth transition. Can it be done? He is on a separate layer to the background.
I have tried gradient maps and masks and still not getting it.
Can anyone steer me in the right direction? Basically I am want the 'ghost' from the chest down to fade into the background as a smooth transition. Can it be done? He is on a separate layer to the background.
Hi Christine, I'll try and guide you through the process! You don't say which program you're using but I'll assume it's one of the Adobe ones.(edit. Just seen your post saying you've got Elements and CC)
The Ghost is on a separate layer, good.
Go to the ghost layer and make it active, in edit go to free transform or CTRL+T
Now you have the layer in a box which you can move, enlarge, make smaller, warp or flip horizontally or vertically.
Put your ghost where you want him and apply the alterations (just hitting "enter" will do it).
Now you want to fade him from the bottom up. You need to give the ghost layer a mask.
In the layers palette, at the bottom you'll see little icons, 3rd from the left is a rectangle with a little round bit in it, This is the layer mask.
Click the layer mask icon and the layer mask will appear, (as if by magic!) in the layer as a white rectangle.
Click on the white layer mask. You can now change the ghost.
Go to the tools palette and click on the gradient tool, make sure it's black to white one. now with your mouse draw a line from the bottom of the ghost upwards and this will fade out the apparition. You may need a few tries to perfect it but just go back one step if you mess up.
good luck!
Quick example using layer mask

Nov 29, 2013 10:29:02 #
Glad to see other folk like the B&W approach:)
I straightened a bit and worked on the shadows and highlights then changed to B&W and used the green filter/channel mostly to emphasise the dark sea and white spray.
Sharpened and ran noise reduction.
Almost forgot, nice shot! You got that wave just right :thumbup:
I straightened a bit and worked on the shadows and highlights then changed to B&W and used the green filter/channel mostly to emphasise the dark sea and white spray.
Sharpened and ran noise reduction.
Almost forgot, nice shot! You got that wave just right :thumbup:

Nov 25, 2013 09:39:04 #
Hi Debbie, a quick way get the result you're after is to select the white/grey background and decrease the exposure i.e. make it brighter, Any bits still not right can be cloned.
This took about 5 mins in PS
Jim
This took about 5 mins in PS
Jim

Nov 21, 2013 09:43:57 #
GWR100 wrote:
Feet
smelly :)
Nov 20, 2013 08:14:10 #
busted_shutter wrote:
Family
Swiss
Nov 17, 2013 12:47:48 #
Tom DePuy wrote:
nope I meant ruder...."german for helm"
Ach, zo, ve hef ein problem. I vill hef to answer wiz zee word
Wheel
Nov 17, 2013 07:34:51 #
Tom DePuy wrote:
ruder
Ha ha Tom, think you meant "rudder" but I'll go with ruder and say
Cheekier
Nov 16, 2013 11:38:07 #
Wellhiem wrote:
Consistent
Steady
Nov 15, 2013 11:44:49 #
busted_shutter wrote:
(havta ask...lol...what's a tups?)
Sorry, tup is a word in the farming world for a ram. It's also a verb as in "tupping" ( the act of a ram or tup copulating with the ewe.)
Perhaps it's only a UK word.
Nov 15, 2013 06:49:51 #
busted_shutter wrote:
Tom Depuy wrote: ewes
rams
rams
Tups
Nov 14, 2013 05:40:09 #
It's always been the same throughout history. Battle-field situation, enemy down and badly hurt and dying, our men still on a rush dispatch the enemy (with the words "Shuffle off this mortal coil, you c#*t, it's nothing you wouldn't do to us.")
Only trouble is this time they're wearing helmet cams and get clocked months later.
Terrible verdict, at most should have been man-slaughter.
Only trouble is this time they're wearing helmet cams and get clocked months later.
Terrible verdict, at most should have been man-slaughter.
Nov 14, 2013 05:25:17 #
busted_shutter wrote:
Darkroom
Smell
Nov 10, 2013 07:33:47 #
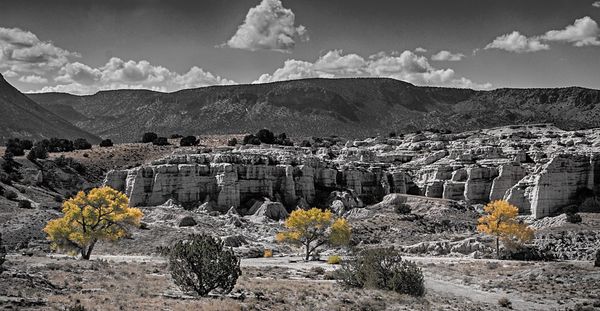
You could just try selecting the yellow trees and making a layer with that colour then turning rest of shot into b&w and blend the yellow trees back in.
This is a very hurried job:)
This is a very hurried job:)
Nov 9, 2013 07:50:59 #
busted_shutter wrote:
Elephant (I knew that...lol)
White
Nov 8, 2013 06:14:31 #
Nickfh wrote:
Has to be - Kentucky!
Fried chucken