Posts for: abc1234
Aug 27, 2013 05:51:24 #
If you are looking to buy paper, I have a lot that I no longer use. Would you want to buy it?
Aug 26, 2013 07:55:46 #
If you have to break this up, I would be interested in the tripod.
Aug 25, 2013 16:27:15 #
rmalarz wrote:
The Sharing Part. br br First off, in most lighti... (show quote)
I appreciate your response. From my standpoint, either picture would be ok with me. What does your program accomplish that the white balance tool does not? And, if I thought the original were too warm, why could I not adjust the color temperature, tint, vibrancy, or saturation to get a similar result?
Aug 25, 2013 16:23:26 #
Bugfan wrote:
photoninja1 ... you remind me of my high school da... (show quote)
Simpler solution: set the camera to auto white balance.
Aug 24, 2013 18:53:35 #
Rongnongno, I think I know that each manufacturer has its own idea of color balance. The Expodisc eliminates this.
Since you have not said that you meter the color temperature, I presume you are using a table. Please describe just exactly your point of reference. If you provide that information, then I think we could have a good discussion on the topic.
Since you have not said that you meter the color temperature, I presume you are using a table. Please describe just exactly your point of reference. If you provide that information, then I think we could have a good discussion on the topic.
Aug 24, 2013 18:44:23 #
rmalarz wrote:
Shooting in RAW has virtually eliminated my need t... (show quote)
1.) How does shooting raw eliminate worrying about color balance?
2.) When you adjust color balance in PS or any other program, do you adjust it to your recollection of the scene or to what looks good to you?
3.) How about showing us your mathematical approach to adjusting color balance?
Aug 24, 2013 08:48:28 #
Expodisc does come in different "flavors". Check that out on their website. The purpose of the ED is to set the white balance to capture that of the scene. Once you have that, you can change it in post-processing if you want to something other than the original scene.
For example, you might want a warmer look for a portrait or autumn scene. Just change the color temperature, tint, vibrance or saturation in the final picture.
PS I recommend shooting raw because you can always undo the edits and have the original back. With jpg's, you have to save a copy of your edits.
Aug 24, 2013 08:42:29 #
Rongnongno wrote:
Personally I set my camera with the kelvin scale depending on the time of the day and location. I find this much more precise than using the auto white balance or any white color balance option offered by the cameras.
When unconcerned (more often than not I simply use 5200k, slightly higher and warmer than the noon sun).
What do you do?
When unconcerned (more often than not I simply use 5200k, slightly higher and warmer than the noon sun).
What do you do?
That is no more than guess work. Color measurement is based upon a calibrated, standardized instrument. No way you can do that. If it has been "working" for you, you are lucky or not discerning.
While auto white balance is better, I suggest you use an Expodisc. By coincidence, today has another thread on it.
Aug 2, 2013 05:56:42 #
Jul 25, 2013 08:52:38 #
Plenty of references to the photographer.
http://en.wikipedia.org/wiki/Jessie_Tarbox_Beals
Could not date the photo.
http://en.wikipedia.org/wiki/Jessie_Tarbox_Beals
Could not date the photo.
Jul 25, 2013 08:23:43 #
I never use the built-in level. Not worth the bother and I prefer the regular viewer rather than the live one on my Canon 60D. If I need to shoot the picture level as for a panorama, I use a separate level that fits into the camera's hot shoe. If my picture has a horizontal or vertical reference line, then I align to that in post-processing. Takes less time than fussing in the field.
Jul 24, 2013 08:03:13 #
Taking the picture was just the beginning. She had to go back to her darkroom, develop the film, make a contact print, figure out what to burn in or hold back and then print again. And she probably toned the print when done, mounted it, framed it and put it up somewhere.
And I forget to mention she had to mix her own chemicals and with every new batch of raw materials, film or paper, she would have to recalibrate everything.
How many digital photos do you think you can turn out in this time?
And I forget to mention she had to mix her own chemicals and with every new batch of raw materials, film or paper, she would have to recalibrate everything.
How many digital photos do you think you can turn out in this time?
Jul 19, 2013 11:04:18 #
traveler90712 wrote:
Hate to do this, but I must ask;
Is this your picture?
If not, did you ask permission to use it and post it here?
Is this your picture?
If not, did you ask permission to use it and post it here?
Not my picture. The photographer did post it on the Internet and I do not have permission to use it. However, I do not think that is an issue in this case. Read the back story.
Jul 19, 2013 10:25:46 #
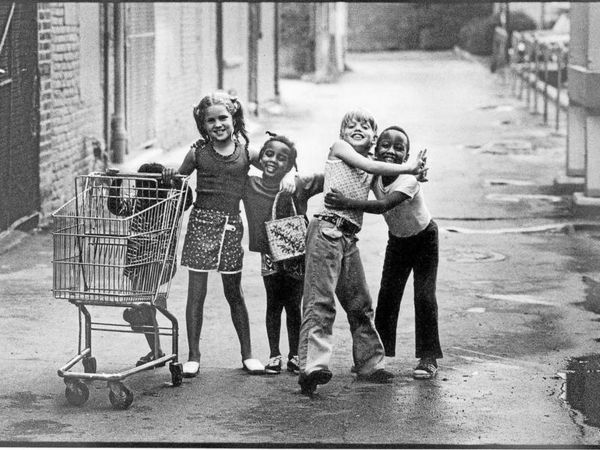
Check out this photo. My question is does this photo have any value despite the technical flaws?
Here is the back story: http://www.npr.org/blogs/codeswitch/2013/07/17/203016331/the-40-year-old-photo-that-gives-us-a-reason-to-smile
Here is the back story: http://www.npr.org/blogs/codeswitch/2013/07/17/203016331/the-40-year-old-photo-that-gives-us-a-reason-to-smile
Kids playing, 1973
Jun 15, 2013 13:11:52 #
I have not used LR5 yet so am not familiar with the radial filter. However, I use the vignetting a lot in LR4 and offer this as an alternative.
Comments anyone?
Comments anyone?