Posts for: georgevedwards
Jan 8, 2012 04:48:02 #
Is there a quick way to make CD's on the spot for doing a birthday party, etc. When dealing with someone far away and finishing a shoot, asking them to pay and trust you will send a CD later is asking a lot. So is sending one later and hoping they send a check. Is there a current procedure for handling this problem?
Jan 8, 2012 04:30:35 #
I am fascinated with the one closeup of Jasper, and the one with him and his handler where both faces are seen in detail and with expression, many of the other shots lose sight of Jasper's face. I know animals are unpredictable, but I think you should go in this direction more (but not exclusively, do the group shots too) but some good closeups of Jaspers face with subjects would be appreciated by all I am sure.
photogrl2 wrote:
donrent wrote:
lETS see some more pictures of Jasper.......
Dec 30, 2011 00:09:12 #
The cool light you put on the back of the head always makes the hair look that way, obviously it is the colored light not the hair; the shirt does not matter, it could be any color (like I said it was my first working at a portrait, I had made attempts to naturalize the face tones without deselecting the shirt, by shifting green to offset the bright reds in the face, which caused the shirt to turn green. Often in painting a portrait from a photo the original shirt color can be changed. Now you know how I did it, you can go back and change the shirt color by selection outline from the magic wand tool and neutralizing the color by making it black and white or adusting the color balance any way you want . The goal of main importance in a portrait would be to have the correct skin tone. What good is right shirt and hair color if the face looks deceased?). If the original was not so messed up it wouldn't have been an issue, at least he does not look like the creature from the orange lagoon any more. Not a bad trade off I would think.
GWMH wrote:
quote=georgevedwards I am a portrait painter by t... (show quote)
Dec 28, 2011 23:57:23 #
I am a portrait painter by trade as well as a photographer but I don't usually photograph people, so this is a first for me here too. I used a lot of layers, selecting the shirt and inversing to work on the face colors and tones with color sliders to remove some yellows and reds and burning and dodging on the face higlights and shadows. And a touch of clone to eliminate a stray hair just below the ear.
GWMH wrote:
I was asked by my friend to take a portrait for him. This is my first attempt at portrait photography, and I was wondering what your opinions are? Critique welcome, and I'm wearing a hard hat :)
Also, feel free to edit them any way you please.
Specs: tripod-mounted Nikon D3000, 18-200mm lens, two speedlights (one bounced off ceiling, the other used with a Stofen Omni-bounce.
both photos: 1/30sec. @ f/5.6 ISO 200 focal length 52mm
GWMH's little bro
Also, feel free to edit them any way you please.
Specs: tripod-mounted Nikon D3000, 18-200mm lens, two speedlights (one bounced off ceiling, the other used with a Stofen Omni-bounce.
both photos: 1/30sec. @ f/5.6 ISO 200 focal length 52mm
GWMH's little bro

Dec 28, 2011 23:12:17 #
And people who use P/P are Artists.
BigBear wrote:
Rachel,
My whole objective as a photographer is to get the best quality photo right out of my camera. I don't use photo editors because I don't have the time or the patience to make it into what it should have been in the first place.
I only use Aperture to manage all of the pics I have and maybe lighten a dark exposure.
I feel that is what defines a real photographer.
BigBear
Dec 24, 2011 23:12:59 #
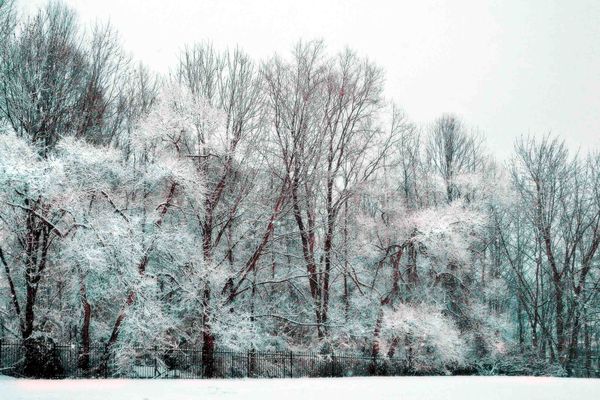
Here is a view out my back door, and using some of the post processing tips. No original overexposure. The idea was to capture that effect of snow outlining every branch, an effect that needs a certain kind of wet snow and no wind.
Then I tried the Faux Infra Red effect. Which one is best?
Then I tried the Faux Infra Red effect. Which one is best?

Dec 20, 2011 02:07:56 #
Beautiful photo! What is it? Give me some answers here, I am curious! 30 seconds with fireworks will just get you a mishmash of over exposed explosions. I have shot the fireworks every year for the past 10 years. Especially for the finale it was often over exposed. I think I left the aperture at 5.6 or wide open maybe, too long lost the dark quality. You must have used a 22 or so aperture...? I tried taking time exposures of the ocean at night and exposures approaching one minute and then a few minutes gave streaks to the stars, due to the rotational movement of the earth. There must be something special to your technique that I am unaware of.
T wrote:
George...30 seconds isn't long at all.
In the battle against the dark metals can turn to liquids and flame into feathers and hours into ice.
t
In the battle against the dark metals can turn to liquids and flame into feathers and hours into ice.
t
Dec 19, 2011 02:33:10 #
30 seconds is a long time! I take fireworks a lot, usually 2 0r 3 seconds is the max. See attached photo. Do you use a small aperture opening? Your photo looks great.
TheBirdMan wrote:
quote=Wright Any night photographers out there? ... (show quote)
"Three Pine Cones"

Dec 18, 2011 13:36:23 #
I will answer my own question but I still don't really understand it. Does it only apply to film? : [Density is a measure of how much light a negative transmits, or how much light a print reflects. It is a simple ratio, expressed as a logarithm.quote=georgevedwards]What does "raise the density" mean? Sounds important,I always have trouble with 'noise', that grainy quality, in my night photography.
T wrote:
[/quote]Good start!
If you can visualize the patterns that you are either creating or being given it's fun from that point on. A little photoshop to adjust the color balance the way you want it and to raise the density on long exposures...
Will be interesting to see how your snow shots work out. If we get snow. Or you do!
T
Dec 18, 2011 13:25:22 #
What a neat boat! I don't think I have seen anything like it here. The Chinese are forging ahead with new designs, while we are mired in conservatism.
PokerInsider wrote:
This was an accidental painting with light from the cabin of our cruise ship in Shanghai, China.
Dec 18, 2011 13:19:31 #
What does "raise the density" mean? Sounds important,I always have trouble with 'noise', that grainy quality, in my night photography.
T wrote:
Good start!
If you can visualize the patterns that you are either creating or being given it's fun from that point on. A little photoshop to adjust the color balance the way you want it and to raise the density on long exposures...
Will be interesting to see how your snow shots work out. If we get snow. Or you do!
T
Dec 17, 2011 14:02:13 #
You can. Here is an example of a blank white with darkened areas created with the burn tool in Photoshop set to "highlights", setting to midtones or shadows has no effect.
wyndjammr wrote:
I think (not totally sure, but I think) that you can't "burn" a pixel that has no color in it. If those pixels are totally white (R255:G255:B255) then burn won't change them. That's been my understanding of it. If I've got that wrong, I would welcome the correct interpretation!
Dec 13, 2011 19:36:01 #
I see in the 'fix' that the whites have all become a flat grey. You could 'paint' a burn in and have some variety in the tones, to give the look of 3 dimensions. I would open the original in Photoshop, click 'Layer' in the menu bar, then 'duplicate layer'. Select the 'burn' tool from the tools menu. It is the one with the hand, the 'dodge' tool is like a black magnifying glass. There should be an options bar now where you can choose brush size, range for shadows, midtones or highlights, and an exposure percentage. Choose a small brush size, choose higlights for range, and exposure percantage very low. I often use only 2 or 4 percent. this way you have very good control over how much each highlight is darkened, by how often you sweep the brush tool over it. This way not all the highlights will be darkened equally, you can 'paint' an implication of folds and curving around the neck by having some parts darker and some parts lighter and it won't have that cardboard cutout look. When you have finished, you can also control the transparency of the layer to let part or none of the original to show through, in order to fine tune your burned effect. This is a quick and easy way once you get the hang of it, I use it on practically every photo, great for altering tones in detailed areas. When you choose the highlight range it leaves alone the midranges and shadows. so you don't mess up the rest of the tones, it just changes tones within a small range, and within the area of the size of the brush. By keeping the percentage low you can make burns in almost imperceptible amounts and slowly build up areas that are darkened, this also helps eliminate brush line edges in the effect.
Adubin wrote:
Put your cursor over the white area of the exposur... (show quote)
Dec 4, 2011 15:55:51 #
After 5 pages of response and not one real example! Even the one online said it was "simulated"! The flower photo had the color removed to a black and white photo, then filtered to have some color.
Nov 30, 2011 05:48:05 #
Seems to imply that real photographers don't know or care about art and it is not necessary to photography. This seems to me a grave mistake. Laws of composition, color, tone, etc are purely visual and an artistic knowledge, even if it is intuitional is required for any good photograph, no matter how realistic. Photography with only great skill in camera technique is misguided. I do not distinguish between art and photography, they just use different mediums to achieve an image.
This sounds like the same old argument that occurs in the
"Art" world between realism and the more expressive schools of impressionism or abstraction, each accusing the other of not being "real art".
This sounds like the same old argument that occurs in the
"Art" world between realism and the more expressive schools of impressionism or abstraction, each accusing the other of not being "real art".
RowdyBlue wrote:
I totally agree with you, Kylemc99.
Kylemc99 wrote:
Photoshop is good when u want to be artistic. But for the most of us we prefer to capture everything on camera. Its about composition, lighting, and taking your time and getting everything right
I totally agree with you, Kylemc99.