Prop for taking pictures with crystal ball
Jan 15, 2019 12:33:27 #
Steve DeMott
Loc: St. Louis, Missouri (Oakville area)
KayakingUSA wrote:
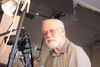
I have seen some pictures taken with a crystal ball so I decided to purchase one for myself.
Excellent Idea and well constructed. I'll have to try my hand at making this.
1 small change I would make. Add a Arca Swiss quick release. I bought a few from Amazon for a couple of other projects.
https://www.amazon.com/gp/product/B00KNPITI2/ref=ppx_yo_dt_b_asin_title_o04__o00_s00?ie=UTF8&psc=1
--Steve
Jan 15, 2019 12:46:56 #

steve DeMott wrote:
Excellent Idea and well constructed. I'll have to try my hand at making this.
1 small change I would make. Add a Arca Swiss quick release. I bought a few from Amazon for a couple of other projects.
https://www.amazon.com/gp/product/B00KNPITI2/ref=ppx_yo_dt_b_asin_title_o04__o00_s00?ie=UTF8&psc=1
--Steve
1 small change I would make. Add a Arca Swiss quick release. I bought a few from Amazon for a couple of other projects.
https://www.amazon.com/gp/product/B00KNPITI2/ref=ppx_yo_dt_b_asin_title_o04__o00_s00?ie=UTF8&psc=1
--Steve
There are lots of modifications that could be made I am sure. Some suggested a suction cup to hold the ball secure which I thought was a good idea. Mine is what you get when you use parts that you have on hand at the spur of the moment. Thanks for looking and you comment.
Jan 15, 2019 13:36:14 #

KayakingUSA wrote:
I have seen some pictures taken with a crystal bal... (show quote)
interesting. The view is very similar to that of a pinhole camera. I like it. I think you should continue to explore this technique with many different subjects.
Jan 15, 2019 13:51:12 #
aellman wrote:
interesting. The view is very similar to that of a pinhole camera. I like it. I think you should continue to explore this technique with many different subjects.
There is a real old oak tree at an old home place that I want to take a picture of and a sunrise at the beach. One important thing that you have to remember is NEVER point this thing directly at the sun. The magnification would fry the camera sensor in a split second. Even holding the ball in you hand will burn your hand if the sun hits it right.
Jan 15, 2019 13:51:58 #

Jan 15, 2019 14:10:45 #


Jan 15, 2019 15:20:09 #
Jan 15, 2019 15:29:21 #
DTCOP wrote:
do you have one for sale?
No, I am afraid not. Thanks for looking and you interest.
Jan 15, 2019 16:22:39 #

Thanks for the pictures and info. Also thanks for giving permission to make one from your design.
Jan 15, 2019 16:39:01 #
EdR wrote:
Thanks for the pictures and info. Also thanks for giving permission to make one from your design.
You are welcome. If you make one or need any help let me know
Jan 15, 2019 17:25:41 #
I made a quick and dirty fish eye lens for a point and shoot with a large, clear marble and some PVC pipe. The pipe was wider than the lens on the camera and just fit over it. Fittings held the marble at the closest point the camera would focus at.
Jan 15, 2019 17:38:55 #
Very, very cleverly done ... & appears you are a craftsman with wood as well. Nice job.
Jan 15, 2019 19:26:21 #
fbeaston wrote:
Very, very cleverly done ... & appears you are a craftsman with wood as well. Nice job.
Thanks for looking. I do my best.
Jan 15, 2019 19:28:20 #
hassighedgehog wrote:
I made a quick and dirty fish eye lens for a point and shoot with a large, clear marble and some PVC pipe. The pipe was wider than the lens on the camera and just fit over it. Fittings held the marble at the closest point the camera would focus at.
It is fun making things that would cost a fortune to buy. Thanks for looking.
Jan 15, 2019 21:44:19 #

KayakingUSA wrote:
I have seen some pictures taken with a crystal bal... (show quote)
========================
Now >>>---> This <---<<< - is Very CooL :-)
Great practical thinking.
I just might give your idea a go for one of my "Winter Projects".
Just finished rebuilding a B&J 5X7 view camera and Your idea is just up my alley.
Thank You - Good Sir - for the posting of this.
=0=
If you want to reply, then register here. Registration is free and your account is created instantly, so you can post right away.