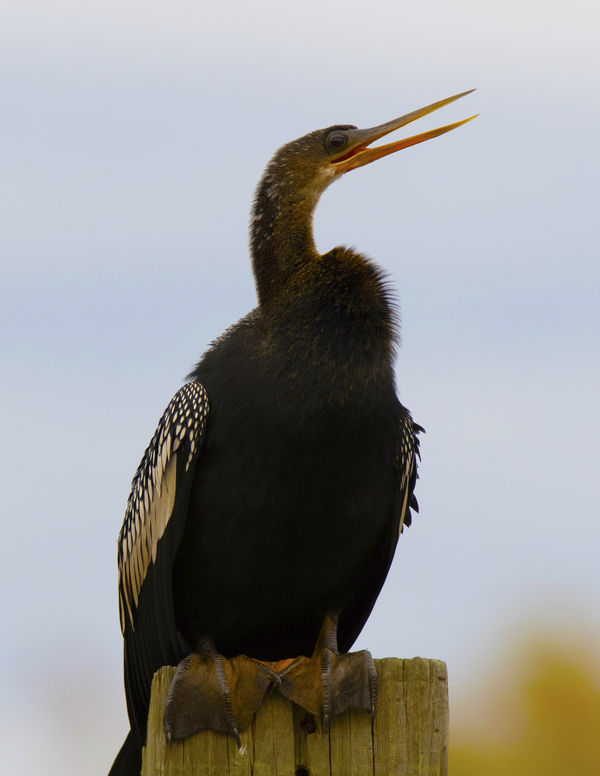
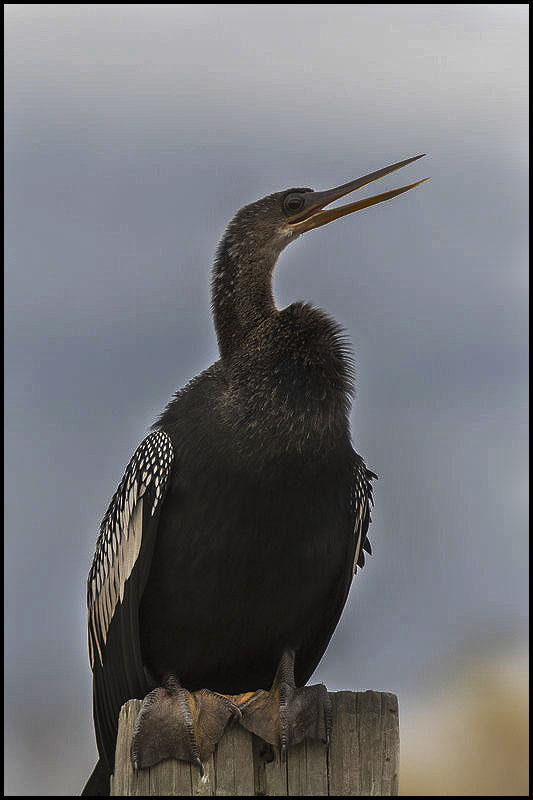
Dark Bird with a Cloudy Sky background
Nov 28, 2018 23:39:30 #
Strodav
Loc: Houston, Tx
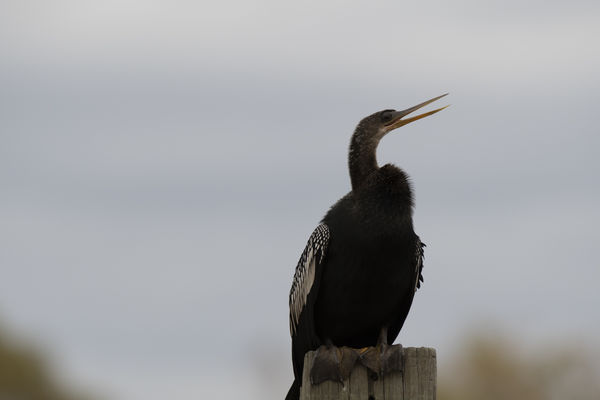
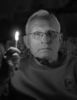
This is my 2nd post in this section and could use some help in these situations as I blow it every time (destroyed a poor little barn swallow on a fence picture - and he was so cute). The upper image is the original, the lower is my Lightroom Classic CC processed version: Nikon D500, Tamron 150-600mm f5-6.3, Tripod, Manual Mode, ISO 500, f6.3, 1/1000 sec, 400mm (600mm in 35mm equivalent), AF-C, Group mode, full metering. Need help with both camera settings and how to process. Thanks in advance.
Nov 29, 2018 01:49:56 #
I am a relative newbie and probably have no qualifications to answer you, but I will say what seems to work for me. We have lots of these days now, gray-white skies that make the bird appear almost as a silhouette. I rely on exposure compensation, that is, I overexpose in the + direction and view my photo to see if the bird is more detailed. If not enough, I increase it a bit more. By doing it, my sky becomes even whiter and I seem to remove any traces of blue. Don't know if there is a solution for this side effect. One warning is to set the exposure comp back to normal or you wind up really washing out subsequent photos taken in more normal lighting. Can't tell you how many times I have forgotten to do this!
By shooting in raw, I can salvage photos I formerly had to toss out--a big advantage I think.
By shooting in raw, I can salvage photos I formerly had to toss out--a big advantage I think.
Nov 29, 2018 07:38:10 #
Strodav wrote:
This is my 2nd post in this section and could use ... (show quote)
I think I would use a slower shutter speed like 1/500 then shoot at different apps. ( bracket). Shoot RAW more choices and much easier to edit.
Attached is and edit in CS6
Nov 29, 2018 08:20:37 #
Based on the histogram, your image is under exposed by about 1.5 stops. Next time, when you give it more exposure, check you blinkies in the field to confirm you have not blown out the sky. With the histogram moved to the right, you will better luck in post to recover the values. You actually can do quite a bit with this image as well in Photoshop. Bringing up the values on the bird while masking the background. However because the original image is under exposed, the image quality will suffer as you make major adjustments. Remember, the general rule of exposure is to push the histogram as far to the right as possible without butting up to the right side. There are always exceptions of coarse.
Nov 29, 2018 08:47:19 #

If you use the sky for the xposure the bird is a silhouette if use exposure on the bird the sky washes out find a balance between the two and compare
J
J
Nov 29, 2018 09:43:12 #

Strodav wrote:
This is my 2nd post in this section and could use ... (show quote)
As Katy mentioned above, and you are NOT shooting in fully manual, you should move the exposure comp to the plus side 1.5 stops ( I use center weighted metering). In seemingly constant light situations similar to this, I prefer to shoot fully manual with a middle incident light exposure - then it will matter less as to the brightness of the back round. From this incident light exposure I will then make slight adjustments for either a white bird (less exposure) or a dark bird (more exposure).
I only ever shoot JPEG and have all the in camera settings in the neutral position with the D-range optimizer turned on. This gives me the best chance to recover shadows if need be.
..
Nov 29, 2018 10:16:51 #
You can use Exposure Compensation or you could go to Spot Metering and meter for the bird. If I have a single subject, like this, I would use Spot Metering. When there are multiple areas then exposure compensation.
I use Photoshop so would sharpen the shot a bit.
As far as camera settings I think you did things right in my mind, it could just be you're at the limit of your equipment.
I use Photoshop so would sharpen the shot a bit.
As far as camera settings I think you did things right in my mind, it could just be you're at the limit of your equipment.
Nov 29, 2018 10:35:57 #

We are all different so there will be different opinions on what to do under a situation like that. I depend on spot metering and the manual mode for these images since the bird is the most important part of the subject. Useless to say that minus compensation is required for a correct exposure.
The chances are excellent that the sky will be slightly overexposed using this technique. If I use Affinity Photo I use a feature called Haze Removal that brings details in the sky. If using Photoshop I burn-in the sky to taste.
A Curves adjustment adjusts the tonalities.
The chances are excellent that the sky will be slightly overexposed using this technique. If I use Affinity Photo I use a feature called Haze Removal that brings details in the sky. If using Photoshop I burn-in the sky to taste.
A Curves adjustment adjusts the tonalities.
Nov 29, 2018 14:05:12 #
Nov 29, 2018 14:06:27 #
Don't be too hard on yourself. There's a lot of good work in this photo. As one reply pointed out, it's a little under exposed. I've had that same problem photographing birds because they often have sky or water reflections behind them which pushes the metered exposure down. I've started using exposure compensation on a regular basis and it has really helped. As for framing the subject, you have plenty of headroom above the bird's head. If you had framed a bit lower you would not have cut off the bird's tail, which I think would have made a better shot. It's just a tad less than tack sharp...a problem I have as well, especially when shooting at a distance from the subject. Practice, practice, practice...get a firm stance, press the eyepiece firmly to the forehead to make that an anchor point, etc. Keep taking pictures and experiment. Share with us as we enjoy seeing others' work. Thanks.
jak
jak
Nov 29, 2018 15:29:57 #
Nov 29, 2018 15:33:01 #
Strodav
Loc: Houston, Tx
jak86094 wrote:
Don't be too hard on yourself. There's a lot of g... (show quote)
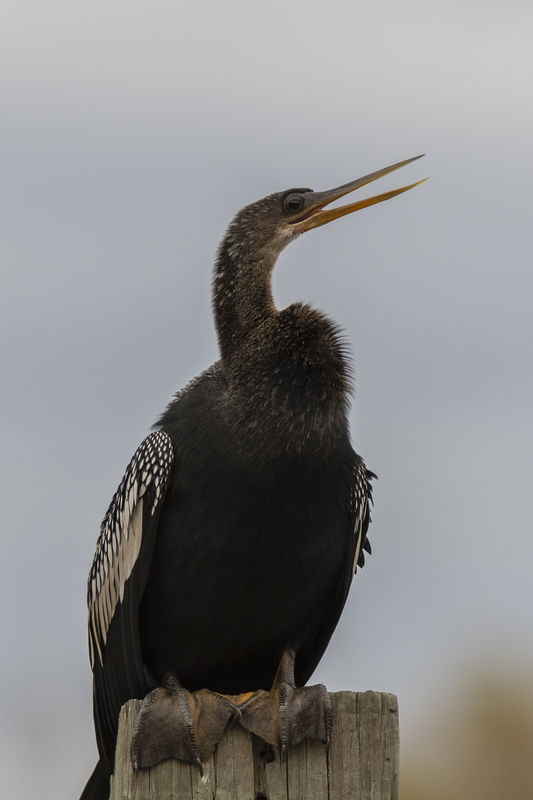
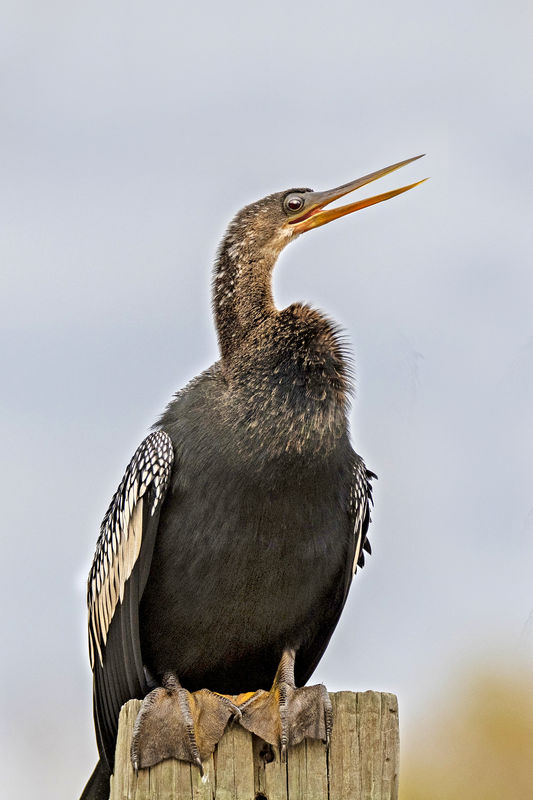
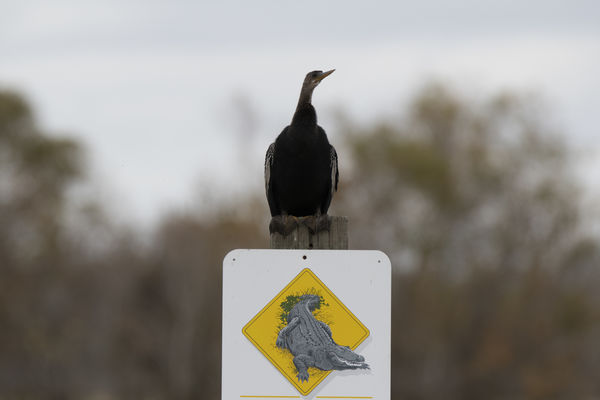
Thank you for the encouragement. Here's the reason for the crop.
Nov 29, 2018 15:56:59 #
Strodav wrote:
Thank you for the encouragement. Here's the reason for the crop.
I wondered if that might be the case. Makes perfect sense. Some of what you’re dealing with, which applies to many of my shots, is the amount of cropping needed, which will enlarge everything and reduce apparent resolution. When I can get close enough to my subjects, especially one as large as this, you get a much better sense of your ability and your camera’s and lenses’ capabilities. Like I said, practice, practice, practice! Take care, and enjoy your photo time. jak
Nov 29, 2018 16:27:28 #
Strodav wrote:
Amazing. Can you share your secrets?
There is nothing secret about it. I copied your downloaded image into Photoshop (I use CS-5) and went right to the 'shadows/highlights' section and brought out detail in the shadows. Then I adjusted the highlights slider until I got a nice blue sky. I then went into the 'dodge/burn' section and chose to dodge all the parts of the bird which I wanted to brighten. The very top of the photo showed a distracting white band of cloud so I just used the rubber stamp tool and cloned the blue part and put it over the white part until it was even enough. A little brightening and contrast was next followed by a little sharpening and...tada!
Nov 29, 2018 16:51:19 #
Strodav
Loc: Houston, Tx
Geegee wrote:
There is nothing secret about it. I copied your d... (show quote)
Thank you and great work. Between remembering to add +1 or +2 steps in exposure when shooting dark birds (critters) against a light background and the post processing steps you have shared, I think I should be able to rescue these types of shots going forward.
If you want to reply, then register here. Registration is free and your account is created instantly, so you can post right away.