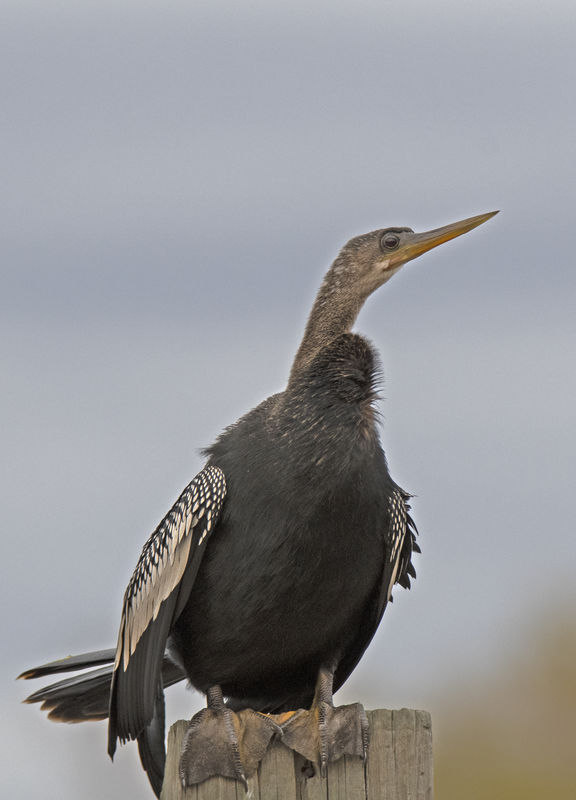
Dark Bird with a Cloudy Sky background
Nov 29, 2018 21:55:26 #
Strodav
Loc: Houston, Tx
Geegee wrote:
There is nothing secret about it. I copied your d... (show quote)
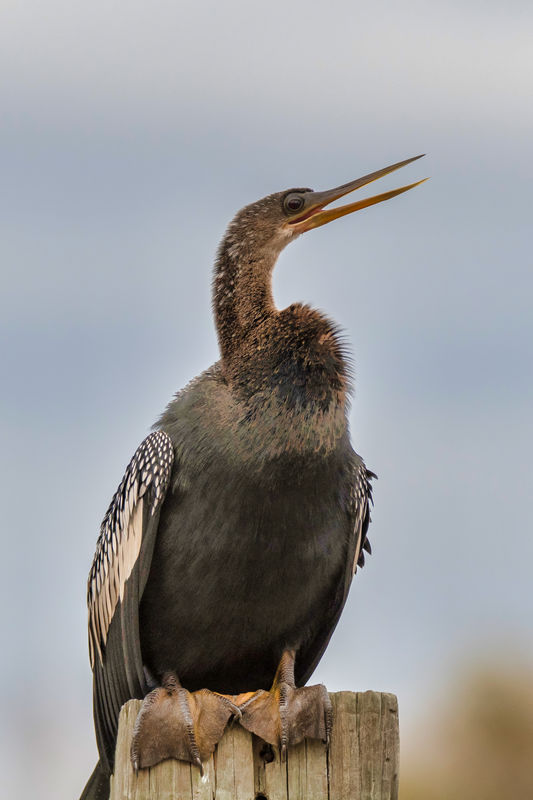
Followed you process and this is the best I could do. I ended up masking the entire bird to pull out the detail in the belly and sharpen, but did not get the same results you got on the neck and beak. It's much better than my first attempt, but not quite up to your abilities.
Nov 30, 2018 05:25:19 #
Opened in Camera Raw and adjusted then into Photoshop and Soft Light blend mode at 14%. Loads more can be done but this was quick and dirty adjustment. Jpegs will open in Camera Raw but different method for different versions of PS. Google is your friend here.
Nov 30, 2018 09:09:07 #
Strodav wrote:
Followed you process and this is the best I could do. I ended up masking the entire bird to pull out the detail in the belly and sharpen, but did not get the same results you got on the neck and beak. It's much better than my first attempt, but not quite up to your abilities.
You have to use the dodge tool more. Make your brush quite small for the beak, specify to make the highlights brighter, choose an intensity which is not too high and just go over the beak, eye, light parts of the feathers etc. until it looks good.
The dodge tool is one of my best friends.
Nov 30, 2018 09:09:15 #

canadaboy wrote:
Opened in Camera Raw and adjusted then into Photoshop and Soft Light blend mode at 14%. Loads more can be done but this was quick and dirty adjustment. Jpegs will open in Camera Raw but different method for different versions of PS. Google is your friend here.
Noisy, but impressive ....!
Nov 30, 2018 09:14:57 #
imagemeister wrote:
Noisy, but impressive ....!
Hey, when you are trying to make a silk purse out of a cow's ear it will usually be at the expense of a little noise. Just stand back a little further and you won't see it.
By the way, there is one more thing that I did. The eye looked quite bland so I used an extremely small brush and cloned a spec off one of the white feathers and placed it in the eye as a catchlight.
Nov 30, 2018 09:18:58 #
Geegee wrote:
Hey, when you are trying to make a silk purse out of a cow's ear it will usually be at the expense of a little noise. Just stand back a little further and you won't see it.
By the way, there is one more thing that I did. The eye looked quite bland so I used an extremely small brush and cloned a spec off one of the white feathers and placed it in the eye as a catchlight.
By the way, there is one more thing that I did. The eye looked quite bland so I used an extremely small brush and cloned a spec off one of the white feathers and placed it in the eye as a catchlight.

Nov 30, 2018 11:30:14 #
Strodav
Loc: Houston, Tx
Geegee wrote:
You have to use the dodge tool more. Make your brush quite small for the beak, specify to make the highlights brighter, choose an intensity which is not too high and just go over the beak, eye, light parts of the feathers etc. until it looks good.
The dodge tool is one of my best friends.
The dodge tool is one of my best friends.
Thanks, I'll give it a try.
Nov 30, 2018 11:36:44 #
Strodav
Loc: Houston, Tx
canadaboy wrote:
Opened in Camera Raw and adjusted then into Photoshop and Soft Light blend mode at 14%. Loads more can be done but this was quick and dirty adjustment. Jpegs will open in Camera Raw but different method for different versions of PS. Google is your friend here.
Nice work and I will look at the Soft Light Blend mode. BTW the original was in raw. My mistake was letting LR Classic CC convert it to jpg for the original post.
Dec 1, 2018 03:38:23 #
Strodav wrote:
Nice work and I will look at the Soft Light Blend mode. BTW the original was in raw. My mistake was letting LR Classic CC convert it to jpg for the original post.
I would say the mistake was using LR for anything other than cataloging. It has no layers no blend modes no access to channels etc etc. Whether Raw or Jpegs open in Camera Raw and use the tools available before going into Photoshop to perform the finale. PS is not so user friendly but once you master it you will not look back.
Dec 1, 2018 03:46:19 #
Strodav wrote:
Nice work and I will look at the Soft Light Blend mode. BTW the original was in raw. My mistake was letting LR Classic CC convert it to jpg for the original post.
Double Post
Dec 1, 2018 10:29:20 #
Strodav
Loc: Houston, Tx
canadaboy wrote:
I would say the mistake was using LR for anything other than cataloging. It has no layers no blend modes no access to channels etc etc. Whether Raw or Jpegs open in Camera Raw and use the tools available before going into Photoshop to perform the finale. PS is not so user friendly but once you master it you will not look back.
Started in photography with film cameras, developed my own negatives and slide film and had a full darkroom. Because of the expense of every shot including the time to develop, make contact prints, then print. I did my best to get the shot right in the camera as "PP" in the darkroom was not trivial. I guess I'm still tied to that practice.
Dec 1, 2018 10:43:25 #
Strodav wrote:
Started in photography with film cameras, developed my own negatives and slide film and had a full darkroom. Because of the expense of every shot including the time to develop, make contact prints, then print. I did my best to get the shot right in the camera as "PP" in the darkroom was not trivial. I guess I'm still tied to that practice.
Dec 3, 2018 17:30:29 #
Dec 23, 2018 09:48:01 #
After a while you will get to an automatic mode where it will be obvious to you that the dark and light areas will be a problem. I too as mentioned with use the + or - exposure compensation to get the picture a bit better. A friend of mine keeps his playback screen in blinky mode to indicate when his highlight are blown out so he can compensate to try and get it under control. This picture he is to me is only about one stop underexposed and then the Post production work should fix the dark areas.
On your picture I have a quick fix program, Photolemur, that I sometimes use. I never know how it will come out but when all else fails I will give it a try. I used it here and then took it into photoshop, opened up the shadows and whites bit more using a selective mask. I loved the color in the web feet and made sure the adjustments wouldn't affect them. I then flattened the image and opened camera raw and moved the Noise Reduction Luminance slider over about 30 and then the Masking slider over about 20. This cleaned up some of the noise.
Because of all the feathers, download the download file to your computer then open in Photoshop to see more clearly.
Dec 23, 2018 11:24:24 #
If you want to reply, then register here. Registration is free and your account is created instantly, so you can post right away.