I'm trying to salvage this image.
Oct 10, 2018 14:52:27 #

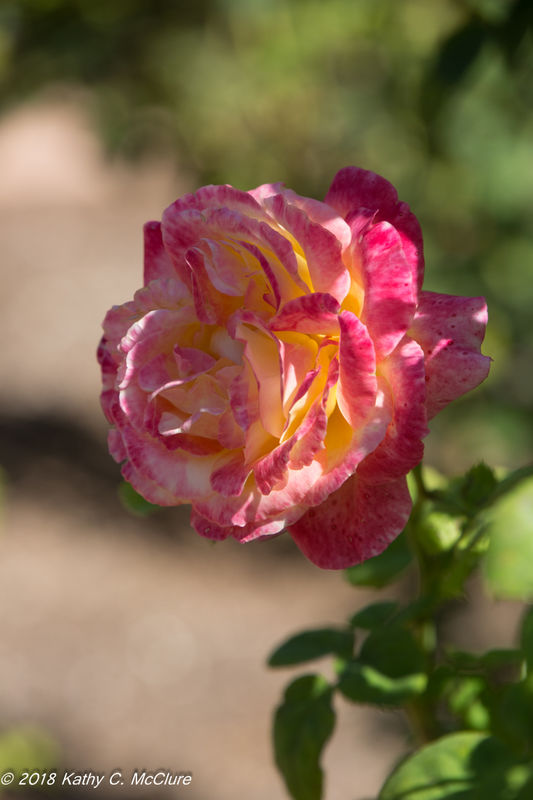
I found this beautiful rose blooming nicely. However, there was nowhere I could go to actually get a "right" perspective on it. The one I got has sunlit path to the left and bright greenery to the right. I feel it both overpower the flower.
So, I worked on it. I applied my normal LR stuff (clarity, highlights and blacks down), then went to PS and used NIK's detail enhancer (sort of sorry I did that, I think), then back to LR and applied the graduated neutral density filter from the bottom left upward to the flower.
So did this work sufficiently? Or should I do something else? If you want me to post the original, I can do that.

Oct 10, 2018 15:06:32 #

De-saturating the yellow on the leaves and background could help reduce its overpowering presence. And I agree that Detail Extractor probably wasn't your friend, unless you use the control points (within the Nik page) to keep it away from everything but the blossom.
Kathy, of course we want you to post the original to play with!
Kathy, of course we want you to post the original to play with!
Oct 10, 2018 15:14:10 #
Linda From Maine wrote:
Reducing the yellow just on the leaves and background could help reduce its overpowering presence. And I agree that Detail Extractor probably wasn't your friend, unless you use the control points (within the Nik page) to keep it away from everything but the blossom.
Kathy, of course we want you to post the original to play with!
Kathy, of course we want you to post the original to play with!
Will do when I get back to the computer.
Ok, I'll admit ignorance. How do I take the yellow down without effecting the flower?
Oct 10, 2018 15:15:31 #
AzPicLady wrote:
I use layers and layer masks in PS Elements. What options do you have for selective edits with LR? Maybe this:Ok, I'll admit ignorance. How do I take the yellow down without effecting the flower?
https://helpx.adobe.com/lightroom-cc/how-to/edit-part-photo-lightroom-cc.html
.
Oct 10, 2018 15:23:46 #

You've done a great job. Nothing about the rose needs additional work for me. When viewed full-screen, I'd push a bit future by taking away the light green sections along the left margin, maybe by pulling in the crop slightly. Or, cloning away the green in the lower left corner, the upper left corner and just below the dark line exiting the frame on the left across from the rose.
Oct 10, 2018 16:34:38 #
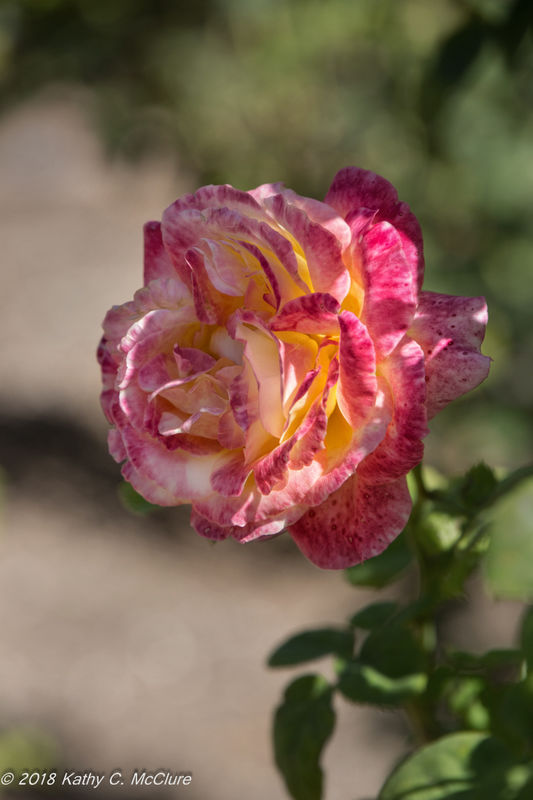
OK, Linda, (and whoever else). Here's the original. I took the original raw file and converted it to jpg. So it's as close to the original as I can get it.
Oct 10, 2018 16:54:08 #
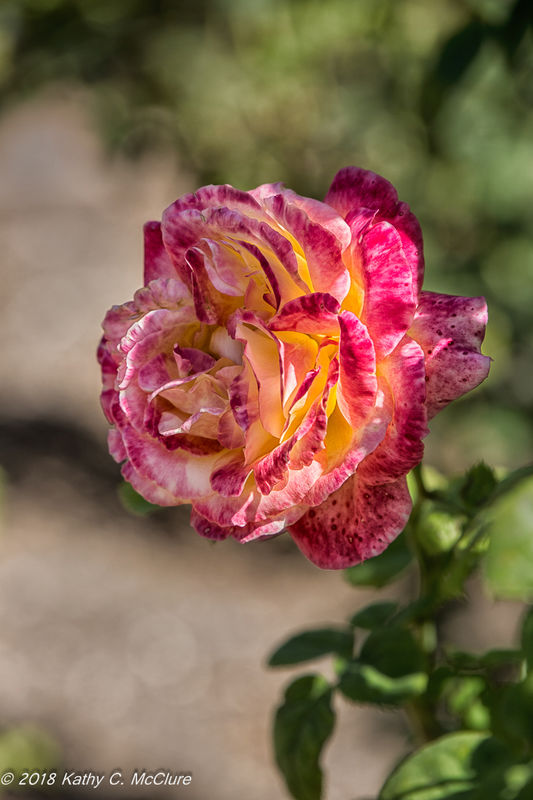
Going with your early comment about feeling that the background overpowered the flower (color, brightness, details), I took it into Nik first and applied the Detail Extractor filter, using intensity of 60% (that's about halfway between first and second pre-sets). I tried to use the control points to keep the filter from everything but the bloom, but I guess I've forgotten how to do that, lol.
So I resorted to my layer masks. Then I did an overall saturation reduction, rather than just a single color, again masking from the bloom.
I did selective burning of a few small areas of background so the bright spots wouldn't draw our eye.
The rest is personal taste: more clarity, saturation, contrast, brightness, clone out the black horizontal line to left of flower?

Oct 10, 2018 16:59:37 #
Linda From Maine wrote:
I took it into Nik first and applied the Detail Ex... (show quote)
WOW! I like the flower in mine and the background in yours. Now I have to figure out how to merge the two! I'm trying to work with masks, but they never seem to work. Erasing is quite inexact, although after all the drawings I did, I'm getting better.
Oct 10, 2018 17:01:14 #
AzPicLady wrote:
For edges, use smaller brush and zoom way in. You can be as "exact" as your patience allows ... Erasing is quite inexact...

Oct 10, 2018 17:07:21 #
Merging yours and mine. My part is at 70% opacity because there was too much disconnect between your edits and mine, otherwise. In PS Elements, I can just drag one image onto the other (make sure same width and height first), which creates a second layer. Since I put mine on top of yours, I just used a layer mask to reveal your beautiful bloom underneath
.
.

Oct 10, 2018 17:08:15 #
Linda From Maine wrote:
I use layers and layer masks in PS Elements. What options do you have for selective edits with LR? Maybe this:
https://helpx.adobe.com/lightroom-cc/how-to/edit-part-photo-lightroom-cc.html
.
https://helpx.adobe.com/lightroom-cc/how-to/edit-part-photo-lightroom-cc.html
.
That's a good video. Unfortunately, I don't think that's possible in my LR, but I'll check. Thanks.
Oct 10, 2018 17:10:52 #
CHG_CANON wrote:
You've done a great job. Nothing about the rose needs additional work for me. When viewed full-screen, I'd push a bit future by taking away the light green sections along the left margin, maybe by pulling in the crop slightly. Or, cloning away the green in the lower left corner, the upper left corner and just below the dark line exiting the frame on the left across from the rose.
I hadn't cropped this at all, so I'll see what I can do via cropping. At least that's an easy thing to do! I was more concerned with the path that was below the rose as I shot it, as it was fully sunlit and light. If it were all green stuff that needed adjustment, I could do that with the green slider. But there's no "beige" slider!
Thanks so much for you input.
Oct 10, 2018 17:12:56 #
Linda From Maine wrote:
For edges, use smaller brush and zoom way in. You can be as "exact" as your patience allows
Ah ha! You've hit the nail on the head. I have NO patience for this kind of work! But I'm trying.
Oct 10, 2018 17:14:36 #
Linda From Maine wrote:
Merging yours and mine. My part is at 70% opacity because there was too much disconnect between your edits and mine, otherwise. In PS Elements, I can just drag one image onto the other (make sure same width and height first), which creates a second layer. Since I put mine on top of yours, I just used a layer mask to reveal your beautiful bloom underneath
.
.
Now that I like. It makes the flower the star. THANKS.
Oct 10, 2018 17:15:02 #
AzPicLady wrote:
I enjoyed it a lot, thank you Kathy.Now that I like. It makes the flower the star. THANKS.
If you want to reply, then register here. Registration is free and your account is created instantly, so you can post right away.