New here as well first post with new camera.
Apr 10, 2018 09:30:05 #
catterar wrote:
Here is a lesson plan I wrote up after attending a... (show quote)
A very good summary, and should be useful by the op, and others here. Allow me to add a few more things that are good to know. P mode vs full auto: In full auto mode the camera will fire the flash if it senses insufficient light. That's good, except in situations where flash is not allowed. Putting the camera in "P" mode will allow you to control that with the shooter turning on, or off the flash as needed. And depending on the particular camera "P" mode may allow you to make some other changes besides ISO. And a note about DOF (depth of field): You mentioned the f/stop has control of that by virtue of different aperture settings. That's true, however, there are other factors that influence DOF. Closeness to the subject, whether physically, or by use of a longer lens or zoom setting will also effect DOF. Lens choice will also be a factor. Wide angle lenses inherently have deeper DOF than long lenses, and lastly, the sensor size also plays a role in DOF.
Apr 10, 2018 10:20:19 #

Welcome aboard, Dennis. For your 1st. DSLR, you certainly hit a home run with your selection. Good luck and many enjoyable years with your new camera.
Apr 10, 2018 10:23:43 #
Apr 10, 2018 10:36:56 #
Hi Dennis, Welcome.
The 18-140 is a very versatile and useful lens. My camera sits in the bag with the 18-140 in place. Others are there but that one is first choice.
Each of the controls on the camera have a specific purpose and you can learn them one at a time if you like. I found that the camera was just a tool for me so I focused on the photo I wanted to capture then determined what control setting would take the photo.
Apr 10, 2018 10:37:58 #
Apr 10, 2018 11:43:28 #
Picture Taker
Loc: Michigan Thumb
Hi Dennis. I'm in the thumb and we have a mentoring club at Seven Ponds Nature Center in Dryden. I know you live way south of us but you are welcome to come up and check the club out. We have members as far away as you now. The club has from point and shoot to pros (a National Geo. and a finalist in the US Nature Photographer of the year) No one care we all help each other. We meet the 1st and 3rd Friday of the month a 7:00PM come check us out. PS we are expensive, if you join it will cost you Ten Bucks for a year.
Apr 10, 2018 13:01:42 #
Wow I'm not sure I can commit to such an extravagant club being that it's such a high membership fee and all. Lol! I will try to look you guys up this summer when I'm up that way. Thanks for the info!
Dennis,
Dennis,
Apr 10, 2018 13:03:57 #
Picture Taker
Loc: Michigan Thumb
Pull us up on the web. We are always setting up trips. Just show up.
Apr 10, 2018 13:10:51 #
Apr 10, 2018 14:45:09 #
dswoff01 wrote:
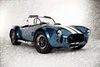
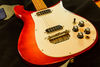
Hello, My name is Dennis Swoffer and I have been photographing with my phone and a P&S for quite a while now. I wanted to get a little more serious about photography so I figured that I would purchase a better camera and actually learn more about what i'm doing. So to get better at this I purchased a new Nikon D7500 with a 18-140 lens. Here is my first photo that I took with it let me know what you think; I had the camera in Aperture priority mode and ISO set to 100.
HMMMPH!!!!!
Louis Vuitton bag, and you didn't buy a D850. We know who writes the checks in your house!
Apr 10, 2018 14:47:39 #
Apr 10, 2018 15:52:55 #
Welcome - Looks sharp, colors are good, slightly under exposed. I'm guessing your aperture was f4 or 5???. Keep shooting and posting. When asking for opinion include all your setting info. (ISO, shutter speed & f-stop) helps the members critique better.
dswoff01 wrote:
Hello, My name is Dennis Swoffer and I have been photographing with my phone and a P&S for quite a while now. I wanted to get a little more serious about photography so I figured that I would purchase a better camera and actually learn more about what i'm doing. So to get better at this I purchased a new Nikon D7500 with a 18-140 lens. Here is my first photo that I took with it let me know what you think; I had the camera in Aperture priority mode and ISO set to 100.
Apr 10, 2018 16:03:25 #
That's funny! That was my 20th anniversary gift to her ant the camera was mine! Both were about the same and I got a bag with my camera too. I told her that I got the better deal.
Apr 10, 2018 16:04:21 #
The guy that sold it to me said it was a great place to start.
Thanks!
Thanks!
Apr 10, 2018 16:06:21 #
Thanks! I've had a few tell me that the person that sold me on it did me right. I was also looking at a smaller model but I didn't like the weight distribution on it.
Thanks!
Thanks!
If you want to reply, then register here. Registration is free and your account is created instantly, so you can post right away.