New here as well first post with new camera.
Apr 9, 2018 10:21:26 #
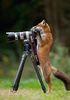
Hello, My name is Dennis Swoffer and I have been photographing with my phone and a P&S for quite a while now. I wanted to get a little more serious about photography so I figured that I would purchase a better camera and actually learn more about what i'm doing. So to get better at this I purchased a new Nikon D7500 with a 18-140 lens. Here is my first photo that I took with it let me know what you think; I had the camera in Aperture priority mode and ISO set to 100.

Apr 9, 2018 10:44:21 #

Hi Dennis, good luck with your new gear. So you said you put the camera in aperture priority which will allow you to choose the aperture...so what setting did you choose for your shot here?
Apr 9, 2018 10:48:17 #

Looks like a good start, Dennis. Welcome to UHH.
--Bob
--Bob
dswoff01 wrote:
Hello, My name is Dennis Swoffer and I have been photographing with my phone and a P&S for quite a while now. I wanted to get a little more serious about photography so I figured that I would purchase a better camera and actually learn more about what i'm doing. So to get better at this I purchased a new Nikon D7500 with a 18-140 lens. Here is my first photo that I took with it let me know what you think; I had the camera in Aperture priority mode and ISO set to 100.
Apr 9, 2018 10:50:27 #
I put the Aperture at f5.4 because that is what was listed on he lens, but after I figure out how that works I'm guessing that I can change it up a bit. I played with the ISO on this but I thought that this was the best one.
Apr 9, 2018 11:23:17 #
dswoff01 wrote:
I put the Aperture at f5.4 because that is what was listed on he lens, but after I figure out how that works I'm guessing that I can change it up a bit. I played with the ISO on this but I thought that this was the best one.
OK, good, now what you want to do is learn why you might want to change your aperture for different shooting opportunities. The obvious is how much light you're bringing into the sensor, but different aperture settings can do more than just that. You may soon find out that your lens indicates f/3.5 as your widest setting, but it may not always be available for you at the different zoom (focal lengths) settings. But. I am pleased to see you starting with your new camera in a more creative mode instead of full auto, and I commend you for that!
Apr 9, 2018 11:25:06 #
Apr 9, 2018 12:34:38 #
dswoff01 wrote:
Hello, My name is Dennis Swoffer and I have been photographing with my phone and a P&S for quite a while now. I wanted to get a little more serious about photography so I figured that I would purchase a better camera and actually learn more about what i'm doing. So to get better at this I purchased a new Nikon D7500 with a 18-140 lens. Here is my first photo that I took with it let me know what you think; I had the camera in Aperture priority mode and ISO set to 100.
Great start.
Apr 9, 2018 14:08:24 #

Apr 9, 2018 15:45:41 #

Apr 9, 2018 18:14:32 #

Welcome! Looking forward to your posts and pictures. Happy shooting!
Apr 10, 2018 05:19:57 #
Apr 10, 2018 06:36:43 #

Apr 10, 2018 07:29:47 #

Apr 10, 2018 08:19:06 #

Apr 10, 2018 08:33:34 #
catterar
Loc: Angier, NC
Here is a lesson plan I wrote up after attending a workshop on Aperture, Shutter Speed and ISO to help me remember what I had learned. Hope it is useful to you.
Aperture, Shutter Speed and ISO Workshop
In this workshop we will explore the three elements of good exposure. Aperture, Shutter Speed and ISO. How they relate to each other. What effect changing one element has on the other two. And why as photographers we would want to change any of the elements.
Consider good exposure as an isosceles triangle. Each element of exposure makes up one leg of the triangle.
Aperture is the size of the hole in the lens that allows the light to strike the camera’s sensor. The size of the hole is referred to as an F-Stop or just a Stop. It is counter intuitive but the larger the F-stop number the smaller the hole. An aperture of F-11 is twice as large as an aperture of F-22 and so allows twice as much light to strike the camera’s sensor when the shutter button is pressed. Going from F-11 to F-22 is referred to as going up a stop. Conversely going from F-22 to F-11 is going down a stop. The size of the aperture also controls the depth of field, or how much of the background and foreground is in focus relative to the main subject of the image. An image where everything is in sharp focus is said to have a large depth of field. This corresponds to large F-stop numbers or a small hole in the lens. An image with just the main subject in sharp focus is said to have a shallow depth of field. A shallow depth of field is achieved by shooting with a larger hole in the lens i.e. a smaller F-stop number. A shallow depth of field emphasizes the main subject indicating what the photographer considered important when exposing the image. F-stops may range from as small as F-32 or smaller to as large as F-1.4.
Shutter Speed is the length of time the hole in the lens remains open allowing light to strike the camera’s sensor. The larger the F-stop. That is the smaller the hole in the lens the longer the shutter needs to remain open to allow enough light to reach the sensor and produce an image. When you shoot with a smaller F-stop, a larger hole in the lens you can use a faster shutter speed and still allow the same amount of light to reach the sensor. Other than aperture settings some reasons to use faster shutter speeds are to freeze motion in fast action subjects like sports or wild life photography. Keep in mind that it is not always necessary to completely freeze the action. Sometimes it is desirable to slow the action down but retain some blur to let the viewer see that motion was occurring when the image was captured. Shutter speeds can range from many seconds to as fast as 1/4000th of a second or greater depending on your camera system. Similar to aperture if you shoot at a shutter speed of 1/125th of a second, you are allowing twice as much light to reach the sensor as when you shoot at 1/500th of a second. Also like aperture doubling or halving the shutter speed is known as going down or up a stop in shutter speed.
ISO pronounced by some photographers as the individual letters and by others as one word, eyeso. ISO is the camera sensor’s sensitivity to light. The lower the ISO number the less sensitive the sensor is to the light that is allowed to strike it by the other two settings. Lower ISO numbers also have the advantage of creating a sharper image. Higher ISO numbers allow the sensor to process an image in lower light environments but may produce noise in the image. Noise in digital photography can be defined as imperfections in the image that may be seen as similar to grain in film images shot with high ASA film. The term sensitivity can be compared to two people trying to get a suntan. A fair skinned person (High ISO) will react to the sun faster than a person with a dark complexion (Low ISO) will. Most modern DSLR cameras have an ISO range from 50 to 12,800 or greater. A good rule of thumb is when shooting in bright sun use an ISO 100 to 200. When shooting on a cloudy or overcast day use an ISO of 400 to 800. When shooting indoors or in subdued light use and ISO of 1600 or greater.
There are five basic shooting modes available on most DSLR camera systems:
Fully Automatic where the camera selects the aperture, shutter speed and ISO.
Programed Auto where you the photographer are able to select the ISO and the camera selects the appropriate aperture and shutter speed.
Manual where you the photographer select all three settings aperture, shutter speed and ISO.
Aperture Priority where you the photographer select the aperture and the camera selects the appropriate shutter speed and ISO.
Shutter Priority where you the photographer select the shutter speed and the camera selects the appropriate aperture and ISO.
Shooting in fully automatic relieves you of all technical decision making allowing you to concentrate only on composition.
Shooting in Programed Auto mode allows you to control the ISO while the camera chooses the correct aperture and shutter speed.
Shooting in Aperture Priority allows you to select the aperture and control the depth of field while the camera sets the shutter speed and ISO.
Shooting in Shutter Priority allows you to choose the shutter speed and control the amount of blur associated with a moving subject while the camera selects the appropriate aperture and ISO to go with the selected shutter speed.
When you shoot in full manual mode you select the aperture, shutter speed and ISO as well as composing the image. Shooting in full manual requires more thought about all technical aspects of making the image but also gives you more creative control of the final exposure.
Exercise:
Set your camera to Fully Automatic Mode. Arrange the three props in a line the rear prop slightly to the left of the center prop and the front prop slightly to the right of the center prop. Focus your camera on the center prop and make an exposure. Look at the image in your camera’s LCD screen and record the aperture, shutter speed and ISO below.
_______________ _______________ _____________
Aperture Shutter Speed ISO
Now set your camera to Programed Auto and double the ISO. Shoot the same image and record the results below.
_______________ _______________ _______________
Aperture Shutter Speed ISO
What happened to the aperture and shutter speed?
Why?
Next set your camera to Manual. Set the ISO to what it was in the first exposure. Then set your aperture to the largest F-stop available, i.e. the smallest number. If this was two stops down from the fully automatic exposure you will need to set your shutter speed two stops faster to keep all legs of the triangle equal and the same relative amount of light reaching the sensor. Look at this image in your camera’s LCD screen.
What has changed in this image?
Why?
Practice this exercise at home using different ISO and aperture settings and see how aperture and shutter speed react to different ISO settings in Programed Auto mode. And how the depth of field changes in the Manual mode.
Today we learned about Aperture and depth of field, Shutter Speed and ISO and why you may wish to change them. We also saw that changing any one of these elements requires changes in one or both of the other elements.
Take your camera home and shoot, shoot, shoot. Don’t leave your camera sitting in its bag waiting for the next workshop. The more often you take your camera out and use it the more ingrained these concepts will become and the more comfortable you will be with your photography.
If you want to reply, then register here. Registration is free and your account is created instantly, so you can post right away.